Posts | Comments

Planet Arduino

Archive for the ‘portable’ Category

Sketch of a Tandy TRS-80 Model 100 with Arduino Mega 2560

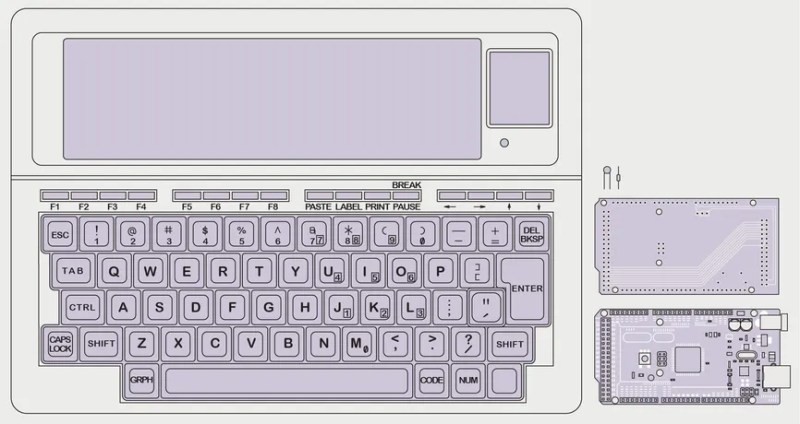
When [Stephen Cass] found himself with a broken Tandy TRS-80 Model 100 portable computer, the simplest solution was to buy another broken one and make one working computer from two non-working computers. However, this left him with a dilemma — what to do with the (now even more) broken one left over?

LCD layout is unusual by modern standard, but optimized for fast updates

Naturally, he did what a lot of us would do and used modern hardware to interface with the original parts that still work. In this case it meant replacing the motherboard with an Arduino Mega 2560.

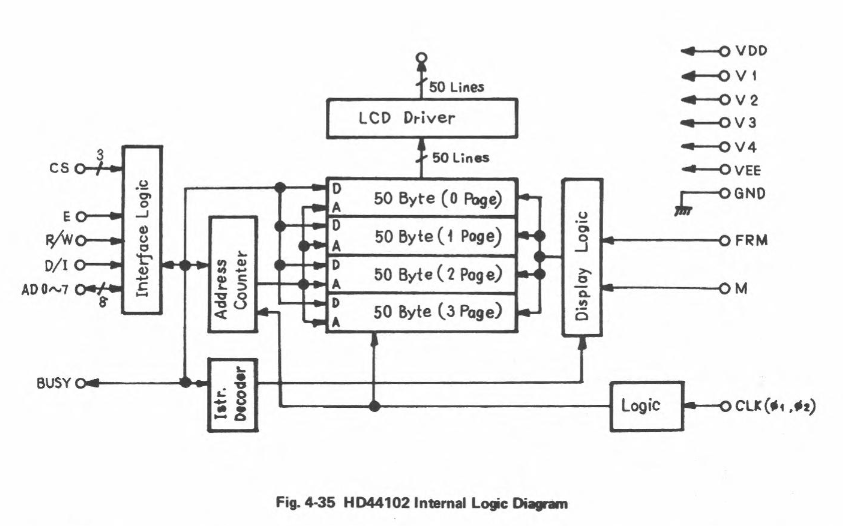
Luckily, the Model 100 has a substantial fanbase and there’s a lot of helpful information available online, including the detailed service manual, that helped [Stephen] to understand how to drive the unusual display.  The LCD has a resolution of 240×64 pixels, which are broken down into eight zones of 50×32 pixels, and two zones of 40×42 pixels.  Each zone is then further divided into four banks, eight pixels tall, so that each column of eight pixels corresponds to a single byte.

Every one of the ten zones is controlled by an individual HD44102 driver IC, connected to a 30-bit wide bus for selecting the correct chip, bank and column.

With the Arduino handling the data, the old LCD still needed a -5 V supply for contrast and an RC filter to smooth out the PWM signal [Stephen] is using to adjust the viewing angle.

With the new interface, [Stephen] is able to access all of the pixels on the original display, and to use modern graphics libraries such as displayio. With the display issue solved, he intends to use a separate Teensy 4.1 to connect with the keyboard matrix and provide a VT100 terminal interface.

Schematic of the HD44102 driver circuit

Upcycling old, broken hardware can be a lot of fun and is always educational.  Understanding why certain design decisions were made at a time when the engineering trade-offs were different can lead to insights that are directly relevant to modern designs when resources get tight. In this case, the quirky LCD drivers were a response to making the display of text as efficient as possible, so as not to overburden the processor.

The TRS-80 computers are ripe for hacking, with their “built-for-service” designs, and we’ve featured a few in the past.  Some have replaced the motherboard with something newer, like [Stephen], whereas others have also replaced the display, or connected them to the cellphone network.

Have you found new ways to get old hardware working? Tell us in the comments below or send us a message on the Hackaday tips line.

Thanks to [nb0x0308] for the tip!

A portable Bluetooth turntable.

You know, we were just discussing weird and/or obsolete audio formats in the writers’ dungeon the other day. (By the way, have you ever bought anything on DAT or MiniDisc?) While vinyl is hardly weird or (nowadays) obsolete, the fact that this Bluetooth record player by [JGJMatt] is so modern makes it all the more fantastic.

Not since the Audio-Technica Sound Burger, or Crosley’s semi-recent imitation, have we seen such a portable unit. But that’s not even the most notable part — this thing runs inversely to normal record players. Translation: the record stands still while the the player spins, and it sends the audio over Bluetooth to headphones or a speaker.

Inside this portable player is an Arduino Nano driving a 5 VDC motor with a worm gear box. There really isn’t too much more to this build — mostly power, a needle cartridge, and a Bluetooth audio transmitter. There’s a TTP223 touch module on the lid that allows [JGJMatt] to turn it off with the wave of a hand.

[JGJMatt] says this is a prototype/work-in-progress, and welcomes input from the community. Right now the drive system is good and the Bluetooth is stable and able, but the tone arm has some room for improvement — in tests, it only played a small section of the record and skidded and skittered across the innermost and outermost parts. Now, [JGJMatt] is trying two-part arm approach where the first bit extends and locks into position, and then a second arm extending from there and moves around freely.

Commercial record players can do more than just play records. If you’ve got an old one that isn’t even good enough for a thrift store copy of a Starship record, you could turn it into a pottery wheel or a guitar tremolo.

[Robin Reiter] needed a better way to show off his work. He previously converted an electric TV stand into a full 360-degree display turntable, but it relied on an external power supply to get it spinning. It was time to give it an upgrade.

Putting his spacial organization skills to work, [Reiter] has crammed a mini OLED display, rotary encoder, a LiPo 18650 battery and charging circuit, a pair of buck converters, a power switch, and an Arduino pro mini into the small control console. To further maximize space, [Reiter] stripped out the pin headers and wired the components together directly. It attaches to the turntable in question with magnets, so it can be removed out of frame, or for displaying larger objects!

When first powered on, the turntable holds in pause mode giving [Reiter] time to adjust the speed and direction. He also took the time to add an optical rotary encoder disk to the turntable and give the gearing a much needed cleaning. Check out the project video after the break!

[Reiter] is looking to add a timed stop feature, and — taking advantage of that rotary encoder — a rotate to target angle option, but it performs admirably at present.

We can see this display coming in handy for any 3D scanning needs too!


Filed under: 3d Printer hacks, Arduino Hacks

[IanMeyer123] should be working on his senior design project. Instead, he’s created a sound-reactive Bluetooth speaker that may not earn him an A grade but will at least keep the team entertained.

[Ian] started with the amp and power. The amp is a 15 watt, 12 volt model based on the popular TDA7297 chip. Power comes from a portable laptop battery rated at 185 Wh. [Ian] himself said that is absolute overkill for this project. While [Ian] hasn’t run any longevity tests on his setup, we’re guesstimating it would be rated in days.

Every Bluetooth speaker needs a sweet light show, right? [Ian] wrapped his 2″ full range speakers in Neopixel rings from Adafriut. The WS2812’s are driven by an Arduino. When music is playing, MSGEQ7 allows the Arduino to play a light show in time to the beat. When the stereo is off, a DS3231 real-time clock module allows the Arduino to display the time on the two rings. If you’re curious about the code for this project, [Ian] posted it on his Reddit thread. Reddit isn’t exactly a great code repository, so please, [Ian] setup a GitHub account, and/or drop your project on Hackaday.io!

[Ian] didn’t realize how many wires would be flying around inside the speaker. That may be why the wiring looks a bit scary. All the chaos is hidden away, underneath a well-built wooden case.

If you want to see another take on a Bluetooth speaker with a Neopixel display, check [Peter’s] project here. Interested in more portable power units? This one’s for you!


Filed under: Arduino Hacks, musical hacks

The Beach Buddy

When you venture out onto the beach for a day in the sun, you’re probably not preoccupied with remembering the specifics about your sunscreen’s SPF rating—if you even remembered to apply any. [starwisher] suffered a nasty sunburn after baking in the sunlight beyond her sunscreen’s limits. To prevent future suffering, she developed The Beach Buddy: a portable stereo and phone charger with a handy sunburn calculator to warn you the next time the sun is turning you into barbecue.

After telling the Beach Buddy your skin type and your sunscreen’s SPF rating, a UV sensor takes a reading and an Arduino does a quick calculation that determines how long until you should reapply your sunscreen. Who wants to lug around a boring warning box, though?

[starwisher] went to the trouble of crafting a truly useful all-in-one device by modifying this stereo and this charger to fit together in a sleek custom acrylic enclosure. There’s a switch to activate each function—timer, charger, stereo—a slot on the side to house your phone, and an LCD with some accompanying buttons for setting up the UV timer. You can check out a demo of all the Beach Buddy’s features in a video below.

[via Dangerous Prototypes]


Filed under: Arduino Hacks, digital audio hacks, solar hacks
Jun
23

Handheld Game System Powered by Arduino

adafruit, arduino, arduino hacks, ATmega, Gaming, LCD, pcb, portable, Shapeoko, Video Games Comments Off on Handheld Game System Powered by Arduino 

DIY Handheld Game System

These days, it’s easy enough to play games on the go. If you have a smart phone, you are pretty much set. That doesn’t mean you can’t still have fun designing and building your own portable gaming system, though.

[randrews] did just that. He started out by purchasing a small memory LCD display from Adafruit. The screen he chose is low power as far as screens go, so it would be a good fit for this project. After testing the screen with a quick demo program, it was time to start designing the circuit board.

[randrews] used Eagle to design the circuit. He hand routed all of the traces to avoid any weird issues that the auto router can sometimes cause. He made an efficient use of the space on the board by mounting the screen over top of the ATMega chip and the other supporting components. The screen is designed to plug in and out of the socket, this way it can be removed to get to the chip. [randrews] needs to be able to reach the chip in order to reprogram it for different games.

Once the board design was finished, [randrews] used his Shapeoko CNC mill to cut it out of a copper clad board. He warns that you need to be careful doing this, since breathing fiberglass dust is detrimental to living a long and healthy life. Once the board was milled out, [randrews] used a small Dremel drill press to drill all of the holes.

The final piece of the puzzle was to figure out the power situation. [randrews] designed a second smaller PCB for this. The power board holds two 3V coin cell batteries. The Arduino expects 5V, so [randrews] had to use a voltage regulator. This power board also contains the power switch for the whole system.

The power board was milled and populated. Then it was time to do some measurements. [randrews] measured the current draw and calculates that he should be able to get around 15 hours of play time using the two 3V coin cell batteries. Not bad considering the size.

[via Reddit]


Filed under: Arduino Hacks

rfidlongrangehack

Security researcher [Fran Brown] sent us this tip about his Tastic RFID Thief, which can stealthily snag the information off an RFID card at long range. If you’ve worked with passive RFID before, you know that most readers only work within inches of the card. In [Fran's] DEFCON talk this summer he calls it the “ass-grabbing method” of trying to get a hidden antenna close enough to a target’s wallet.

His solution takes an off-the-shelf high-powered reader, (such as the HID MaxiProx 5375), and makes it amazingly portable by embedding 12 AA batteries and a custom PCB using an Arduino Nano to interpret the reader’s output. When the reader sees a nearby card, the information is parsed through the Nano and the data is both sent to an LCD screen and stored to a .txt file on a removable microSD card for later retrieval.

There are two short videos after the break: a demonstration of the Tastic RFID Thief and a quick look at its guts. If you’re considering reproducing this tool and you’re picking your jaw off the floor over the price of the reader, you can always try building your own…


Filed under: Arduino Hacks, wireless hacks


  • Newsletter

    Sign up for the PlanetArduino Newsletter, which delivers the most popular articles via e-mail to your inbox every week. Just fill in the information below and submit.

  • Like Us on Facebook