Posts | Comments

Planet Arduino

Archive for the ‘machine’ Category

One of the worst things about sewing is finding out that your bobbin — that’s the smaller spool that works together with the needle and the larger spool to make a complete stitch — ran out of thread several stitches ago. If you’re lucky, the machine has a viewing window on the bobbin so you can easily tell when it’s getting dangerously close to running out, but many machines (ours included) must be taken halfway apart and the bobbin removed before it can be checked.
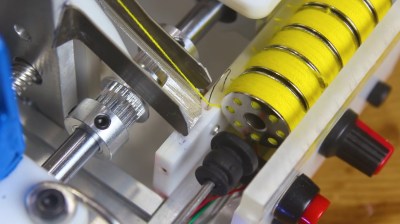
Having spare bobbins ready to go is definitely the answer. We would venture to guess that most (if not all) machines have a built-in bobbin winder, but using them involves de-threading the machine and setting it up to wind bobbins instead of sew. If you have a whole lot of sewing to do and can afford it, an automatic bobbin winder is a godsend. If you’re [Mr. Innovative], you build one yourself out of acrylic, aluminium, and Arduinos.
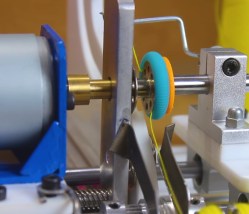
Here’s how it works: load up the clever little acrylic slide with up to twelve empty bobbins, then dial in the speed percentage and press the start button. The bobbins load one at a time onto a drill chuck that’s on the output shaft of a beefy 775 DC motor. The motor spins ridiculously fast, loading up the bobbin in a few seconds. Then the bobbin falls down a ramp and into a rack, and the thread is severed by a piece of nichrome wire.

An important part of winding bobbins is making sure the thread stays in place at the start of the wind. We love the way [Mr. Innovative] handled this part of the problem — a little foam doughnut around a bearing holds the thread in place just long enough to get the winding started. The schematic, BOM, and CAD files are available if you’d like to make one of these amazing machines for yourself. In the meantime, check out the demo/build video after the break.

Still not convinced that sewing is cool enough to learn? Our own [Jenny List] may be able to convert you. If that doesn’t get you, you might like to know that some sewing machines are hackable — this old girl has a second life as a computerized embroidery machine. If those don’t do it, consider that sewing machines can give you a second life, too.

Thanks for the tip, [Baldpower]!

The Useless Machine – a machine with a toggle switch, a mechanical arm, and something that only exists to turn itself off – is a staple of Instructables and builds from random workbenches the world over. It’s cliché, and now hackaday.io has a better project: The Annoying Machine, a machine that exists purely to annoy.

According to [unigamer], the Annoying Machine is the evil cousin of the Useless Machine. On the outside, it’s extremely simple: a switch labeled ‘on’ and ‘off’, and a hole for an LED. Turn the switch on, and the Annoying Machine will emit an annoying buzzing sound. Switch the Machine off, and the buzzing will go away. Then the switch will flick itself back to on. Insidious.

A switch and buzzer is easy enough, but the key component of this build is an actuated rocker switch. It’s basically a normal toggle switch with two additional terminals for a coil that can move the switch back and forth electronically. Throw in an Arduino, buzzer, battery, and a boost converter for the switch, and that’s just about all there is to it.

How to deactivate the Annoying Machine? There’s an accelerometer attached to the Arduino, and by throwing the box up in the air after flicking the switch off, it will reset. There are already plans for a Version 2 of the Annoying Machine that will be even louder and made out of aluminum. Anything to protect it from the inevitable hammers of frustration.

Video below.


Filed under: Arduino Hacks

[Sigurd] manage to obtain an old vending machine from his dorm. The only problem was that the micocontroller on the main board was broken. He and his friend decided they could most likely get the machine back into working order, but they also knew they could probably give it a few upgrades.

This system uses two Arduino Pro Minis and an Electric Imp to cram in all of the new features. One Arduino is connected to the machine’s original main board. The Arduino interfaces with some of the shift registers, relays, and voltage regulators. This microcontroller also lights up the buttons on the machine as long as that particular beverage is not empty. It controls the seven segment LED display, as well as reading the coin validator.

The team had to reverse engineer the original coin validator in order to figure out how the machine detected and counted the coins. Once they figured out how to read the state of the coins, they also built a custom driver board to drive the solenoids.

A second Arduino is used to read NFC and RFID cards using a Mifare RC522 reader. The system uses its own credit system, so a user can be issued a card with a certain amount of pre-paid credit. It will then deduct credit appropriately once a beverage is vended. The two Arduinos communicate via Serial.

The team also wanted this machine to have the ability to communicate with the outside world. In this case, that meant sending cheeky tweets. They originally used a Raspberry Pi for this, but found that the SD card kept getting corrupted. They eventually switched to an Electric Imp, which worked well. The Arduino sends a status update to the Imp every minute. If the status changes, for example if a beverage was dispensed, then the Imp will send a tweet to let the world know. It will also send a tweet to the maintenance person if there is a jam or if a particular slot becomes empty.


Filed under: Arduino Hacks
Nov
20

Turning encryption On with Light Cryptalk

arduino, DUE, encryption, enigma, machine, MakerFaire Comments Off on Turning encryption On with Light Cryptalk 

cryptlight

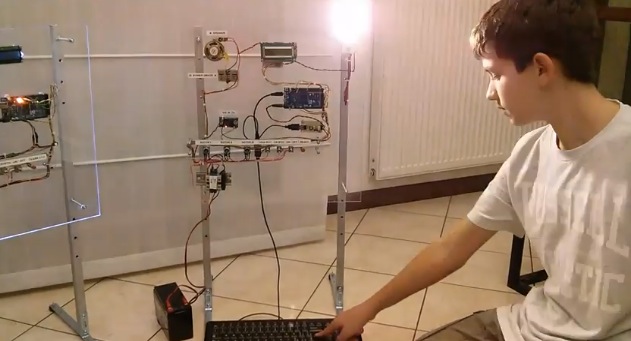
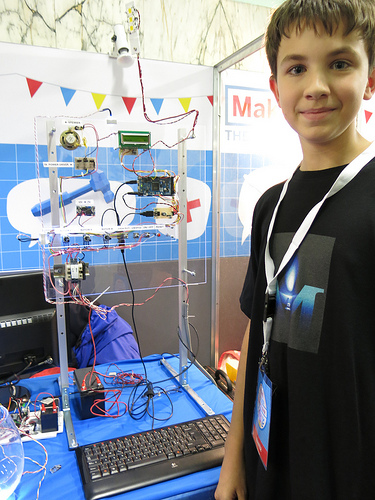
Light Crytpalk is an Enigma machine implemented by Michele Lizzit with Arduino Due. Enigma machines have an historical meaning as they were  used in 20th century to enciphering and deciphering secret messages and were adopted by military and government services of several countries.

We met Michele during Maker Faire Rome and he received a Maker of Merit badge directly from Massimo Banzi:

The idea of the Maker Faire project came to me when Google dedicated a doodle to Alan Turing. Reading on Wikipedia his story I’ve learned about the Enigma machine. This project was initially realized to be presented as final project of Middle School (junior high – seventh grade). In the first version I used Xbee to transmit and cryptography was just a table substitution.

He chose to use the Arduino DUE because it allows hosting a USB keyboard in order to write the messages to be sent.

Michele Lizzit

Michele did a great job and also shared documentation on his website, it’s pretty cool for his age and we asked him a couple of questions to know more about his experience as a young maker:

How do your friends see your projects? Do you share them with people of your age or is it more a family activity?  

Until now, I have not had the possibility to share this passion with other people of my age: even when I went to my regional hacklab or to the linux day, I did not find anybody of my age. Soon after returning from Maker Faire Rome, my English teacher asked me to tell to my class mates (in English) how my experience have been; after a general description of the faire, I started to explain my project. But at a certain point, my teacher interrupted me saying: “ Explain it to poor mortals”: and yet I thought I had been clear enough!
Probably, if I had have the possibility of bringing the Light Cryptalk in my class and let my friends try it, it would have been better.

You did a lot of work to share documentation of Enigma hardware and software on the website and translating it also in english. Do you think it’s important to share? Do you think you are contributing to the open source community?

I use Linux for everything I do with my computer and I am very grateful to the open source community and to Arduino for making available online for free a huge amount of documentation. I believe that it is important to share your ideas freely and for free so that others like me can learn and so that the opportunities to know, learn and make do not remain available only to those who can spend more. I know that so far I have contributed only in minimal part to the open source community but I am just at the beginning.

Have you got any plan yet for your  next project?

Now I’ve in mind the idea of building a 3d printer and I’m finishing up my quadcopter which I made using as a controller a joystick connected to Arduino and Xbee and for which I wrote the whole code by myself.

—–


  • Newsletter

    Sign up for the PlanetArduino Newsletter, which delivers the most popular articles via e-mail to your inbox every week. Just fill in the information below and submit.

  • Like Us on Facebook