Posts | Comments

Planet Arduino

Archive for the ‘DHT11’ Category

For years [Edward] has been building professional grade underwater sensing nodes at prices approachable for an interested individual without a government grant. An important component of these is temperature, and he has been on a quest to get the highest accuracy temperature readings from whatever parts hit that sweet optimum between cost and complexity. First there were traditional temperature sensor ICs, but after deploying numerous nodes [Edward] was running into the limit of their accuracy. Could he use clever code and circuitry to get better results? The short answer is yes, but the long answer is a many part series of posts starting in 2016 detailing [Edward]’s exploration to get there.
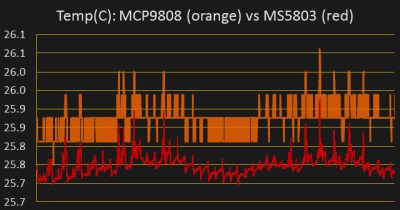
Orange is 12 bits, red is 24

The first step is a thermistor, a conceptually simple device: resistance varies with temperature (seriously, how much more simple can a sensor get?). You can measure them by tapping the center of a voltage divider the same way you’d measure any other resistance, but [Edward] had discarded this idea because the naive approach combined with his Arduino’s 10 bit ADC yielded resolution too poor to be worthwhile for his needs. But by using the right analog reference voltage and adjusting the voltage divider he could get a 20x improvement in resolution, down to 0.05°C in the relevant temperature range. This and more is the subject of the first post.

What comes next? Oversampling. Apparently fueled by a project featured on Hackaday back in 2015 [Edward] embarked on a journey to applying it to his thermistor problem. To quote [Edward] directly, to get “n extra bits of resolution, you need to read the ADC four to the power of n times”. Three bits gives about an order of magnitude better resolution. This effectively lets you resolve signals smaller than a single sample but only if there is some jitter in the signal you’re measuring. Reading the same analog line with no perturbation gives no benefit. The rest of the post deals with the process of artificially perturbing the signal, which turns out to be significantly complex, but the result is roughly 16 bit accuracy from a 10 bit ADC!

What’s the upside? High quality sensor readings from a few passives and a cheap Arduino. If that’s your jam check out this excellent series when designing your next sensing project!

We first thought [Alexis Ospitia]’s watch was a sports watch made with an Arduino, but it’s actually a sporty watch made with an Arduino. This explains the watch’s strange ability to tell you the current temperature and humidity.

The core of the watch is an Arduino Mini. To make it good for time telling, a real-time clock module was added. A DHT11 monitors the temperature and humidity. A charge circuit and lithium battery provide power. Finally, the watch displays the date, time, and other data with an LCD from a Nokia 5110. We can tell you the last part that’s going to break on this.

Even if you think the watch is a bit chunky, the tutorial is very slick. [Alexis] has taken the trouble to individually draw and describe each portion of the watch’s construction. He explains each pin, what they do, and provides a Fritzing drawing of the wires to the Arduino. The code is provided; to program the watch a USB-to-serial module must be used.

For the housing he made a box from a thin gauge aluminum sheet and attached leather straps to the assembly. The final construction is cool looking in a techno-punk way, and is fairly compact. One might even say sporty.


Filed under: Arduino Hacks
May
22

DIY Temperature & Humidity & Smoke Detector

arduino, ATMEGA2560, DHT11, Gas, Humidity, MQ-2, Sensor, smoke, temperature Comments Off on DIY Temperature & Humidity & Smoke Detector 

FPTBQC4HV72CMNV.MEDIUM

ICStation @ instructables.com writes:

ICStation team introduce you how to DIY this temperature & humidity & smoke alarm system based on ICStation Mega 2560 compatible with Arduino.The working voltage of this system is DC5V.It can measure the current temperature, humidity and smoke. It can display real-time data by the 1602 LCD and can realize the sound and light alarm when in the dangerous temperature and humidity. It is a simply and easily to operate monitoring alarm system about temperature humidity and smoke.

DIY Temperature & Humidity & Smoke Detector - [Link]

Apr
05

Step-by-step guide for making a very simple temperature and humidity meter

arduino, arduino uno, DHT11, MAX7219 Comments Off on Step-by-step guide for making a very simple temperature and humidity meter 

CrowduinoUnoTrH3

Raj @ embedded-lab.com

In this blog post, I am providing you step by step instructions to build a very simple temperature and relative humidity meter for indoor use. All you need to build this project are an Arduino Uno or compatible board, a DHT11 sensor, and a MAX7219 based 8-digit serial 7-segment LED display. The temperature is displayed in degree Celsius and relative humidity in percentage.

Step-by-step guide for making a very simple temperature and humidity meter - [Link]

Nov
21

BO.Duino – ATmega328 Arduino Compatible board

arduino, AT24, ATmega328, atmel, BO.Duino, clock, DHT11, DS18B20, LED, microSD, Real-time clock, RGB Comments Off on BO.Duino – ATmega328 Arduino Compatible board 

handmade_pcb

BO.Duino is an Arduino compatible board based on ATmega328 ATMEL’s mcu. This board features many peripherals usually externally connected on a breadboard or prototyping board such as sensors, SD card etc. Peripherals included are:

- A real-time clock
- AT24 series external memory chip
- MicroSD card adaptor (SPI)
- RGB LED
- A potentiometer on analog input
- Connector for DS18b20 or DHt11 series sensors

BO.Duino – ATmega328 Arduino Compatible board - [Link]


  • Newsletter

    Sign up for the PlanetArduino Newsletter, which delivers the most popular articles via e-mail to your inbox every week. Just fill in the information below and submit.

  • Like Us on Facebook