Posts | Comments

Planet Arduino

Archive for the ‘scanning’ Category

What’s the best way to image a room? A picture? Hah — don’t be so old-fashioned! You want a LIDAR rig to scan the space and reconstruct it as a 3D point map in your computer.

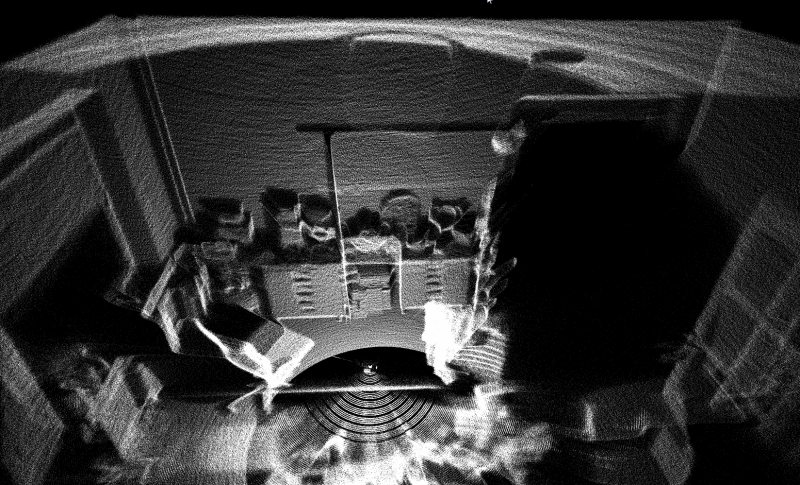
Hot on the heels of [Saulius Lukse]’s scanning thermometer, he’s replaced the thermal camera on their pan/tilt setup with a time-of-flight (TOF) camera — a Garmin LIDAR — capable of 500 samples per second and end up scanning their room in a mere fifteen minutes. Position data is combined with the ranging information to produce a point cloud using Python. Open that file in a 3D manipulation program and you’ll be treated to a sight like this:

That’s an image generated of a 4.7 million point cloud. It’s not perfect, but it’ll certainly do.

[Lukse] laments that the camera requires ideal lighting conditions that make it unsuitable to for a lot of outdoor imaging and is similarly limited to shorter ranges. It also necessitates hauling a laptop around so he’s considering making it an all-in-one package down the road.

Want to more about how LIDAR works? Check out this teardown video of a police speed enforcement LIDAR ‘gun.’ Or have a look at this (faster) completely DIY laser scanner.


Filed under: Arduino Hacks, laser hacks
Jan
31

[Jordan] managed to cobble together his own version of a low resolution digital camera using just a few components. The image generated is pretty low resolution and is only in grey scale, but it’s pretty impressive what can be done with some basic hardware.

The heart of the camera is the image sensor. Most consumer digital cameras have tons of tiny receptors all jammed into the sensor. This allows for a larger resolution image, capturing more detail in a smaller space. Unfortunately this also usually means a higher price tag. [Jordan’s] sensor includes just a single pixel. The sensor is really just an infrared photodiode inside of a tube. The diode is connected to an analog input pin on an Arduino. The sensor can be pointed at an object, and the Arduino can sense the brightness of that one point.

In order to compile an actual image, [Jordan] needs to obtain readings of multiple points. Most cameras do this using the large array of pixels. Since [Jordan’s] camera only has a single pixel, he has to move it around and take each reading one at a time. To accomplish this, the Arduino is hooked up to two servo motors. This allows the sensor to be aimed horizontally and vertically. The Arduino slowly scans the sensor in a grid, taking readings along the way. A Processing application then takes each reading and compiles the final image.

Since this camera compiles an image so slowly, it sometimes has a problem with varying brightness. [Jordan] noticed this issue when clouds would pass over while he was taking an image. To fix this problem, he added an ambient light sensor. The Arduino can detect the amount of overall ambient light and then adjust each reading to compensate. He says it’s not perfect but the results are still an improvement. Maybe next time he can try it in color.


Filed under: Arduino Hacks
Nov
24

Hack-a-Day Logo Laser Light Show

arduino hacks, laser, laser hacks, logo, Processing, scanning, servo, software hacks Comments Off on Hack-a-Day Logo Laser Light Show 

hackaday-laser-2

The Hack-a-Day logo challenge keeps on bearing fruit. This tip comes from [Enrico Lamperti] from Argentina who posted his follies as well as success creating a Hack-a-Day logo using a home built scanning laser projector.

The build consists of a couple small servos, a hacked up pen laser and an Arduino with some stored coordinates to draw out the image. As usual the first challenge is powering your external peripheral devices like servos. [Enrico] tackled this problem using 6 Ni-MH batteries and an LM2956 simple switcher power converter. The servos and Arduino get power directly from the battery pack and the Arduino controls the PWM signals to the servos as they trace out the stored coordinate data. The laser is connected to the servo assembly and is engaged and powered by an Arduino pin via an NPN transistor. He also incorporated a potentiometer to adjust the servo calibration point.

His first imported coordinate data generated from some Python script was not very successful. But later he used processing with an SVG file to process a click-made path the Arduino could use as map data to draw the Hack-a-Day logo. It requires a long exposure time to photograph the completed drawing in a dark room but the results are impressive.

It’s an excellent project where [Enrico] shares what he learned about using Servo.writeMicroseconds() instead of Servo.write() for performance along with several other tweaks. He also shared the BOM, Fritzing diagram, Processing Creator and Simulator tools and serial commands on GitHub. He wraps up with some options that he thinks would improve his device, and he requests any help others may want to provide for better performance. And if you want you could step it up a notch and create a laser video projector with an ATMega16 AVR microcontroller and some clever spinning tilted mirrors.


Filed under: Arduino Hacks, laser hacks, software hacks


  • Newsletter

    Sign up for the PlanetArduino Newsletter, which delivers the most popular articles via e-mail to your inbox every week. Just fill in the information below and submit.

  • Like Us on Facebook