Posts | Comments

Planet Arduino

Archive for the ‘pump’ Category

[Nick] does a lot of custom work with vacuum tubes. So much so that he builds his own vacuum tubes of various shapes, sizes, and functions right on his own workbench. While the theory of vacuum tubes is pretty straightforward, at least to those of us who haven’t only been exposed to semiconductors, producing them requires some specialized equipment. A simple vacuum won’t get you all the way there, and the complexity of the setup that’s needed certainly calls for some automation.

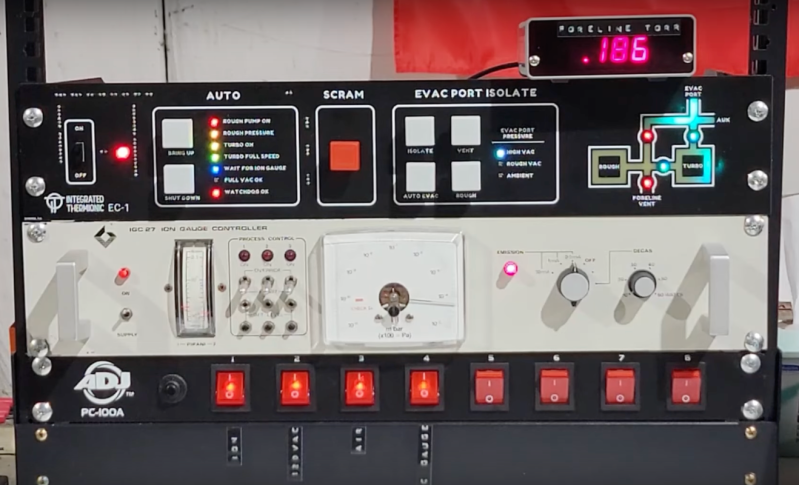
The vacuum system that [Nick] uses involves three sections separated by high-vacuum valves in order to achieve the pressures required for vacuum tube construction. There’s a rough vacuum section driven by one pump, a high vacuum section driven by a second pump, and a third section called the evac port where the tube is connected. Each second must be prepared properly before the next section can be engaged or disengaged. An Arduino Pro is tasked with all of this, chosen for its large amount of ADC inputs for the instrumentation monitoring the pressures in each section, as well as the digital I/O to control the valves and switches on the system.

The control system is built into a 19-inch equipment rack with custom faceplates which outline the operation of the vacuum system. A set of addressable LEDs provide the status of the various parts of the system, and mechanical keyboard switches are used to control everything, including one which functions as an emergency stop. The automation provided by the Arduino reduces the chances for any mistakes to be caused by human error, allows the human operator to focus on other tasks like forming the glass, and can also react much faster to any potentially damaging situations such as the high-pressure pump being exposed to atmospheric pressure.

[Nick] might look a little familiar to some of us as well. If you can’t quite place him, he did a talk at Hackaday Supercon 2022 detailing all of the intricacies of building one’s own vacuum tubes. Since getting into the somewhat niche field of constructing vacuum tubes, he’s gone on to produce all kinds of specialty devices and his YouTube channel is definitely worth a watch.

Thanks to [M] for the tip!

What’s the coolest thing a person can build with LEGO? Well it’s gotta be an air conditioner, right? Technically, [Manoj Nathwani] built a LEGO-fied swamp cooler, but it’s been too hot in London to argue the difference.

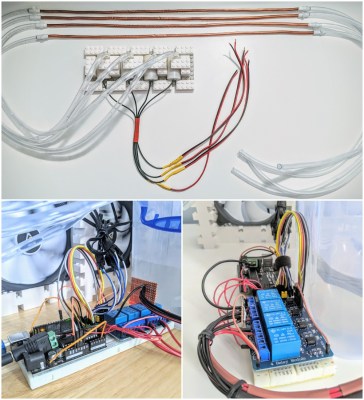
This thoroughly modular design uses an Arduino Uno and a relay module to drive four submersible pumps. The pumps are mounted on a LEGO base and sunk into a tub filled with water and ice packs. In the middle of the water lines are lengths of copper tubing that carry it past four 120mm PC case fans to spread the coolness. It works well, it’s quiet, and it was cheap to build. Doesn’t get much cooler than that.

[Manoj] had to do a bit of clever coupling to keep the tubing transitions from leaking. All it took was a bit of electrical tape to add girth to the copper tubes, and a zip tie used as a little hose clamp.

We think the LEGO part of this build looks great. [Manoj] says they did it by the seat of their pants, and lucked out because the copper and plastic tubing both route perfectly through the space of a 1x1x1 brick.

DIY cooling can take many forms. It really just depends what kind of building blocks you have at your disposal. We’ve even seen an A/C built from a water heater.

In preparation for Makerfaire, [hwhardsoft] needed to throw together some demos. So they dug deep and produced this unique display.

The display uses two synchronized peristaltic pumps to push water and red paraffin through a tube that switches back over itself in a predictable fashion. As visible in the video after the break, the pumps go at it for a few minutes producing a seemingly random pattern. The pattern coalesces at the end into a short string of text. The text is unfortunately fairly hard to read, even on a contrasting background. Perhaps an application of UV dye could help?

Once the message has been displayed, the water and paraffin drop back into the holding tank as the next message is queued up. The oil and water separate just like expected and a pump at the level of each fluid feeds it back into the system.

We were deeply puzzled at what appeared to be an Arduino mounted on a DIN rail for use in industrial settings, but then discovered that this product is what [hwhardsoft] built the demo to sell. We can see some pretty cool variations on this technique for art displays.


Filed under: Arduino Hacks

feature-SensoreeGoosebumpPoof3web copy 2Pump up your look using drone motors and pneumatic air muscles to give your wearables a hint of animation with soft robotics.

Read more on MAKE

The post Inflate Your Wearables Using Drone Motors and Pneumatic Air Muscles appeared first on Make: DIY Projects and Ideas for Makers.

Jul
28

Bar Mixva: The Drink Mixing Robot

3D printing, arduino, mixed drink, pump Comments Off on Bar Mixva: The Drink Mixing Robot 

barmixvahIf you’d like a “cool refreshing drink,” but don’t really feel like mixing it yourself, why not just build a robot to do it for you? It might not save time in the long run (I seriously hope not), but as creator Yu Jiang Tham notes, “It’s great fun at […]

Read more on MAKE

Nov
30

The Flow Of Time Draws On A River

arduino hacks, Piezo, pump, river Comments Off on The Flow Of Time Draws On A River 

river

You would think Hackaday would see more projects from public art exhibitions. They really do have everything – the possibility to mount electronics to just about anything in a way that performs interesting but an ultimately useless function. So far, though, [Richard Schwartz's] Flow of Time is on the top of a very short list of public art installations we like.

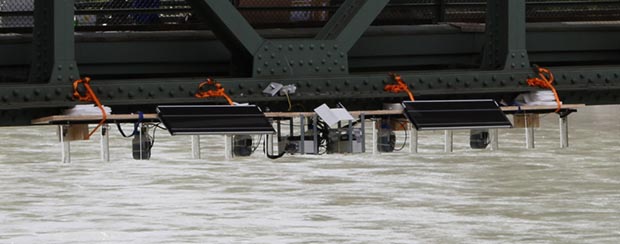
The idea behind the build is a German phrase that means something similar to ‘time trickles away’. [Richard]‘s project implements this by printing the current time onto the surface of a flowing river in [Richard]‘s native Innsbruck.

The build uses five micro piezo pumps to dispense food coloring from a bridge. Every minute, an Arduino pumps this food coloring in a 5×7 pixel digit to ‘write’ the time onto the surface of a river.

Surprisingly, [Richard]‘s installation doesn’t require much upkeep. The pumps only use about 70ml of food coloring a day, and the entire device – including the Raspi WiFi webcam – is solar powered with a battery backup.

You can see a video of the time printing on a river below.


Filed under: Arduino Hacks


  • Newsletter

    Sign up for the PlanetArduino Newsletter, which delivers the most popular articles via e-mail to your inbox every week. Just fill in the information below and submit.

  • Like Us on Facebook