Posts | Comments

Planet Arduino

Archive for the ‘laser cut’ Category

[Build Some Stuff] created an unusual spiral clock that’s almost entirely made from laser-cut wood, even the curved and bendy parts.
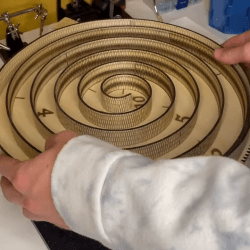
The living hinge is one thing, but getting the spacing, gearing, and numbers right also takes work.

The clock works by using a stepper motor and gear to rotate the clock’s face, which consists of a large dial with a spiral structure. Upon this spiral ramp rolls a ball, whose position relative to the printed numbers indicates the time. Each number is an hour, so if the ball is halfway between six and seven, it’s 6:30. At the center of the spiral is a hole, which drops the ball back down to the twelve at the beginning of the spiral so the cycle can repeat.

The video (embedded below) demonstrates the design elements and construction of the clock in greater detail, and of particular interest is how the curved wall of the spiral structure consists of a big living hinge, a way to allow mostly rigid materials to flex far beyond what they are used to. Laser cutting is well-suited to creating living hinges, but it’s a technique applicable to 3D printing, as well.

Thanks to [Kelton] for the tip!

Unless you happen to be from Finland, this is just an all too familiar situation: you’re stuck in an inescapable situation with this one person who is really more of an acquaintance than a friend, and neither of you knows who should say something in hopes of keeping a conversation going. Awkward silence is inevitable, and the longer it lasts, the more excruciating the thought of opening your mouth becomes. Well, consider those days over, thanks to [Jasper Choi] and his friends, who blessed us with the System for Awkward Silence Solution and Interaction Enhancer, or SASSIE.

Built as a laser-cut rotating cylinder, and equipped with a pair of microphones, SASSIE detects and counts the duration of any ongoing silence in the room. Once a pre-defined time limit is reached, it rotates itself to a random direction, symbolically pointing a finger to one of the people present in the room to indicate its their turn to speak now. To break the silence right off the bat, the finger pointing is accompanied by some pre-recorded messages. Unfortunately the audio files exceeded the storage of the Arduino Uno used here, so the responsibilities had to be divided between two Arduinos, arranged with the help of some simple serial communication.

While this is obviously a tongue-in-cheek project, it might just be a welcoming relieve for people with social anxiety, and there is definitely potential to take the idea further. Maybe with some inspiration from this happy robot fellow, a future version might ease the conversation even further by suggesting a topic along the way.

Digitizing an object usually means firing up a CAD program and keeping the calipers handy, or using a 3D scanner to create a point cloud representing an object’s surfaces. [Dzl] took an entirely different approach with his DIY manual 3D digitizer, a laser-cut and 3D printed assembly that uses rotary encoders to create a turntable with an articulated “probe arm” attached.

Each joint of the arm is also an encoder, and by reading the encoder values and applying a bit of trigonometry, the relative position of the arm’s tip can be known at all times. Manually moving the tip of the arm from point to point on an object therefore creates measurements of that object. [Dzl] successfully created a prototype to test the idea, and the project files are available on GitHub.

We remember the earlier version of this project and it’s great to see how it’s been updated with improvements like the addition of a turntable with an encoder. DIY 3D digitizing takes all kinds of approaches, and one example was this unit that used four Raspberry Pi Zeros and four cameras to generate high quality 3D scans.

Stecchino demo by the creator

Self-described “Inventor Dad” [pepelepoisson]’s project is called Stecchino (English translation link here) and it’s an Arduino-based physical balancing game that aims to be intuitive to use and play for all ages. Using the Stecchino (‘toothpick’ in Italian) consists of balancing the device on your hand and trying to keep it upright for as long as possible. The LED strip fills up as time passes, and it keeps records of high scores. It was specifically designed to be instantly understood and simple to use by people of all ages, and we think it has succeeded in this brilliantly.

To sense orientation and movement, Stecchino uses an MPU-6050 gyro and accelerometer board. An RGB LED strip gives feedback, and it includes a small li-po cell and charger board for easy recharging via USB. The enclosure is made from a few layers of laser-cut and laser-engraved material that also holds the components in place. The WS2828B LED strip used is technically a 5 V unit, but [pepelepoisson] found that feeding them direct from the 3.7 V cell works just fine; it’s not until the cell drops to about three volts that things start to glitch out. All source code and design files are on GitHub.

Games are great, and the wonderful options available to people today allow for all kinds of interesting experimentation like a blind version of tag, or putting new twists on old classics like testing speed instead of strength.

Photography turntables are made for both the precise and lazy. Whether you are concerned about the precision of consistent angles during a photo shoot or you simply do not want to stand there rotating a plate after every picture — yes, it does get old — a lazy susan style automatic photography turntable is the ticket. This automatic 360° design made over at circuito.io satisfies both of these needs in an understated package

The parts required to make this DIY weekend project are about as minimal as they get. An Arduino Uno controls it all with a rotary encoder for input and a character LCD to display settings. The turntable moves using a stepper motor and an EasyDriver. It even takes care of controlling the camera using an IR LED.

The biggest obstruction most likely to arise is creating the actual laser cut casing itself. The circuito team avoided this difficulty by using Pololu‘s online custom laser cutting service for the 4 necessary laser cut parts. After all of the components have been brought together, all that is left to do is Avengers assemble. They provide step by step instructions for this process in such a straightforward way that you could probably put this sucker together blindfolded.

We have seen some other inspired photography turntables on Hackaday before. [NotionSunday] created a true turntable hack based off of the eject mechanism of an old DVD-ROM drive. With the whole thing spinning on the head assembly of a VCR, this is the epitome of letting nothing go to waste. We also displayed another very similar Arduino Uno controlled turntable created 2 years ago by [Tiffany Tseng]. There is even a non-electronic version out there of a DIY 360° photography turntable that only uses a lazy susan and tape measure. All of these photography turntable hacks do the job wonderfully, but there was something that we liked about the clean feel of this one. All of the necessary code for this project has been provided over at GitHub. What is your favorite photography turntable?


Filed under: Arduino Hacks, digital cameras hacks

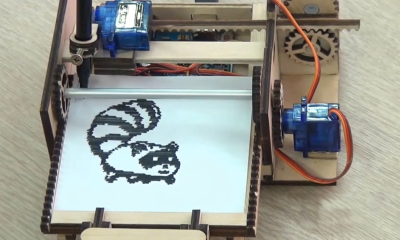
This little DIY 64×64 graphical printer by [Egor] is part pen plotter in design, somewhat dot matrix-ish in operation, and cleverly designed to use unmodified 9G servos. The project page is all in Russian (translation to English here) but has plenty of photos that make the operation and design clear. Although nearly the entire thing is made from laser-cut wood, [Egor] says that a laser cutter is optional equipment. The first version was entirely cut with hand tools.

screenshot-2016-12-06-10-49-13Small DIY CNC machines driven over a serial line commonly use Arduinos and CD-ROM drive guts (like this Foam Cutter or this Laser Paper Cutter) but this build uses its own custom rack-and-pinion system, and has some great little added details like the spring-loaded clip to hold paper onto the print pad.

The frame and parts (including all gears) are laser-cut from 4 mm plywood and the unit is driven by three small servos. A simple Java program processes images and an Arduino UNO handles the low-level control. A video of everything in action is embedded below.

Speaking of rack-and-pinion setups using cheap servos, that idea was taken to the next level by this design for a 3-D printed linear actuator that uses unmodified servos.


Filed under: Arduino Hacks, cnc hacks

[Ryan Bates] loves arcade games, any arcade games. Which is why you can find claw machines, coin pushers, video games, and more on his website.

We’ve covered his work before with his Venduino project. We also really enjoyed his 3D printed arcade joystick based off the design of a commercial variant. His coin pushing machine could help some us finally live our dream of getting a big win out of the most insidious gambling machine at arcades meant for children.

Speaking of frustrating gambling machines for children, he also built his own claw machine. Nothing like enabling test mode and winning a fluffy teddy bear or an Arduino!

It’s quite a large site and there’s good content hidden in nooks and crannys, so explore. He also sells kits, but it’s well balanced against a lot of open source files if you’d like to do it yourself. If you’re wondering how he gets it all done, his energy drink review might provide a clue.


Filed under: Arduino Hacks, misc hacks, Raspberry Pi
Mar
02

[wyojustin] was trying to think of projects he could do that would take advantage of some of the fabrication tech that’s become available to the average hobbyist. Even though he doesn’t have any particular interest in clocks, [wyojustin] discovered that he could learn a lot about the tools he has access to by building a clock.

[wyojustin] first made a clock based off of a design by [Brian Wagner] that we featured a while back. The clock uses an idler wheel to move the hour ring so it doesn’t need a separate hour hand. After he built his first design, [wyojustin] realized he could add a planetary gear that could move an hour hand as well. After a bit of trial and error with gear ratios, he landed on a design that worked.

The clock’s movement is a stepper motor that’s driven by an Arduino. Although [wyojustin] isn’t too happy with the appearance of his electronics, the drive setup seems to work pretty well. Check out [wyojustin]’s site to see the other clock builds he’s done (including a version with a second hand), and you can peruse all of his design files on GitHub.

Looking for more clock-building inspiration? Check out some other awesome clock builds we’ve featured before.


Filed under: Arduino Hacks, clock hacks

DIY laser cut word clock.

What is a word clock? A word clock is a clock that displays the time typographically that is also an interactive piece of art. Rather than buy one for $1500, [Buckeyeguy89] decided to build one as a present for his older brother. A very nice present indeed!

There are many different things that come into play when designing a word clock. The front panel is made from a laser cut piece of birch using the service from Ponoko. Additionally, white translucent pieces of acrylic were needed to keep each word’s light from bleeding into the neighboring letters. The hardware uses two Arduinos to control the LEDs and a DS3231 RTC for keeping accurate time. The results are very impressive, but it would sure make assembly easier if a custom PCB was used in the final version. For a one-off project, this makes a great birthday present.

The craftsmanship of this word clock is great, making it well suited for any home. What projects have you built that involve more than just electronics? Sometimes, quality aesthetics make all the difference.


Filed under: Arduino Hacks, clock hacks

FLRGC76HP7M9BLI.LARGE

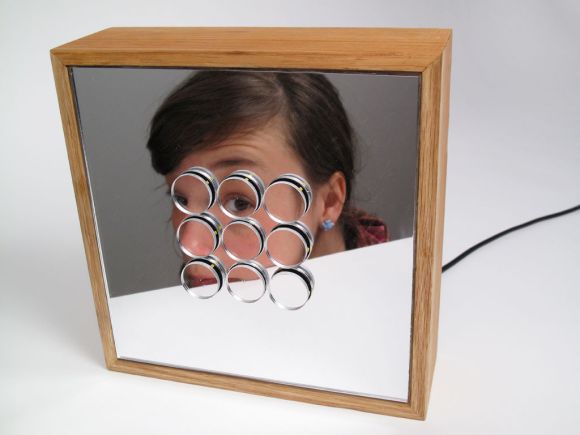
We love a good art-related project here at Hackaday, and [Wolfgang's] vibrating mirror prototype is worth a look: into its distorting, reflective surface, of course.

[Wolfgang] began by laser cutting nine 1″ circles from an 8″ square mirror, then super glued a 1/4″ neoprene sheet to the back of the square, covering the holes. Each circular cutout received some custom acrylic backings, glued in place with a short piece of piano wire sticking out of the center. The resulting assemblage pushes through the neoprene backing like a giant thumbtack, thus holding all nine circular mirrors in place without restricting movement. The back end of the piano wire connects to yet another piece of acrylic, which is glued to a tiny vibrating motor.

He uses some shift registers and an Arduino Uno to control the motors, and although there’s no source code to glance it, we’re guessing [Wolfgang] simply designed the nine mirrors to buzz about in different patterns and create visually interesting compositions. Check out a quick video of the final effect after the break, and if you can help [Wolfgang] out with a name for his device, hit us up with your suggestions in the comments.


Filed under: Arduino Hacks, Microcontrollers


  • Newsletter

    Sign up for the PlanetArduino Newsletter, which delivers the most popular articles via e-mail to your inbox every week. Just fill in the information below and submit.

  • Like Us on Facebook