Posts | Comments

Planet Arduino

Archive for the ‘puzzle’ Category

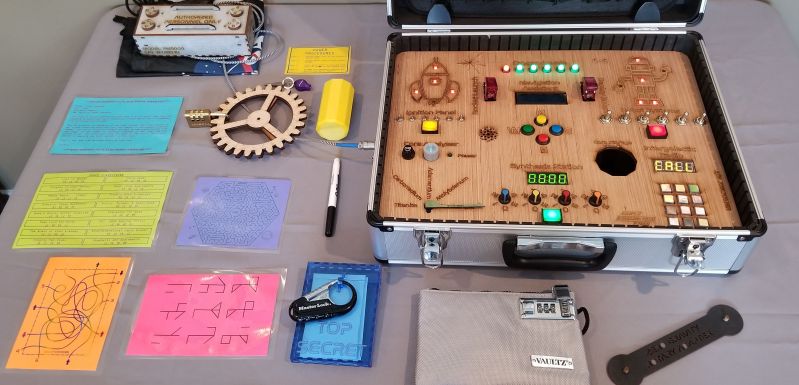
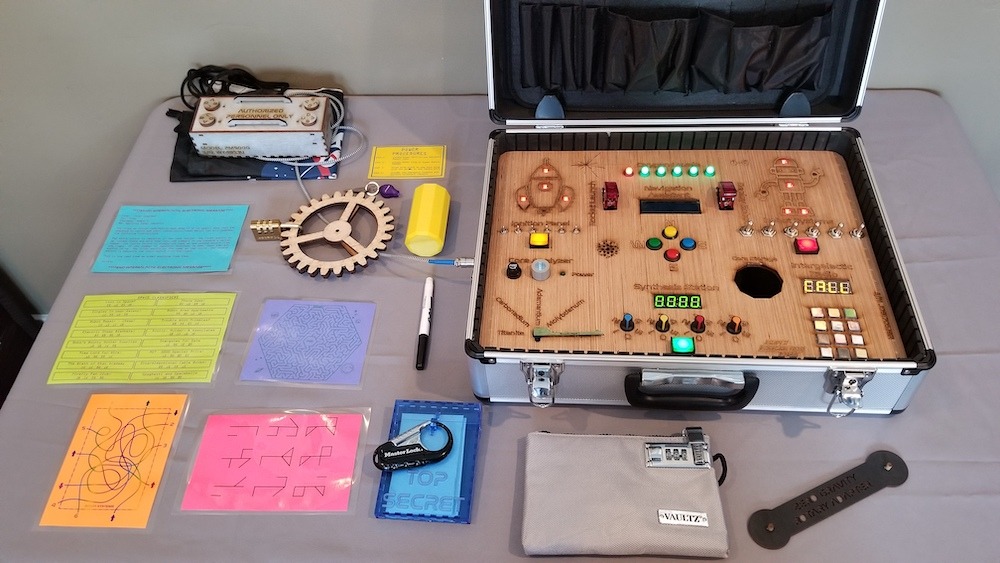
The trick to a fun escape room is layers. For [doktorinjh]’s Spacecase, you start with an enigmatic aluminum briefcase and a NASA drawstring backpack. A gamemaster reads the intro speech to set the mood, and you’re ready to start your escape from the planet. The first layer is the backpack with puzzles you need to solve to get into the briefcase. In there, you discover a hidden compartment and enough sci-fi references to put goofy smiles on our faces. We love to see tools reused as they are in one early puzzle, you use a UV LED to reveal a hidden message, but that light also illuminates puzzle clues later.

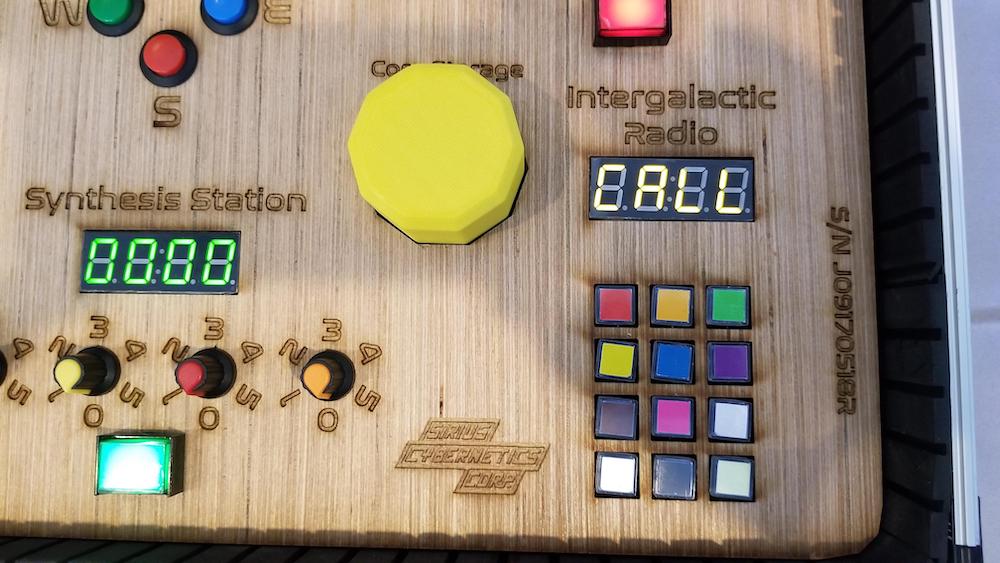
All the tech in Spacecase makes it a wonder of mixed media. The physical layer has laser engraved wood featuring the font from the 1975 NASA logo, buttons, knobs, LEDs, toggle switches, and a servo. Beneath the visible faceplate is an RGB sensor, audio player, speaker, and at the center is an Arduino MEGA. We’d love to get our hands on Spacecase for a game, and we’re inspired to pull out all the stops and build games with our personal touches. Maybe something with a mousetrap.

This isn’t the first escape room hardware we’ve seen and [doktorinjh] similarly made a bomb diffusing game.

Escape rooms can be a lot of fun, though with today’s conditions, you may instead be staying at home. As seen in the video below, the Spacecase gives you the best of both worlds as an entirely portable escape “room” in a box.

The Spacecase consists of only a hard suitcase, along with a NASA tote bag. Each of these contain different elements that allow you to “repair your spaceship and escape before you and your crew run out of oxygen.”

Inside the bag is an emergency power module, which must be opened to reveal the key to the suitcase, and plugged in to power it. Hidden within the suitcase is about 20 puzzles that are solved interactively via the Arduino Mega-based electronics under the control panel.

The build features voice feedback, as well as a variety of knobs, LEDs, switches, and more, providing what looks like a fun and challenging puzzle to get your spaceship off the ground!

Michael Klements’ Arduino Uno-controlled “safe” may not be the most secure model that you can find, but it certainly looks like a very entertaining puzzle. 

Users can place whatever “treasure” they want hidden inside, shut the door, and press a rotary encoder button to lock it via a micro servo. They then must decipher a randomly generated four-digit code to get it open again.

Number guesses are input using the encoder dial on the front, which are displayed by a small OLED I2C screen. Green and red LEDs provide feedback as to how many digits are correct and if they’re in the right position, eventually letting users figure out where everything goes by a process of elimination.

If you like solving puzzles out in the real world, you’ve probably been to an escape room before, or are at least familiar with its concept of getting (voluntarily) locked inside a place and searching for clues that will eventually lead to a key or door lock combination that gets you out again. And while there are plenty of analog options available to implement this, the chances are you will come across more and more electronics-infused puzzles nowadays, especially if it fits the escape room’s theme itself. [Alastair Aitchison] likes to create such puzzles and recently discovered how he can utilize a USB powered plasma globe as a momentary switch in one of his installations.

The concept is pretty straightforward, [Alastair] noticed the plasma globe will draw significantly more current when it’s being touched compared to its idle state, which he measures using an INA219 current shunt connected to an Arduino. As a demo setup in his video, he uses two globes that will trigger a linear actuator when touched at the same time, making it an ideal multiplayer installation. Whether the amount of fingers, their position on the globe, or movement make enough of a reliable difference in the current consumption to implement a more-dimensional switch is unfortunately not clear, but definitely something worth experimenting with.

In case you’re planning to build your own escape room and are going for the Mad Scientist Laboratory theme, you’ll obviously need at least one of those plasma globes sparking in a corner anyway, so this will definitely come in handy — maybe even accompanied by something slightly larger? And for all other themes, you can always resort to an RFID-based solution instead.

Puzzle boxes are great opportunities for hacking. You can start with a box which was originally used for something else. You get to design circuitry and controls which offer a complex puzzle for the players. And you can come up with a spectacular reward for those who solve it. [thomas.meston’s] Dr. Hallard’s Dream Transmission Box, which he created for an original party game, has all those elements.

The box was a broken 1948 National NC-33 Ham Radio purchased on eBay after a number of failed bids. Most of it was removed except for the speaker. The electronics is Arduino based, so most of the smarts are in the form of code. Potentiometers and a switch provide the mechanism for players to enter codes. And when the correct code is entered, a relay triggers an external smoke machine and turns on a laser which illuminates a party ball, rewarding the victors. And of course, there are also sound effects as well as a recorded message.

We weren’t kidding when we said puzzle boxes make great hacks. Here’s one which ignites fireworks, one made only from discrete components, and a valentine based one which makes your significant other work for their gift.

We can race against the clock when assembling jigsaw puzzles online but what about competing against each other in the real world? [HomeMadeGarbage] came up with the simplest of solutions with his jigsaw puzzle timer that stops only when the puzzle’s completely assembled.

Copper strip on back of puzzle

His simple solution was to attach copper foil tape to the back of the pieces, with overlap. He did this in a serpentine pattern to ensure that all pieces had a strip of the tape. The puzzle he used comes with a special container to assemble it in. At two corners of that container, he put two more pieces of copper foil, to which he soldered wires. Those two act as a switch. Only when the puzzle is completed will those two pieces be connected through the serpentine strip on the back of the puzzle.

Next, he needed a timer. The two wires from the puzzle container go to an Arduino UNO which uses an ILI9325 touch panel TFT display for both the start, stop, and reset buttons, and to show the time elapsed. Press the touch screen when it says START and begin assembling the puzzle. When the last piece is inserted, the serpentine strip of copper tape completes the circuit and only then does the Arduino program stop the timer. As you can see from the video below, the result makes doing the puzzle lots of fun.

Naturally, it takes some work to apply the copper tape and you wouldn’t likely do this for puzzles with a thousand pieces but most online puzzles don’t have many pieces either. It’s the fun of the race that matters, and with people taking turns, you want it to be quick anyway.

If you have a printed photo that you want to turn into a puzzle with suitably sized pieces, then you can use this online program that produces an SVG file to tell your laser cutter how to cut out the puzzle. Or maybe you’d prefer to make a robot to make the puzzle for you? In that case, you can start with [thomasgruwez]’s pick and place jigsaw puzzle aid.

Instagram Photo


Filed under: Arduino Hacks

For those who love to hike, no excuse is needed to hit the woods. Other folks, though, need a little coaxing to get into the great outdoors, which is where geocaching comes in: hide something in the woods, post clues to its location online, and they will come. The puzzle is the attraction, and doubly so for this geocache with an Arduino-powered game of Hangman that needs to be solved before the cache is unlocked.

The actual contents of a geocache are rarely the point — after all, it’s the journey, not the destination. But [cliptwings]’ destination is likely to be a real crowd pleaser. Like many geocaches, this one is built into a waterproof plastic ammo can. Inside the can is another door that can only be unlocked by correctly solving a classic game of Hangman. The game itself may look familiar to long-time Hackaday readers, since we featured it back in 2009. Correctly solving the puzzle opens the inner chamber to reveal the geocaching goodness within.

Cleverly, [cliptwings] mounted the volt battery for the Arduino on top of the inner door so that cachers can replace a dead battery and play the game; strangely, the cache entry on Geocaching.com (registration required) does not instruct players to bring a battery along.

It looks like the cache has already been found and solved once since being placed a few days ago in a park north of Tucson, Arizona. Other gadget caches we’ve featured include GPS-enabled reverse caches, and a puzzle cache that requires IR-vision to unlock.

Thanks to [Dan Wagoner], who built the game upon which this is based, for the tip.


Filed under: Arduino Hacks, misc hacks
Jun
16

Explore This Elegant Wooden Arduino Puzzle Box

arduino, electronic, Electronics, Fun & Games, game, leds, pontentiometer, puzzle, wood, Woodworking Comments Off on Explore This Elegant Wooden Arduino Puzzle Box 

Minigame_1If you’re like me, you find yourself fighting the urge to push every button, flip every switch, and turn every knob you see. This arcade-style puzzle box was designed to satiate those deep-seated desires. Powered by an Arduino, with completely custom wooden enclosure and components, this is a wood shop geek’s first […]

Read more on MAKE

The post Explore This Elegant Wooden Arduino Puzzle Box appeared first on Make: DIY Projects, How-Tos, Electronics, Crafts and Ideas for Makers.

Dec
28

Captain Hermano’s Mystery Box is Full of Puzzles

arduino, arduino hacks, box, CO sensor, gift, mega, present, puzzle, temperature Comments Off on Captain Hermano’s Mystery Box is Full of Puzzles 

[Raffi] needed a birthday present idea but he wanted to do something extra special. He realized that a big part of gift giving is the anticipation and excitement of opening the present. In order to prolong this experience, [Raffi] built an electronic puzzle box. The box contains the final gift, but first a series of puzzles must be solved in order to open the box.

The project runs on an Arduino Mega. This is hooked up to several sensors, including a temperature sensor, GPS unit, and CO sensor. There is also an LCD screen and numeric keypad for user input and output. The project page contains a flow chart that shows all of the puzzles and their solutions. One of the more interesting puzzles requires the user to blow tobacco smoke into a tube. The CO sensor detects the smoke and unlocks the next puzzle.

Some of the puzzles require interacting with outside systems. For example, one puzzle requires the user to send an email to the fictional Captain Hermano’s email address. If the correct keyword is included in the email, the user will receive a reply with the code to enter into the box. Another puzzle requires the user to call a particular phone number and listen for another riddle. We’ve included the video demonstration below.

This isn’t the first puzzle box we’ve seen, but each one has its own special flair. This one is very well made and looks like a lot of care was put into it. We’ve seen another that uses only discrete components. We’ve seen yet another that uses Morse code.

[Thanks Simon]


Filed under: Arduino Hacks
Oct
28

SAINTCON Badge (Badge Hacking for Mortals)

arduino hacks, badge, Beginner, cons, crypto, puzzle, saintcon Comments Off on SAINTCON Badge (Badge Hacking for Mortals) 

saintcon-badge

[Josh] attended his first SAINTCON this weekend before last and had a great time participating in the badge hacking challenge.

The 2014 SAINTCON is only the second time that the conference has been open to the public. They give out conference badges which are just an unpopulated circuit board. This makes a lot of sense if you figure the number of people who actually hack their badges at conferences is fairly low. So he headed off to the hardware hacking village to solder on the components by hand — it’s an Arduino clone.

This is merely the start of the puzzle. We really like that the published badge resources include a crash course on how to read a schematic. The faq also attests that the staff won’t solder it for you and to get your microcontroller you have to trade in your security screw (nice touch). Once up and running you need to pull up the terminal on the chip and solve the puzzles in the firmware’s menu system. This continues with added hardware for each round: an IR receiver, thermistor, EEPROM, great stuff if you’re new to microcontrollers.

[Josh] mentions that this is nothing compared to the DEFCON badge. Badge hacking at DEFCON is **HARD**; and that’s good. It’s in the top-tier of security conferences and people who start the badge-solving journey expect the challenge. But if you’re not ready for that level of puzzle, DEFCON does have other activities like Darknet. That is somewhere in the same ballpark as the SAINTCON badge — much more friendly to those just beginning to developing their crypto and hardware hacking prowess. After all, everyone’s a beginner at some point. If that’s you quit making excuses and dig into something fun like this!


Filed under: Arduino Hacks, cons


  • Newsletter

    Sign up for the PlanetArduino Newsletter, which delivers the most popular articles via e-mail to your inbox every week. Just fill in the information below and submit.

  • Like Us on Facebook