Posts | Comments

Planet Arduino

Archive for the ‘misc hacks’ Category

[FacelessTech] was recently charmed by one of our prized possessions as a kid — the Magic 8-Ball — and decided to have a go at making a digital version. Though there is no icosahedron or mysterious fluid inside, the end result is still without a doubt quite cool, especially for a project made on a whim with parts on hand.

It’s not just an 8-ball, it also functions as a 6-sided die and a direct decider of yes/no questions. Underneath that Nokia 5110 screen there’s an Arduino Pro Mini and a 3-axis gyro. Almost everything is done through the gyro, including setting the screen contrast when the eight ball is first powered on. As much we as love that aspect, we really like that [FacelessTech] included a GX-12 connector for easy FTDI programming. It’s a tidy, completely open-source build, and there’s even a PCB. What’s not to like? Be sure to check out the video after the break to see it in action.

Believe it or not, this isn’t the smallest Magic 8-Ball build we’ve seen. Have you met the business card version?

[via adafruit]

For a recent event, [MakerMan] was tasked with creating an interactive display that could move back and forth along an image of the Moscow skyline to highlight different points of interest. The end result is certainly gorgeous, but since this is Hackaday, we were more excited to see all the behind the scenes video of how it was built.

As with many of his projects, this one started with little more than scrap parts. Two metal I-beams were welded together to make a track, and a wheeled cart was fashioned to ride on it. Using a belt and pulley system that’s not unlike a scaled up version of what you might see on a desktop 3D printer, the motor in the cart is able to move the arrangement back and forth with minimal slop.

Installing the motor and pulley in the cart.

The cart actually holds all of the electronics in the project, including the power supplies, MA860H motor controller, a pair of endstop switches, and the Arduino that pulls it all together. A drag chain is used to keep the wires tight to the side of the rail without getting tangled up in anything.

[MakerMan] doesn’t explain much of the software side of this one, though we suppose he might only have been contracted to develop the hardware. But towards the end of the video you can see how the cart, now with large touch screen display mounted on top, moves back and forth when the appropriate commands are sent to the Arduino.

We’re not really sure what application such a contraption would have for the average hacker, but that doesn’t mean we can’t be jealous. There’s just something about huge illuminated screens that just speaks to us.

Have you ever been at the bookstore and stumbled across a great book you’ve been looking for, but had a nagging feeling that you already had it sitting at home? Yeah, us too. If only we’d had something like [Kutluhan Aktar]’s ISBN verifier the last time that happened to say for sure whether we already had it.

To use this handy machine, [Kutluhan] enters the International Standard Book Number (ISBN) of the book in question on the 4 x 4 membrane keypad. The Arduino Nano 33 IoT takes that ISBN and checks it against a PHP web database of book entries [Kutluhan] created with the ISBN, title, author, and number of pages. Then it lets [Kutluhan] know whether they already have it by updating the display from a Nokia 5110.

If you want to whip one of these up before your next trip to the bookstore, this project is completely open source down the web database. You might want to figure out some sort of enclosure unless you don’t mind the shy, inquisitive stares of your fellow bookworms.

Stalled out on reading because you don’t know what to read next? Check out our Books You Should Read column and get back to entertaining yourself in the theater of the mind.

Via r/duino

Traditionally, the useless machine is a simple one that invites passersby to switch it on. When they do, the machine somehow, some way, turns itself off; usually with a finger or finger-like object that comes out from the box in what feels like an annoyed fashion. Honestly, that’s probably part of what drives people to turn them on over and over again.

But [Bart Blankendaal] has managed to turn the useless machine on its head. When this machine is switched to the on position, unseen forces inside the box will spin the toggle switch around 180° to the off position.

What’s really happening is that an Arduino is getting a signal from the toggle switch, and is then rotating it on a ball bearing with a stepper motor driven through an H-bridge.

It shouldn’t be too hard to make one of these yourself, given that [Bart] has provided the schematic and STLs. If we weren’t living in such touchy times, we might suggest building one of these into your Halloween candy distribution scheme somehow. Sell the switch as one that turns on a candy dispenser, and then actually dispense it after three or five tries.

Many see useless machines as tangible examples of existential quandary. Here is one that takes that sentiment a bit further by snuffing out a candle.

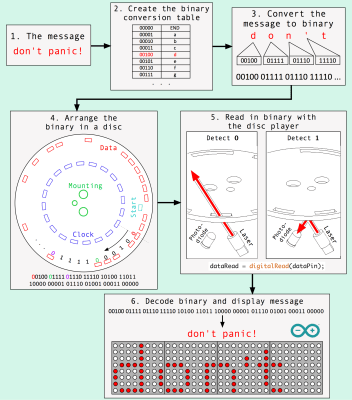
[jbumstead] used MATLAB to convert the text messages into binary to be cut out of the disk.
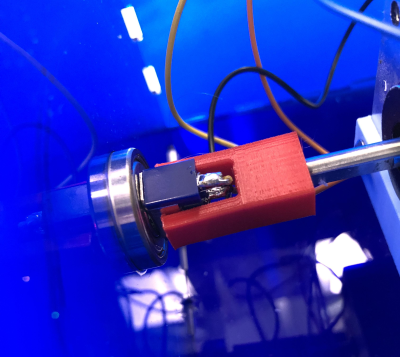
[jbumstead] wanted to demonstrate the idea of information-storing devices such as LPs, CDs, and old hard drives. What he came up with lies directly at the intersection of art and technology: an intricately-built machine that plays beautiful collaged wooden disks. Much like the media that inspired the Wooden Disk Player, it uses a laser to read encoded data, which in this case is short bits of text like “Don’t Panic”.

These snippets are stored in binary and read by a laser and photodiode pair that looks for holes and not-holes in the disk. The message is then sent to an Arduino Nano, which translates it into English and scrolls the text on an LED matrix. For extra fun, the Nano plays a MIDI note every time it reads a 1, and you can see the laser reading the disk through a protective acrylic shield.

Though the end result is fantastic, [jbumstead] had plenty of issues along the way which are explored in the build video after the break. We love it when people show us their mistakes, because it happens to all of us and we shouldn’t ever let it tell us to stop hacking.

If anyone knows their way around lasers, it’s [jbumstead]. We loved playing their laser harp at Supercon!

Via adafruit

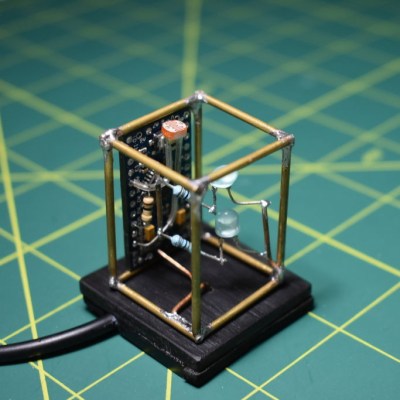
If you’re planning to get into circuit sculpture one of these days, it would probably be best to start with something small and simple, instead of trying to make a crazy light-up spaceship or something with a lot of curves on the first go. A small form factor doesn’t necessarily mean it can’t also be useful. Why not start by making a small automatic night light?

The circuit itself is quite simple, especially because it uses an Arduino. You could accomplish the same thing with a 555, but that’s going to complicate the circuit sculpture part of things a bit. As long as the ambient light level coming in from the light-dependent resistor is low enough, then the two LEDs will be lit.

We love the frosted acrylic panels that [akshar1101] connected together with what looks like right angle header pins. If you wanted to expose the electronics, localize the light diffusion with a little acrylic cover that slips over the LEDs. Check it out in the demo after the break.

There’s more than one way to build a glowing cuboid night light. The Rubik’s way, for instance.

Have you ever looked around your city’s layout and thought you could do better? Maybe you’ve always wanted to see how she’d run on nuclear or wind power, or just play around with civic amenities and see how your choices affect the citizens.

[Robbe Nagel] made this physical-digital simulator for a Creative Programming class within an industrial design program. We don’t have all the details, but as [Robbe] explains in the video after the break, each block has a resistor on the bottom, and each cubbyhole has a pair of contacts ready to mate with it. An Arduino nestled safely in the LEGO bunker below reads the different resistance values to determine what block was placed where.

[Robbe] wrote a program that evaluates various layouts and provides statistics for things like population, overall health, education level, pollution, etc. As you can see after the break, these values change as soon as blocks are added or removed. Part of what makes this simulator so cool is that it could be used for serious purposes, or it could be totally gamified.

It’s no secret that we like LEGO, especially as an enclosure material. Dress it up or dress it down, just don’t leave any pieces on the floor.

Via r/Arduino

Maps can be a great way to get a message across when the data you’re dealing with affects people on a country’s population scale. [jwolin] works for a non-profit organization, and wanted a way to help people visualize the extent of their operations and the causes they deal with. To do that, he created a nifty smart map wall display.

The display consists of a world map cut out of MDF, and affixed to a brick wall. There’s also two 4K Samsung monitors included as part of the system. The top monitor displays headings to contextualise the data, while the bottom screen displays related full motion video. A series of DMX-controlled lights then shine on the world map in various configurations to highlight the area of interest.

The system requires delicate coordination to operate cleanly and smoothly. There are three Windows 10 computers in the system, one for each monitor and another for the world map. An AutoHotkey script runs on the first computer, which selects a random video, and then sends out a command over serial to an Arduino Nano. This Arduino nano then communicates with two others, which make sure the second screen and DMX lighting rig then play the correct matching sequences, in time with the main video. Special care is taken to ensure that transitions are as smooth as possible, with no gaps in between each sequence. The entire installation is simple to update just by uploading additional content to a Dropbox folder, a crucial touch to future proof the project.

It’s an eye-catching system that helps educate visitors as to the mission of the organisation. We’ve seen other innovative world-map displays, like this clock that highlights night and day around the world. Video after the break.

Sometimes, traveling the internet feels a little like exploring an endless cave system looking for treasure. Lots of dark passageways without light or life, some occasional glimmers as you find a stray gold doubloon or emerald scattered in a corner. If we take the metaphor too far, then finding [Paul]’s “Little Arduino Projects” repository is like turning an unremarkable corner only to discover a dragon’s hoard.

LEAP (as [Paul] also refers to the collection) is a numbered collection of what looks like more or less every electronics project he has completed over the last few years. At the time of writing there are 434 projects in the GitHub repository and tagged and indexed in a handy blog-style interface. Some are familiar, like a modification to a Boldport project. Others are one-off tests of a specific concept like driving a seven segment display (there are actually 16 similar projects if you search the index for “7-Segment”). On the other end are project builds with more detailed logs and documentation, like the LED signboard for monitoring the status of 24 in-progress projects, mounted in a guitar fret board.

LEAP reminds us of the good old days on the internet, before it felt like 50% trolling and 50% tracking cookies. Spend a few minutes checking out [Paul]’s project archive and see if you find anything interesting! We’ve just scratched the surface. And of course, send a tip if you discover something that needs a write-up!

When tossing something into the rubbish bin, do you ever concoct that momentary mental scenario where you’re on a basketball court charging the net — the game’s final seconds ticking down on the clock — making a desperate stretch and flicking some crumpled paper perfectly into the basket only for no one to notice your awesome skills? Well, now you can show off how good you are at throwing out garbage.

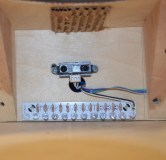
Well, not strictly garbage. The genesis of this IoT basketball hoop was in fact an inflatable ball on [Brandon Rice]’s desk that he felt would be more fun to fidget with if he could keep score. The hoop and backboard were laser cut on his Epilog cutter, and sport a Particle Photon to track and upload his running point tally to the Internet. An Arduino and IR sensor detect objects passing through the hoop — ultrasound proved to be too slow to keep up with [Rice]’s shots.

This smart hoop also has an LCD screen which displays [Rice]’s score, and a strip of LEDs that flash every five points. Not a bad way to spend $50, if you ask him. With the advent of smart basketball nets, there will be robots out-shooting us at free-throws in no-time. Wait, that’s already happened?


  • Newsletter

    Sign up for the PlanetArduino Newsletter, which delivers the most popular articles via e-mail to your inbox every week. Just fill in the information below and submit.

  • Like Us on Facebook