Posts | Comments

Planet Arduino

Archive for the ‘Github’ Category

Apr
30

A Simple And Inexpensive GPS Navigation Device

arduino, arduino hacks, bitmap, BMP, display, geotiff, Github, gps, LCD, navigation, TFT, uno Comments Off on A Simple And Inexpensive GPS Navigation Device 

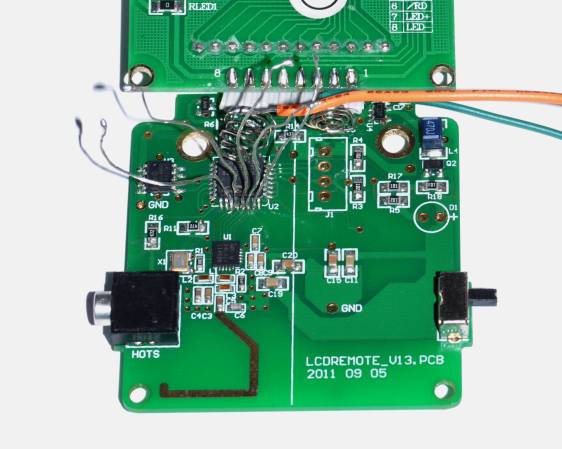
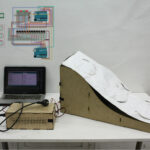
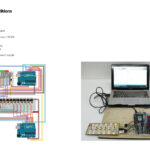
There are plenty of GPS navigation units on the market today, but it’s always fun to build something yourself. That’s what [middelbeek] did with his $25 GPS device. He managed to find a few good deals on electronics components online, including and Arduino Uno, a GPS module, and a TFT display.

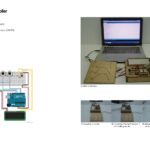
In order to get the map images on the device, [middelbeek] has to go through a manual process. First he has to download a GEOTIFF of the area he wants mapped. A GEOTIFF is a metadata standard that allows georeferencing information to be embedded into a TIFF image file.  [middelbeek] then has to convert the GEOTIFF into an 8-bit BMP image file. The BMP images get stored on an SD card along with a .dat file that describes the boundaries of each BMP. The .dat file was also manually created.

The Arduino loads this data and displays the correct map onto the 320×240 TFT display. [middelbeek] explains on his github page that he is currently unable to display data from two map files at once, which can lead to problems when the position moves to the edge of the map. We suspect that with some more work and tuning this system could be improved and made easier to use, of course for under $25 you can’t expect too much.


Filed under: Arduino Hacks
Feb
06

MicroGame – Custom Arduino Compatible Gamming Platform

arduino, atmega32u4, Github, Microcontroller, OLED Comments Off on MicroGame – Custom Arduino Compatible Gamming Platform 

ee5fe36e-a105-11e4-9ca0-8aaffabbccef

Oscar Gonzalez writes:

The MicroGame is an experiment of making a custom portable platform for gamming compatible with Arduino. It’s based on a small monochrome 128×64 pixels OLED from Adafruit and a ATmega32U4 8-bits microcontroller running at 8MHz. All hardware design and game source code is writed from scratch by me and you can find all the files in my Github repository if you want to build your own. You can modify, share and make improvements as you like but do not forget to shoot me and email and show me your work!

MicroGame – Custom Arduino Compatible Gamming Platform - [Link]


Strobe Remote

If you want to take a photograph with a professional look, proper lighting is going to be critical. [Richard] has been using a commercial lighting solution in his studio. His Lencarta UltraPro 300 studio strobes provide adequate lighting and also have the ability to have various settings adjusted remotely. A single remote can control different lights setting each to its own parameters. [Richard] likes to automate as much as possible in his studio, so he thought that maybe he would be able to reverse engineer the remote control so he can more easily control his lighting.

[Richard] started by opening up the remote and taking a look at the radio circuitry. He discovered the circuit uses a nRF24L01+ chip. He had previously picked up a couple of these on eBay, so his first thought was to just promiscuously snoop on the communications over the air. Unfortunately the chips can only listen in on up to six addresses at a time, and with a 40-bit address, this approach may have taken a while.

Not one to give up easily, [Richard] chose a new method of attack. First, he knew that the radio chip communicates to a master microcontroller via SPI. Second, he knew that the radio chip had no built-in memory. Therefore, the microcontroller must save the address in its own memory and then send it to the radio chip via the SPI bus. [Richard] figured if he could snoop on the SPI bus, he could find the address of the remote. With that information, he would be able to build another radio circuit to listen in over the air.

Using an Open Logic Sniffer, [Richard] was able to capture some of the SPI communications. Then, using the datasheet as a reference, he was able to isolate the communications that stored information int the radio chip’s address register. This same technique was used to decipher the radio channel. There was a bit more trial and error involved, as [Richard] later discovered that there were a few other important registers. He also discovered that the remote changed the address when actually transmitting data, so he had to update his receiver code to reflect this.

The receiver was built using another nRF24L01+ chip and an Arduino. Once the address and other registers were configured properly, [Richard's] custom radio was able to pick up the radio commands being sent from the lighting remote. All [Richard] had to do at this point was press each button and record the communications data which resulted. The Arduino code for the receiver is available on the project page.

[Richard] took it an extra step and wrote his own library to talk to the flashes. He has made his library available on github for anyone who is interested.


Filed under: Arduino Hacks, radio hacks
Jan
08

Arduino Yún at Open Thesis Fabrication

architecture, arduino, barcelona, Fablab, Github, IAAC, Yun Comments Off on Arduino Yún at Open Thesis Fabrication 

OTF at Iaac


The Arduino Yún has been used by IAAC‘s  Open Thesis Fabrication student Marisa Charusilawong to make an interactive toolkit for developing interactive facade elements using shape-memory alloy. During the 16-week intensive research program based in Barcelona:

We developed a modular system where several Arduino Uno’s can be networked over I2C and finally connect them to an Arduino Yun where a simple REST API is exposed allowing application to interface the system to manually actuate on the structure and to set the different behavior modes. Because Yun’s rich API capabilities we will be able to connect to other API’s to retrieve real time weather and environmental data on a near future.

The electronics were assisted by Physical Computing expert Guillem Camprodon based at IAAC – Fab Lab Barcelona who also wrote us:

 It was amazing how easy and nice it is to connect things to the internet with Yún. We are planning a workshop on IoT at Fab Lab Barcelona by mid-winter and Yun will be the default platform. For the first time we will be able to teach IoT projects to non Arduino experts.

Stay tuned on FablabBCN website for news about the workshop and now take a look at the code published on Github and  pictures with some more details about this project:

iaac arduino web7 arduino web8 arduino web5 arduino web6 arduino web4 arduino web3 arduino web2 arduino web1


  • Newsletter

    Sign up for the PlanetArduino Newsletter, which delivers the most popular articles via e-mail to your inbox every week. Just fill in the information below and submit.

  • Like Us on Facebook