Posts | Comments

Planet Arduino

Archive for the ‘handheld’ Category

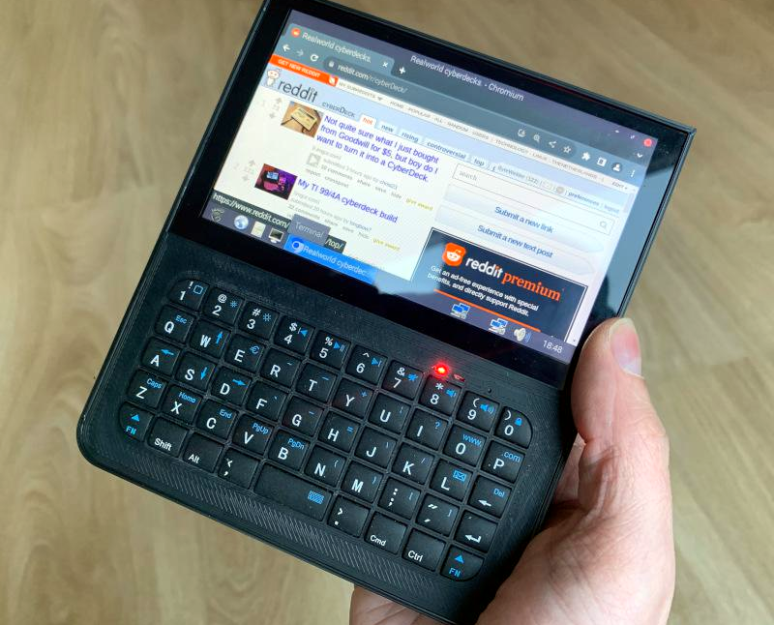
[Bytewelder] fondly remembers the Palm III and Sharp HC-4500, so taking on the design of Decktility, a custom handheld cyberdeck , was a natural next step. The blog post goes into much detail about the design decisions and challenges throughout the project. The end result, though, looks great.

The device uses a Raspberry Pi CM4 and an IPS touchscreen. The bulk of the design work was to get the power system working. There is a custom FET board and an Arduino that manages charging and battery state.

The 3D-printed case is compact, and the whole thing weighs about 375 grams. You can replace the batteries after their 6-hour stint or charge them in situ via USB-C.

The battery charger is of particular interest. [Bytewelder] wanted to integrate power management but didn’t want to write custom Linux drivers. The solution was simple: have the Arduino emulate an existing power management device with Linux driver support. In this case, the power management system looks to the Raspberry Pi like an LTC294x device, so the normal Linux OS knows how to handle it.

If you are really worried about batteries, you can swap processing power for battery life. This build reminds us of some of the organizers that were popular once upon a time. We have a soft spot for decks that look like retro computers or even if they could have been.

Just before the holidays, we brought you word of the Arduboy Mini — the latest in the line of open source 8-bit handheld gaming systems designed by [Kevin Bates]. He was good enough to send along a prototype version ahead of the system’s Kickstarter campaign, and we came away impressed with the possibilities it offered for customization.

Today, we’re pleased to tell you that not only did the Arduboy Mini Kickstarter cross the finish line with more than six times its original funding goal, but [Kevin] has made some pretty major changes to the design from the last time it graced these pages. The final Mini offers even more opportunities for modification and expansion, while still keeping the $29 USD price tag which made it so appealing in the first place.

In our review of the prototype Arduboy Mini, one of the diminutive handheld’s few downsides was that [Kevin] had decided not to include a speaker or battery. It was an observation we noted several other publications made as the campaign went on, which might have lead to something of a change of heart. For the final design, he ended up adding a 5 mm SMD piezo speaker to the back of the final unit.

Looking to avoid the headaches associated with shipping LiPo pouches, there’s still no battery included. But he did add a 1.25 mm Molex connector that’s popular with micro drone batteries, so it will be easier to hook one up yourself compared to the prototype’s solder pads.

The I2C Qwiic connector he hinted at during the campaign has also made the cut for the final hardware, which will allow the handheld to be easily connected to all sorts of off-the-shelf sensors and hardware. In addition, he’s broken all the GPIO pins of the 16 MHz ATmega32U4 microcontroller out to test pads on either side of the system. While we’d still pick the Arduboy FX for pure gaming purposes, these changes make the Arduboy Mini an eminently hackable device that we think will be just as welcome on the work bench as it would be on a park bench.

There’s nothing quite as annoying as duplicated effort. Having to jump through the same hoops over and over again is a perfect way to burn yourself out, and might even keep you from tackling the project that’s been floating around in the back of your mind. [Alain Mauer] found that he’d build enough Arduino gadgets that were similar enough he could save himself some time by creating a standardized piece of hardware that he can load his code du jour on.

He’s come to call this device the Arduino Nano QP (which stands for Quick Project), and now it’s part of the 2019 Hackaday Prize. [Alain] doesn’t promise that it’s the perfect fit for everything, but estimates around 85% of the simple Arduino projects that he’s come up with could be realized on QP. This is thanks to the screw terminals on the bottom of the device which let you easily hook up any hardware that’s not already on the board.

The QP board itself has the ubiquitous 16×2 character LCD display (complete with contrast control trimmer), seven tactile buttons arranged in a vaguely Game Boy style layout, and of course a spot to solder on your Arduino Nano. All of which is protected by a very slick laser cut acrylic case, complete with retained buttons and etched labels.

We’ve seen no shortage of handheld Arduino devices, but we have to admit, something about the utilitarian nature of this one has us intrigued. We wouldn’t mind having one of these laying around the lab next time we want to do a quick test.

We all have a gaming system in our pocket or purse and some of us are probably reading on it right now. That pocket space is valuable so we have to budget what we keep in there and adding another gaming system is not in the cards, if it takes up too much space. [Kevin Bates] budgeted the smallest bit of pocket real estate for his full-size Arduboy clone, Arduflexboy. It is thin and conforms to his pocket because the custom PCB uses a flexible substrate and he has done away with the traditional tactile buttons.

Won’t a flexible system be hard to play? Yes. [Kevin] said it himself, and while we don’t disagree, a functional Arduboy on a flexible circuit makes up for practicality by being a neat manufacturing demonstration. This falls under the because-I-can category but the thought that went into it is also evident. All the components mount opposite the screen so it looks clean from the front and the components will not be subject to as much flexing and the inputs are in the same place as a traditional Arduboy.

cost = low, practicality = extremely low, customer service problems = high

     ~[Kevin Bates]

These flexible circuit boards use a polyimide substrate, the same stuff as Kapton tape, and ordering boards is getting cheaper so we can expect to see more of them popping up. Did we mention that we currently have a contest for flexible circuits? We have prizes that will make you sing, just for publishing your flex PCB concept.

[Thank you for the tip, c00p3r]

[Jason Carlson]’s favorite game as kid was 1983’s Treasure of Tarmin by Intellivision, a maze game that eventually came to be called Minotaur. As an adult there was only one thing he could do: remake it on a beautiful Arduino-based handheld.

[Jason] built the handheld out of a small-footprint Arduino Mega clone, a 1.8” LCD from Adafruit, a 5 V booster, a 1” speaker and vibe motor for haptic feedback. There are some nice touches, like the joystick with a custom Sugru top and a surprisingly elegant 2 x AA battery holder — harvested from a Yamaha guitar.

The maze maps are all the same as the original game, which [Jason] found online, but he stored the maps as bytes in an array to speed up the game—there was a flicker in the refresh already. However he added a progress map so players could see every area that was explored. In addition to Minotaur [Jason] also added remakes of Tetris, Simon and Snake, simpler games he wrote to test out the hardware.

We’ve published a bunch of handheld gaming projects over the years, including putting a Pi Zero in a GameBoy, building a throwback handheld, and playing Ocarina of Time on a N64 handheld.


Filed under: Arduino Hacks
Feb
28

Gamebuino: A Handheld Arduino Gaming Console Ready for Prime Time

2dgames, arduino, arduino hacks, diy handheld, game boy, game console, handheld Comments Off on Gamebuino: A Handheld Arduino Gaming Console Ready for Prime Time 

Gamebuino

[Rodot] wrote in to tell us about the Gamebuino, a very nicely designed and easily reproducible version of his handheld Arduino gaming console. We originally featured [Rodot's] Arduino based gaming console over a year ago.

With the Gamebuino, you too can build your own games and gaming hardware around the Arduino. While there is a lot of information currently missing from the site’s Wiki, such as the layout and game code, [Rodot] plans on making everything open source. The console includes a rechargeable lithium battery, a micro SD card, and I2C expansion connectors. This is one project to keep an eye (and two hands) on, especially since a full game library is going to be provided, letting you easily create your own games. See what the console can do in the demo video after the break.

It would be amazing so see some old Game Boy games ported to run on the Arduino, or maybe one of our readers can make an Game Boy emulator for the Arduino!


Filed under: Arduino Hacks


  • Newsletter

    Sign up for the PlanetArduino Newsletter, which delivers the most popular articles via e-mail to your inbox every week. Just fill in the information below and submit.

  • Like Us on Facebook