The Zumo Robot is an Arduino-based tracked robot that is less than 10 cm × 10 cm, which qualifies it for mini sumo competitions. Power is provided by two micro metal gearbox motors, and it features a stainless steel bulldozer-like blade for pushing around the competition. It has six infrared sensors for line following or edge detection, an accelerometer, a magnetometer, gyroscope, and a buzzer, allowing you to play your favourite victory song. No soldering required – just add four AA batteries and an Arduino, and you’ll be all set for some robotic sumo wrestling.
They rate the Zumo 9 out of 10, saying “A clean looking bot.”
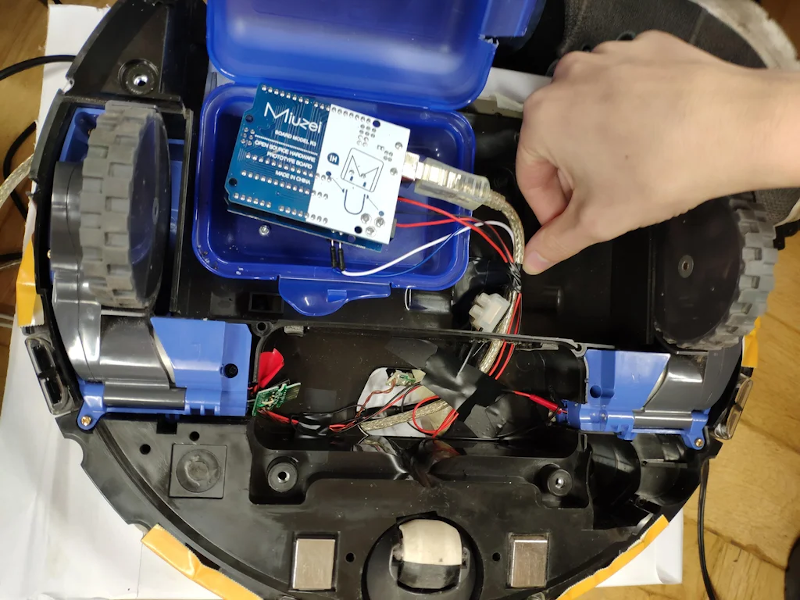
There are several projects you can imagine where it would be useful to have a robot follow you. For example, we’ve always wanted luggage that would trail us at the airport and we’ve seen several coolers that will follow you. [Madmax95] apparently dream of having a medical cart following a patient, though, and that’s good too. But how do you do it? [Max’s] method was to strip down a Roomba and build a work table and electronics on it. An Arduino controls the motor and communicates with a PC. The PC reads video from a Kinect camera on the robot and uses special tracking software to follow the patient.
We could easily imagine all of this project except the tracking. That depended on a service called Nuitrack. There is a free version that only works for 3 minutes, but it costs if you want to use it practically. However, it would still be cheaper than rolling your own if your time has value.
Nuitrack can do body tracking, face tracking, and also gesture recognition. So it would be easy to imagine commanding the robot using some sort of Jedi-style gesture. It looks like using this makes the project significantly easier than you’d imagine.
The project also uses Thingsboard to create a simple control panel. This is another solution that requires a subscription, but there is a free community edition you can host locally.
Overall, we probably won’t duplicate this robot ourselves, but we were interested in learning how we could pull off something similar for other projects. We’ve seen variations of this done with things like OpenCV. Our suitcase idea, by the way, isn’t original, but we wonder about how much packing volume you lose for batteries, electronics, and we imagine the airlines will be unhappy stowing one.
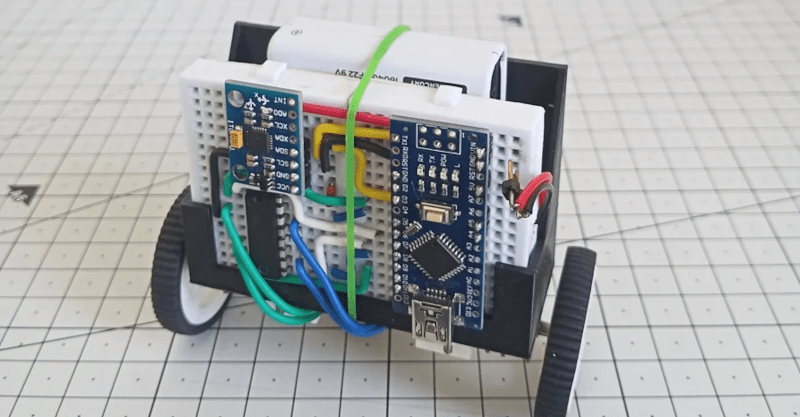
A self-balancing robot isn’t a new idea, but we liked the aesthetics of [Maker ATOM’s] build. The use of a breadboard and a printed bracket looks good, as you can see in the video, below.
Like most first-time projects, though, there were some lessons learned. The power supply needs a little work and the range of balance compliance didn’t meet expectations. But those problems are soluble and, as usual, you often learn more from working through issues like these.
The heart of the system is an MPU6050 which provides a gyroscope and accelerometer along with fusion capability onboard. The availability of libraries for the sensor and the PID controller makes the project pretty simple to finish.
In particular, a PID control loop looks at the desired state of the system and the current state. It then computes an output based on the difference in state at the current time and over time in different ways. In other words, part of the output forms because of the raw difference but other parts of the output form due to accumulated error over time or from sudden perturbations. Adjusting the gains so that these parts stay in balance can be a bit tricky.
However, in the end, the two batteries were not sufficient to power the device adequately. Temporarily, a bench supply did the trick, but the batteries still needed to be there to provide some counterweights for balance. Experimenting wth some PID loop gains might also improve operations.
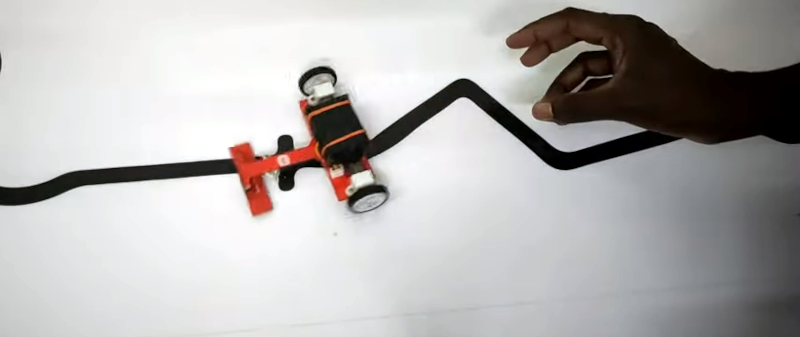
While a line-following robot may not be the newest project idea in the book, this one from [Edison Science] is a clean build using modern components and gets a good speed thanks to PID control feedback instead of the more traditional bang-bang control you see in low-end robots.
Of course, PIDs need tuning and that seems to be the weak link — you’ll have to experiment with the settings. The sensors also require calibration, but we bet both of those issues could be fixed pretty easily.
If the idea of PID is new to you, the acronym stands for porotional, integral, and derivative. To determine the output at any given time, you look at where you are compared to where you want to be (the present value vs the set point). Then you compute a proportional error. So, for a temperature, for example, if you want to be at 30 degrees and you are at 20 degrees, that a proportional error of 10 degrees. You also want to look at how much change has been building up over time and the rate of change of the error.
We’ve had some excellent PID tutorials in the past if you want to read some math. Thie simplest line followers don’t need PIDs or even CPUs.
What could be more terrifying than ghosts, goblins, or clowns? How about a shapeless pile of fright on your bedroom floor that only moves when you’re not looking at it? That’s the idea behind [Sciencish]’s nightmare robot, which is lurking after the break. The Minecraft spider outfit is just a Halloween costume.
In this case, “looking at it” equates to you shining a flashlight on it, trying to figure out what’s under the pile of clothes. But here’s the thing — it never moves when light is shining on it. It quickly figures out the direction of the light source and lies in wait. After you give up and turn out the flashlight, it spins around to where the light was and starts moving in that direction.
The brains of this operation is an Arduino Uno, four light-dependent resistors, and a little bit of trigonometry to find the direction of the light source. The robot itself uses two steppers and printed herringbone gears for locomotion. Its chassis has holes in it that accept filament or wire to make a cage that serves two purposes — it makes the robot into more of an amorphous blob under the clothes, and it helps keep clothes from getting twisted up in the wheels. Check out the demo and build video after the break, because this thing is freaky fast and completely creepy.
While we usually see a candy-dispensing machine or two every Halloween, this year has been more about remote delivery systems. Don’t just leave sandwich bags full of fun size candy bars all over your porch, build a candy cannon or a spooky slide instead.
[Ty Palowski] doesn’t like folding his many shirts. He saw one of those boards on TV that supposedly simplifies folding, but it does require you to manually move the board. That just won’t do, so [Ty] motorized it to create a shirt folding robot.
The board idea is nothing new, and probably many people wouldn’t mind the simple operation required, but what else are you going to do with your 3D printer but make motor mounts for a shirt folding machine. The folding board is, of course, too big for 3D printing so he made that part out of cardboard at first and then what looks like foam board.
The side “wings” were easy to manipulate, but the top fold required a little more effort. The machine still requires a manual fold at the end and, of course, you have to put the shirt on the right way for things to work out.
Honestly, we aren’t sure this is a very practical project, but we still enjoyed the idea and we can’t deny it seems to work. We don’t think there’s much torque required so we wondered if some beefy RC servos would have been just as effective and probably a lot easier to work with. Still, just about anything that could move would work. You could probably even use a spring and a solenoid to get the same effect. There’s not much build detail, but we think you could figure it out using whatever motors you happen to have on hand.
If you find laundry too time-consuming, there’s always Eleven. If you want a better folding robot, you’ll have to put in some serious work.
[Ivan] seems to enjoy making 3D printed vehicles with tracks. His latest one uses 50 servo motors to draw patterns in the sand at the beach. You can see it work in the video below. Well, more accurately you can see it not work and then work as the first iteration didn’t go exactly as planned.
An Arduino Mega 2560 provides the brains and the whole unit weighs in at almost 31 pounds, including the batteries. We didn’t see Ivan’s design files, although it wouldn’t be hard to do your own take on the robot.
Speaking of the weight, we were amused at [Ivan’s] quick and dirty trailer he built to haul the thing around. We wondered if he had those wheels sitting around or if he had to source them from somewhere for this project.
The robot more or less moves in a straight line and the servos either drag a pointy part into the sand or lift the pointy part up so the sand is undisturbed in that area. The robot isn’t perfect. Not only did it not work the first time, but it also looked like it dropped at least one pointy part during the second test run. The tracks seemed to provide good traction, but we would not want to bet that the motion was completely straight.
On the other hand, it did get the job done. It was a lot of wiring and we suspect that’s why it was made all in one piece. Making it break down into sections would have been nice for transport. You might even be able to make it take a varying number of sections if you did it right. However, it would take a lot of connectors and a way for those connectors to support the weight of the beam, so that would be a much tougher problem.
We wish the design files were posted, but we still thought this was a neat enough idea and easy enough to figure out. We aren’t likely to build a 30-pound robot, but we might think about replicating it on a smaller scale to take to our local beach next summer.
We couldn’t help but remember Skryf, the robot that didn’t draw in the sand but drew with sand. Then there’s also SandBot.
It’s the end of the academic semester for many students around the globe, so here comes the flurry of DIY projects. Always a great time to check out all the cool hacks from our readers all over the world. One project that piques our interest comes courtesy of [Jason Ummel] and his Auto-Bartender.
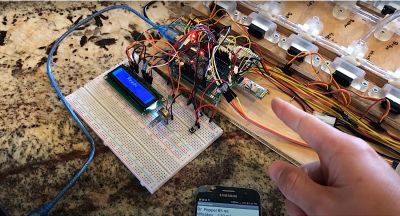
[Jason] developed this project as a part of his robotics class taught by Professor Martinez, one of our friends at FlexiLab. Powered by one of our favorite microcontrollers, the ATmega328, the Auto-Bartender is driven by a single 12 V motor coupled with 10 individual valves for separate drinks. Drinks are pumped into a cup sitting on top of a scale, allowing the device to know how much of each drink has been dispensed. The entire setup is controlled using a smartphone application developed in MIT App Inventor, a super-easy way to prototype Android applications.
Furthermore, [Jason] incorporated a number of user-centered design considerations into his project. These include an LCD to display updates, a green LED to indicate the device is in progress, and a buzzer to let the user know the drink is complete.
We really like the combination of craftsmanship, electronics hardware design, and software development that [Jason] put into his project. It’s the kind of project we know our readers will enjoy.
It looks like Jason substituted tap water for Whiskey and Dr. Pepper for his demo. Not exactly what we had in mind, but I guess he still has exams to finish.
Cool project [Jason]! We can’t wait to see Auto-Bartender on Hackaday.io.
Planet Arduino is, or at the moment is wishing to become, an aggregation of public weblogs from around the world written by people who develop, play, think on Arduino platform and his son. The opinions expressed in those weblogs and hence this aggregation are those of the original authors. Entries on this page are owned by their authors. We do not edit, endorse or vouch for the contents of individual posts. For more information about Arduino please visit www.arduino.cc
You are currently browsing the archives for the Robot category.