Posts | Comments

Planet Arduino

Archive for the ‘RTC’ Category

Like many of us, [Lee] wakes up every morning grumpy and tired. Once he decided to try to do something about it, he settled on making a sunrise alarm clock using NeoPixels. Over the course of thirty minutes the clock illuminates 60 NeoPixels one by one in blue mode to simulate a sunrise.

The clock has three modes: 30-minute sunrise, analog time display, and a seconds counter that uses the full RGB range of the LEDs to light up one for each passing second. It runs on an Arduino Pro Mini knockoff and an RTC module for the sake of simplicity. [Lee] chained NeoPixel strips together in five rows of eight, which allowed him to use a 3×5 font to display the time. The only other electronics are passives to protect the LEDs.

NeoPixels are great, but powering them becomes an issue pretty quickly. [Lee] did the math and figured that he would need 3.4 A to drive everything. He found a 3-outlet USB power adapter that delivers 3.4 A total while shopping at IKEA for an enclosure. [Lee] took his first Instructable from beginner to intermediate level by cracking the adapter open and using two of the USB ports wired in parallel to provide 5 V at 3.4 A. [Lee] has the code available along with detailed instructions for replicating this build. Be sure to check out the demo after the break.

We love a good clock build around here, especially when they involve Blinkenlights. For those less interested in building an alarm clock, here’s a word clock that pulls time and weather data with an ESP8266.


Filed under: Arduino Hacks, clock hacks
Apr
06

Arduino Project: Data Logging with DS3231 RTC, SD card module and Arduino Nano DIY data logger

arduino, datalogger, DS3231, RTC, sd Comments Off on Arduino Project: Data Logging with DS3231 RTC, SD card module and Arduino Nano DIY data logger 

Arduino Project: Data Logging DS3231 SD card module and Arduino Nano DIY data logger

Arduino Project: Data Logging with DS3231 RTC, SD card module and Arduino Nano DIY data logger - [Link]

[Bob’s] Pac-Man clock is sure to appeal to the retro geek inside of us all. With a tiny display for the time, it’s clear that this project is more about the art piece than it is about keeping the time. Pac-Man periodically opens and closes his mouth at random intervals. The EL wire adds a nice glowing touch as well.

The project runs off of a Teensy 2.0. It’s a small and inexpensive microcontroller that’s compatible with Arduino. The Teensy uses an external real-time clock module to keep accurate time. It also connects to a seven segment display board via Serial. This kept the wiring simple and made the display easy to mount. The last major component is the servo. It’s just a standard servo, mounted to a customized 3D printed mounting bracket. When the servo rotates in one direction the mouth opens, and visa versa. The frame is also outlined with blue EL wire, giving that classic Pac-Man look a little something extra.

The physical clock itself is made almost entirely from wood. [Bob] is clearly a skilled wood worker as evidenced in the build video below. The Pac-Man and ghosts are all cut on a scroll saw, although [Bob] mentions that he would have 3D printed them if his printer was large enough. Many of the components are hot glued together. The electronics are also hot glued in place. This is often a convenient mounting solution because it’s relatively strong but only semi-permanent.

[Bob] mentions that he can’t have the EL wire and the servo running at the same time. If he tries this, the Teensy ends up “running haywire” after a few minutes. He’s looking for suggestions, so if you have one be sure to leave a comment.


Filed under: Arduino Hacks, clock hacks
Dec
13

Using DS1307 and DS3231 real-time clock modules with Arduino

arduino, DS1307, DS3231, RTC Comments Off on Using DS1307 and DS3231 real-time clock modules with Arduino 

DS1307_RTC_module

John Boxall over at Tronixstuff has posted a detailed tutorial on how to on how to use DS1307 and DS3231 real-time clock modules with Arduino:

There are two main differences between the ICs on the real-time clock modules, which is the accuracy of the time-keeping. The DS1307 used in the first module works very well, however the external temperature can affect the frequency of the oscillator circuit which drives the DS1307’s internal counter.
This may sound like a problem, however will usually result with the clock being off by around five or so minutes per month. The DS3231 is much more accurate, as it has an internal oscillator which isn’t affected by external factors – and thus is accurate down to a few minutes per year at the most. If you have a DS1307 module- don’t feel bad, it’s still a great value board and will serve you well.

[via]

Using DS1307 and DS3231 real-time clock modules with Arduino - [Link]

Dec
10

MAX DS1339 RTC Real Time Clock for Arduino

arduino, clock, DS1307, DS1339, RTC Comments Off on MAX DS1339 RTC Real Time Clock for Arduino 

The most popular RTC for the Arduino is the DS1307. However, it does have some drawbacks, the most notable of which is that its operating voltage is 5v, which means it cannot be used with 3.3v projects.  The Maxim DS1339 however, features a wide tolerance of voltages from 2.97V-5.5V with the typical voltage as 3.3v, a battery backup, two alarms, and a trickle charger. The breakout board here packages the DS1339 with the components and connections necessary to use with your Arduino projects easily.

MAX DS1339 RTC Real Time Clock for Arduino - [Link]

Nov
27

DS3231 OLED clock with 2-button menu setting and temperature display

arduino, clock, display, DS3231, LCD, OLED, RTC, temperature Comments Off on DS3231 OLED clock with 2-button menu setting and temperature display 

FLNQVLCI2TR1IVC.MEDIUM

by df99 @ instructables.com:

This is an OLED clock I built using an Arduino Micro, a tiny OLED 128×64 display using the SSD1306 controller and I2C interface, and a precision DS3231-based real-time clock module with rechargeable battery backup. It features a menu system for setting the RTC (no serial port or USB required)

DS3231 OLED clock with 2-button menu setting and temperature display - [Link]

Sep
29

MAX DS1339 RTC real time clock for arduino

arduino, DS1307, DS1339, RTC Comments Off on MAX DS1339 RTC real time clock for arduino 

The most popular RTC for the Arduino is the DS1307. However, it does have some drawbacks, the most notable of which is that its operating voltage is 5v, which means it cannot be used with 3.3v projects.  The Maxim DS1339 however, features a wide tolerance of voltages from 2.97V-5.5V with the typical voltage as 3.3v, a battery backup, two alarms, and a trickle charger.   The breakout board here packages the DS1339 with the components and connections necessary to use with your Arduino projects easily.

MAX DS1339 RTC real time clock for arduino - [Link]

Infinity Mirror Clock

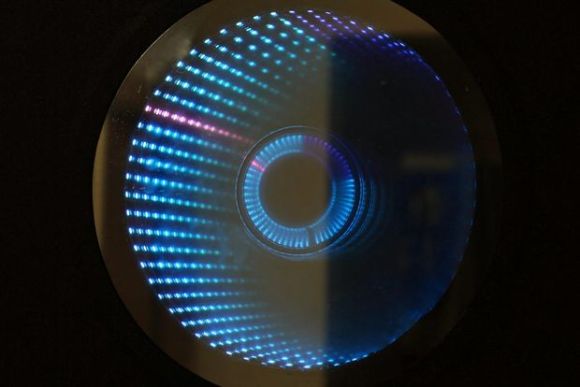
We don’t think we’ve seen an Infinity Mirror Clock before, but we love this new twist on an old favorite. Different colors distinguish between seconds, minutes and hours, and an additional IR sensor detects when someone is directly in front of the clock and switches the LEDs off, allowing it to be used as a normal mirror. This build is the work of [Dushyant Ahuja], who is no stranger to hacking together clocks out of LEDs. You can tell how much progress he’s made with the mirror clock by taking a glance at his first project, which is an impressive creation held together by jumbles of wire and some glue.

[Dushyant] has stepped up his game for his new clock, attaching an LED strip along the inside of a circular frame to fashion the infinity mirror effect. The lights receive a signal from an attached homemade Arduino board, which is also connected to a real-time clock (RTC) module to keep time and to a Bluetooth module, which allows [Dushyant] to program the clock wirelessly rather than having to drag out some cords if the clock ever needs an adjustment.

Stick around after the jump for a quick demonstration video. The lights are dazzling to watch; [Dushyant] inserted a stainless steel plate at the center of the circle to reflect the outer rim of LEDs. After a quick rainbow effect, it looks like the mirror enters clock mode. See if you can figure out what time it is. For a more step-by-step overview of this project, swing by his Instructables page.


Filed under: Arduino Hacks, clock hacks, led hacks

DIY laser cut word clock.

What is a word clock? A word clock is a clock that displays the time typographically that is also an interactive piece of art. Rather than buy one for $1500, [Buckeyeguy89] decided to build one as a present for his older brother. A very nice present indeed!

There are many different things that come into play when designing a word clock. The front panel is made from a laser cut piece of birch using the service from Ponoko. Additionally, white translucent pieces of acrylic were needed to keep each word’s light from bleeding into the neighboring letters. The hardware uses two Arduinos to control the LEDs and a DS3231 RTC for keeping accurate time. The results are very impressive, but it would sure make assembly easier if a custom PCB was used in the final version. For a one-off project, this makes a great birthday present.

The craftsmanship of this word clock is great, making it well suited for any home. What projects have you built that involve more than just electronics? Sometimes, quality aesthetics make all the difference.


Filed under: Arduino Hacks, clock hacks

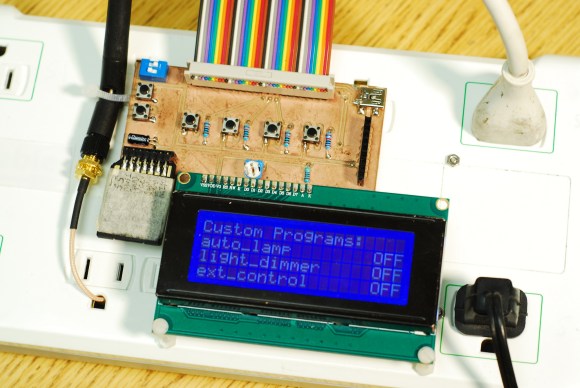
powerduinoThings don’t always run the way we want them to or operate at the ideal temperature out of the box. Instead of spending extra for power controls that may or may not meet your needs, wouldn’t it make more sense to dial in the ideal level from the source? That’s what [dekuNukem] had in mind when he decided to make Powerduino, an arduino-compatible programmable power strip.

With Powerduino, [dekuNukem] can control the electrical consumption of all kinds of things without ever worrying about the irreversible deadliness of mains voltage. It actually uses a Teensy 3.1 which can be programmed with the Arduino IDE through the micro USB connector. He’s really tricked it out to the point of putting Kill A Watt meters to shame. A wi-fi module lets him control any of the outlets from anywhere, and the RTC module lets him make customized schedules for them. Powerduino has an SD card slot for logging energy consumption, and a 20 x 4 LCD screen makes it easy to directly interface with the power strip.

The Powerduino code is up on GitHub, and [dekuNukem]‘s walkthrough video is after the jump.

http://www.youtube.com/watch?v=ZPqnHy5OSVQ


Filed under: Arduino Hacks, green hacks


  • Newsletter

    Sign up for the PlanetArduino Newsletter, which delivers the most popular articles via e-mail to your inbox every week. Just fill in the information below and submit.

  • Like Us on Facebook