Posts | Comments

Planet Arduino

Archive for the ‘Rotary Phone’ Category

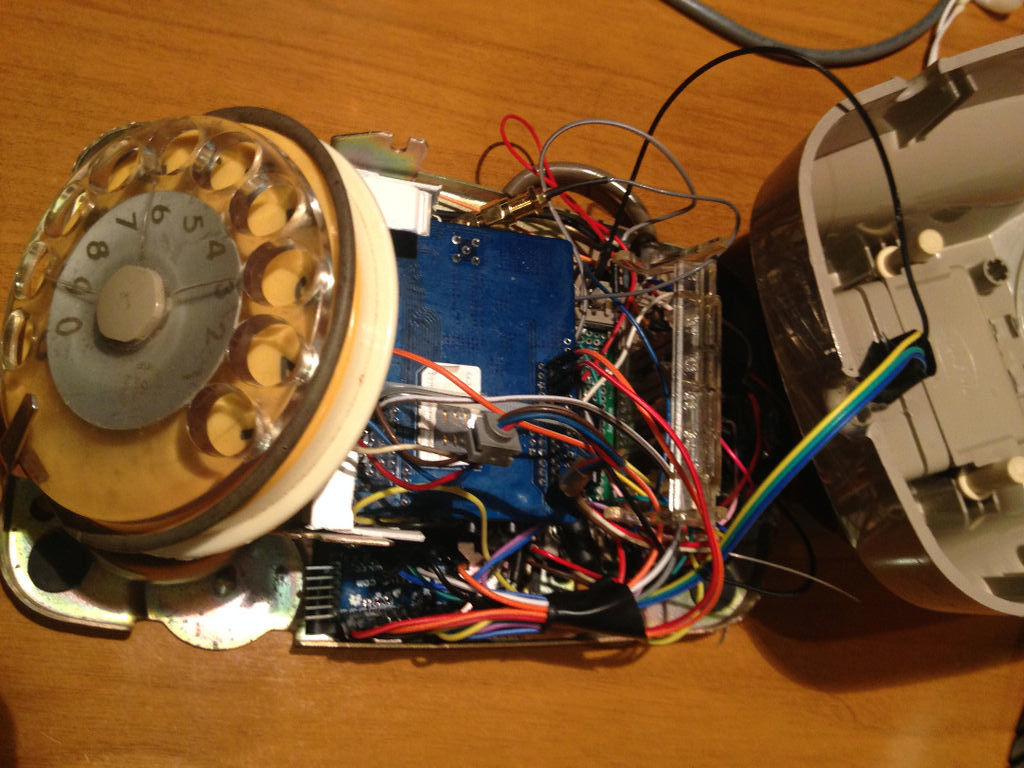
[Kevin] has long wanted to do something musical with a vintage rotary phone and an Arduino, and has finally done so and committed the first of several experiments to HTML in a five-part series. He found a nice old British Telecom number, but it had been converted to plug and socket wiring to work on the modern system. Because of this, [Kevin] wanted to keep it completely functional as a phone. After all, it ought to work fine until 2025, when pulse dialing will no longer be supported in [Kevin]’s locality.

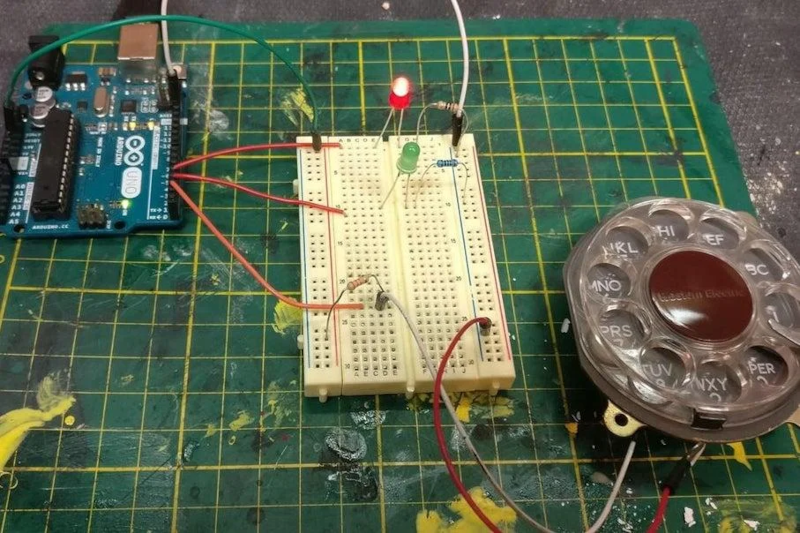
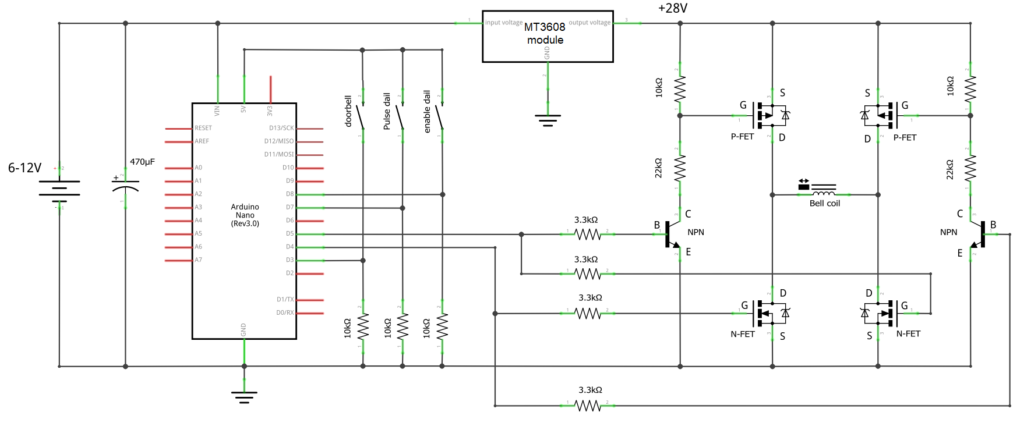
As you can likely understand, [Kevin] was keen to interface with the phone from the outside and leave the inside untouched. He used a sacrificial ADSL filter’s PCB to break out the socket, and added a pull-up resistor between the pin and 5 V.

Pretty quickly, [Kevin] figured out that when the phone is on the hook, it gives a constant high signal, where as the picking up the phone presents as a high signal going low, and dialing each number results in pulses of that quantity that alternate between high and low.

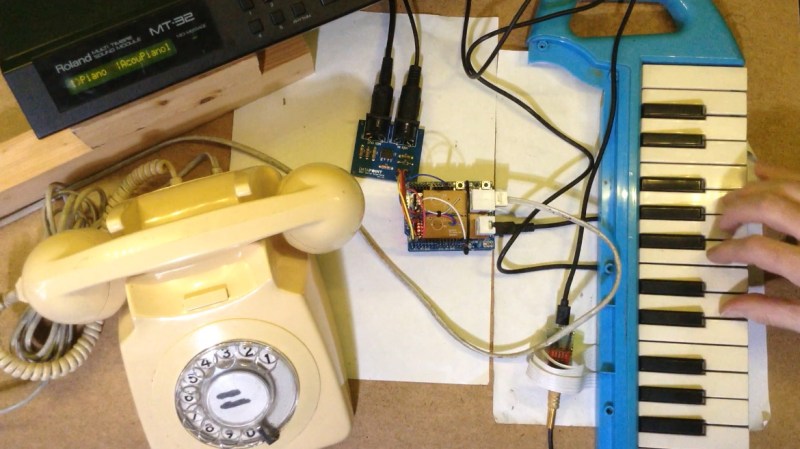
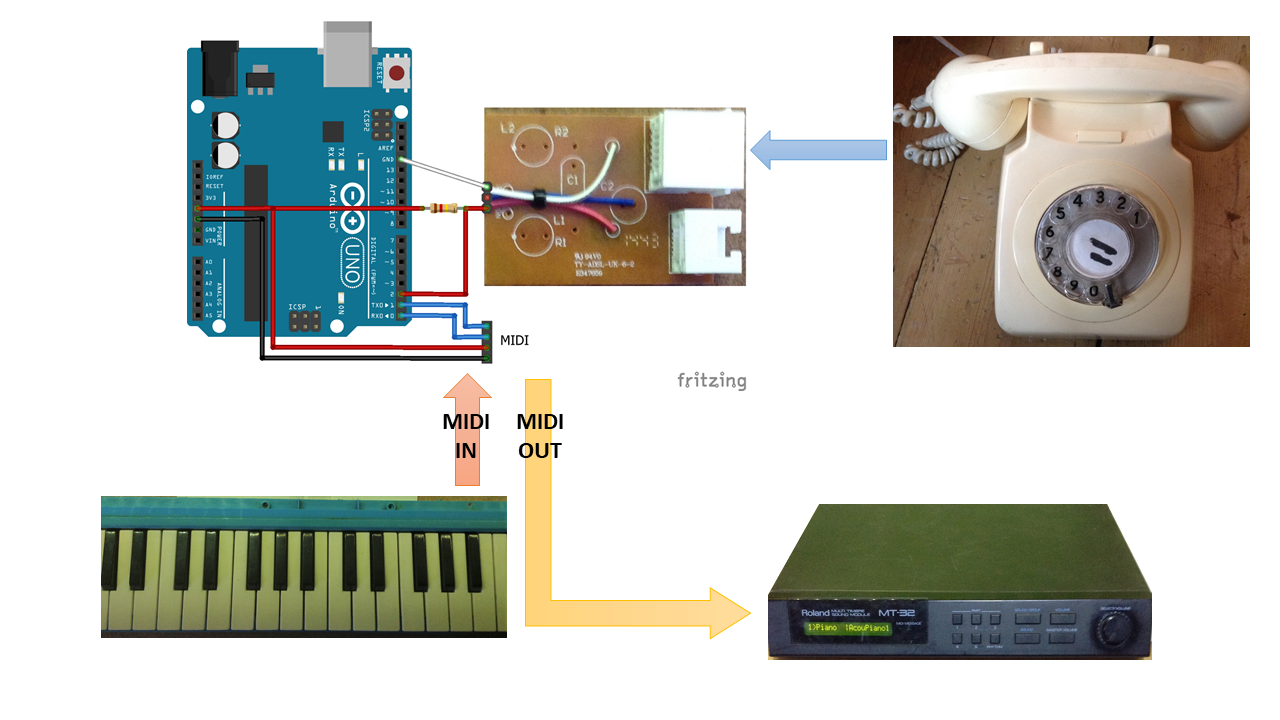
In part two of the series, [Kevin] really gets into decoding the pulse dialing, which is necessary for the third installment when things get musical. Here, [Kevin] adds in a MIDI module and a Roland MT-32 synth to use the dial as a MIDI note generator — each note dialed will sustain until the receiver is replaced on the hook.

Part four focuses on a MIDI patch changer. [Kevin] picks up the phone, dials a code up to three digits long, and hangs up, which this triggers the synth to change to the assigned voice. In part five, the phone becomes a random note sequencer, and each successive spin of the same digit will produce a different, randomly-chosen note. This is really just the beginning, however, so we’ll be checking back for updates. In the meantime, you can listen to the note generator and the random note sequencer demos after the break.

Wouldn’t you like to use a rotary dial all the time? Well, as long as it wasn’t an emergency?

A lot of phrases surrounding phones don’t make sense anymore. With a modern cellphone, you don’t really “hang up” and there’s certainly no “dial” to be had. However, with [jakeofalltrades’] project, you can read an old-fashioned phone dial using an Arduino.

The idea behind a phone dial is actually pretty simple. When you pull the dial back to the stop using one of the numbered holes and release it, it causes a switch to open and close the same number of times as the hole you selected. That is, if you pull back the 5 hole, you should get 5 switch closures. The duration of each switch event and the time between switch events is a function of the speed the dial moves because of its internal spring. The zero hole actually produces ten pulses.

There are standards for how precise the timing has to be, but — honestly — it’s pretty loose since these were not made to be read by precise microcontroller timers. In the United States, for example, the dial was supposed to produce between 9.5 and 10.5 pulses per second, but the equipment on the other end would tolerate anything from 8 to 11.

Even if you don’t want a rotary dial in your next project, the code has some good examples of using ATmega328 timers that you might find useful in another context. However, a dial would add a nice retro touch to any numeric input you might happen to need.

If you need project inspiration, how about a volume control? Or, why not a numeric keypad?

What we carry today in our pockets is nominally called a “phone,” but more often than not we’re using it to do various other computing tasks. Justine Haupt, however, wanted an actual phone that “goes as far from having a touchscreen as [she could] imagine.”

What she came up with is a rotary cellphone that’s not just a show-and-tell piece, but is intended to be her primary mobile device. It’s reasonably portable, has a removable antenna for excellent reception, a 10-increment signal meter, and, perhaps most importantly, doesn’t make her go through a bunch of menus to actually use it as a phone. Other features include number storage for those she calls most often and a curved ePaper display that naturally doesn’t use any power when revealing a fixed message.

The project was prototyped using an Arduino Micro. It was then laid out of a PCB with an an Adafruit FONA 3G board and an ATmega2560V, programmed in the Arduino IDE.

Haupt has published a detailed look at the build process here.

While once an essential communication tool, rotary phones in the wild are quite a rarity today. Still, they do hold a certain charm, and hacker Kristiaan N. decided to turn one of these units into a clever home automation interface.

The original idea was to use the phone as a doorbell. Like many projects, this simple job turned into something much more involved, with an Arduino Nano and a bevy of complimentary electronics being installed in the housing. This allows it to respond to doorbell presses as intended, and it’s now also able to ring in different patterns via wireless input from a smartphone. 

Most impressively, the modified phone can signal up to 10 devices using the rotary input, using the MySensors Arduino library and a Domoticz setup. The system’s capabilities are demonstrated in the video below, switching lights, and showing off its multi-ring capability.

The current version features the following functions:

  • Doorbell function with simple button
  • MySensors integration with NRF24 radio
  • Wirelessly activate 5 different ringtones
  • Alarm signal
  • Working dial with 10 virtual switches

The idea is basically that it will ring just like a old phone when somebody presses the doorbell button. If you don’t want any wires for that, you can just sent a command from any button attached to your Domoticz controller. You can also set your Domoticz controller to ring different ringtones for any events like a door that has open, or a set timer that has passed.

The dial also acts like 10 virtual switches. Your Domitcz controller will see these as 10 different switches that will be turned on and immediately be turned off again. You can use this to trigger events like turning a light on, or set the heating to a different setpoint.

The wireless function is done by the incredible MySensors library. In my opinion its one of the best platforms for home build sensors and actors. Its cheap to build, very reliable, and the possibilities are endless. You will need a MySensors gateway attached to your Domiticz controller. I’m using the USB version. Building one is very easy and doesn’t require knowledge of MySensors, Arduino, or electronics. If you just want the doorbell, don’t worry about all the other functions. Just leave out the radio and the connections to the dial. The Arduino code will work fine without.

While cleaning out his closet, Instructables user “Acmecorporation” discovered an old rotary telephone. Instead of tossing it away, the Maker decided to give the old-school device some modern-day technology using an Arduino Pro Mini and a SIM900 GSM shield.

Acmecorporation is able to use the aptly named TOWA Phone (There Once Was A Telephone) to make and receive calls, send single DMTF tones, and even program numbers on speed dial. Aside from its classic bell ringer, there’s an RGB LED that indicates GSM status: red for offline, green for online, and blue for an incoming call.

The Maker briefly explains how it works:

To make a phone call you have to pick up the handset and dial the number, that’s all. Terminate call hanging up the handset.

When phone is ringing, pick up the handset to answer. Terminate it hanging up.

If you call to a support center or an office, usually you have to dial numbers to connect a specific department. You can do this because TOWA sends single DMTF tones.

Inside the Arduino script, you can add your favorite telephone numbers and combine it with a specific integer number. For example, I’ve stored my favorites combined with numbers from 1 to 8. So when I pick up the handset and dial 1, it starts a call to my wife. When I dial 2 or 3, it calls one of my sons, and so on.

Although Acmecorporation didn’t design TOWA for everyday use, it has become a permanent fixture on his desk. Do you have a rotary phone lying around? Time to brush off the dust and rig your own!

Mar
26

New Project: Arduino Rotary Phone

arduino, ArduinoD14, Art, Art & Design, installation, phone, Rotary Phone Comments Off on New Project: Arduino Rotary Phone 

IMG_20131204_205243Modify a retro phone to create strange, interactive conversations.

Read more on MAKE


  • Newsletter

    Sign up for the PlanetArduino Newsletter, which delivers the most popular articles via e-mail to your inbox every week. Just fill in the information below and submit.

  • Like Us on Facebook