We’re surprised we haven’t seen this kind of clock before, or maybe we have, but forgot about it in the dark filing cabinets of our minds. The above picture of [danjhamer’s] Matrix Clock doesn’t quite do it justice, because this is a clock that doesn’t just tick away and idly update the minutes/hours.
Instead, a familiar Matrix-esque rain animation swoops in from above, exchanging old numbers for new. For the most part, the build is what you would expect: a 16×8 LED Matrix display driven by a TLC5920 LED driver, with an Arduino that uses a DS1307 RTC (real-time clock) with a coin cell battery to keep track of time when not powered through USB. [danjhamer] has also created a 3D-printed enclosure as well as added a piezo speaker to allow the clock to chime off customizable musical alarms.
You can find schematics and other details on his Hackaday.io project page, but first, swing down below the jump to see more of the clock’s simple but awesome animations.
LED matrices are a popular mean of displaying text, graphics, and animated information at gas stations, convenient stores, and many other public places. Raj’s new project is about making a Bluetooth-enabled 8×64 LED matrix display, where you can send the text messages through a smartphone over a Bluetooth connection. He used Arduino as the main controller and an HC-06 Bluetooth adapter to receive data from the smartphone. He has shared all of his design files and Arduino firmware on his blog.
DIY LED Matrix Display with Bluetooth support - [Link]
arduino, LED, matrixComments Off on Arduino Tetris on bi-color LED matrix
jollifactory @ instructables.com writes:
One of the electronics DIY kit jolliFactory came up with is the Bi-color LED Matrix Driver Module Kit. This module is designed to be chain-able so that you may daisy-chain the modules together to the number of modules you need to suit your project.
Digital code lock or digital combination lock are a type of digital locks where a combination of digits/characters or both are used for unlocking the lock. This article is about a simple digital code lock using arduino. Here the code consists of a combination of digits from 1 to 6. There are separate keys for locking and unlocking the system. The system can be unlocked by pressing the unlock button after entering the correct combination of digits. A hex key pad is used as the input device. Only the first two rows of key (1, 2, 3, A, 4, 5, 6, B) are used in this project. A is used for locking the system and B is used for unlocking the system. Read this article Interfacing hex keypad to arduino for knowing more about hex keypad and its interfacing to the arduino. The circuit diagram of the digital code lock using arduino is shown in the figure below.
Digital code lock or digital combination lock are a type of digital locks where a combination of digits/characters or both are used for unlocking the lock. This article is about a simple digital code lock using arduino. Here the code consists of a combination of digits from 1 to 6. There are separate keys for locking and unlocking the system. The system can be unlocked by pressing the unlock button after entering the correct combination of digits. A hex key pad is used as the input device. Only the first two rows of key (1, 2, 3, A, 4, 5, 6, B) are used in this project. A is used for locking the system and B is used for unlocking the system. Read this article Interfacing hex keypad to arduino for knowing more about hex keypad and its interfacing to the arduino. The circuit diagram of the digital code lock using arduino is shown in the figure below.
Interfacing hex keypad to arduino @ circuitstoday.com
This article is about how to interface a hex keypad to arduino. Hex keypad is a very important component in embedded systems and the typical applications are code locks, calculators, automation systems or simply any thing that requires a character or numeric input. This project will display the pressed key in the serial monitor window of the arduino IDE. The same project can be modified to display the pressed key on 7-segment LED display or an LCD display. Before going into the details, have a look at the hex keypad.
One day I was sitting behind my desk at work and I got that weird need to build something, after looking around for a bit I got my eye on an LED matrix and that sparked an idea in my head : “I WANNA MAKE A TAMAGOTCHI”.
So for those of you that don’t know what the heck is a Tamagotchi here is a little snip-it from wikipedia :
“The Tamagotchi (たまごっち Tamagocchi?) is a handheld digital pet, created in Japan by Akihiro Yokoi of WiZ and Aki Maita of Bandai. It was first sold by Bandai in 1996 in Japan.”
So my take on this classic toy is to make it in to a desktop gadget with an LED matrix for a display, and an Arduino for brains to make it more accessible to people. With that said join me as we design,build and program the World’s first (As far as I know) desktop Tamagotchi.
Here, we show how a 7 Bi-color 8×8 LED Matrix Scrolling Text Display is built, in which messages and commands can be sent to it via Bluetooth using an Android Smart Phone. Logically, any devices capable of sending text messages via Bluetooth may be adapted to work with the display.
To build this project, basic electronics component soldering skills and some knowledge on using the Arduino or Arduino based micro-controllers are required.
The reason for building a 7 LED Matrices long display is that it is quite adequate for ease of reading scrolling text and also because the largest tinted acrylic sheet easily available in Hobby or Art shops is 18 inches by 12 inches, which is just the right length for making the enclosure for the display as each LED matrix is around 60mm x 60mm in size.
7 Bi-color LED Matrix Scrolling Text Display - [Link]
Time for another kit review, and in this instalment we’ve received some LED matrix modules and a matching Arduino-compatible controller board from friedcircuits.us. Behind the name is William Garrido – who some of you may know as “mobile will” from following his blog. Over time William has created a range of small and useful products, which are now available on the tindie online store.
The system comprises of two modules. The first is a small Arduino-compatible board with an ATmega328P microcontroller – the LED matrix master. It’s quite small and is designed to be the start of a chain of matching LED matrix link boards. Each of these holds an 8×8 LED matrix and is controlled by the AS1107 LED driver IC. This is a direct replacement IC for the popular MAX7219, works exactly the same and is a great find instead of using knock-off MAX7219s. You can chain up to 8 matrix modules from the one controller. We received a matrix master and two matrix link boards to examine, which arrived in solid packaging a fun Tindie sticker:
Assembly
All the surface-mount soldering is done in advance, leaving you with some simple through-hole soldering for the LED matrix and the connectors between each module. The PCBs are clearly labelled with the silk screen and have mounting holes for permanent installations:
So after a few minutes of soldering it’s time to get the blinking on:
You may have noticed by now that the master board doesn’t have a USB socket, so you’ll need a 5V FTDI cable or a USBasp programmer to upload your Arduino sketches or AVR .hex file to get things moving.
Controlling a matrix or more
As the system is basically an Arduino-compatible with one or more MAX7219-compatible modules you can find all sorts of example sketches to experiment with. If you haven’t used a MAX7219/AS1107 before there are a couple of starting points including the Arduino library and another random tutorial. Using an example sketch on the Arduino forum by member “danigom“, and after checking the data, clock and load pins it was ready to go. Here’s the sketch for your consideration:
/* Program is currently hard coded to drive 4x MAX7219 chips
   though altering code to drive upto 7 chips is trivial
   Orginal sketch by Arduino forum member "danigom"
   http://forum.arduino.cc/index.php?action=profile;u=188950
*/

//We always have to include the libraries
#include <avr/pgmspace.h>
#include <LedControl.h>

// *CONSTANTS
const int DIN = 12;            //DataIn pin (18)
const int CLK = 11;            //Clock pin (17)
const int LOAD = 10;           //Load pin (16)
const int numDevices = 2;      //Number of MAX7219 LED Driver Chips (1-8)
const long scrollDelay = 70;

prog_uchar font5x7 [] PROGMEM = {      //Numeric Font Matrix (Arranged as 7x font data + 1x kerning data)
    B00000000,	//Space (Char 0x20)
    B00000000,
    B00000000,
    B00000000,
    B00000000,
    B00000000,
    B00000000,
    6,

    B10000000,	//!
    B10000000,
    B10000000,
    B10000000,
    B00000000,
    B00000000,
    B10000000,
    2,

    B10100000,	//"
    B10100000,
    B10100000,
    B00000000,
    B00000000,
    B00000000,
    B00000000,
    4,

    B01010000,	//#
    B01010000,
    B11111000,
    B01010000,
    B11111000,
    B01010000,
    B01010000,
    6,

    B00100000,	//$
    B01111000,
    B10100000,
    B01110000,
    B00101000,
    B11110000,
    B00100000,
    6,

    B11000000,	//%
    B11001000,
    B00010000,
    B00100000,
    B01000000,
    B10011000,
    B00011000,
    6,

    B01100000,	//&
    B10010000,
    B10100000,
    B01000000,
    B10101000,
    B10010000,
    B01101000,
    6,

    B11000000,	//'
    B01000000,
    B10000000,
    B00000000,
    B00000000,
    B00000000,
    B00000000,
    3,

    B00100000,	//(
    B01000000,
    B10000000,
    B10000000,
    B10000000,
    B01000000,
    B00100000,
    4,

    B10000000,	//)
    B01000000,
    B00100000,
    B00100000,
    B00100000,
    B01000000,
    B10000000,
    4,

    B00000000,	//*
    B00100000,
    B10101000,
    B01110000,
    B10101000,
    B00100000,
    B00000000,
    6,

    B00000000,	//+
    B00100000,
    B00100000,
    B11111000,
    B00100000,
    B00100000,
    B00000000,
    6,

    B00000000,	//,
    B00000000,
    B00000000,
    B00000000,
    B11000000,
    B01000000,
    B10000000,
    3,

    B00000000,	//-
    B00000000,
    B11111000,
    B00000000,
    B00000000,
    B00000000,
    B00000000,
    6,

    B00000000,	//.
    B00000000,
    B00000000,
    B00000000,
    B00000000,
    B11000000,
    B11000000,
    3,

    B00000000,	///
    B00001000,
    B00010000,
    B00100000,
    B01000000,
    B10000000,
    B00000000,
    6,

    B01110000,	//0
    B10001000,
    B10011000,
    B10101000,
    B11001000,
    B10001000,
    B01110000,
    6,

    B01000000,	//1
    B11000000,
    B01000000,
    B01000000,
    B01000000,
    B01000000,
    B11100000,
    4,

    B01110000,	//2
    B10001000,
    B00001000,
    B00010000,
    B00100000,
    B01000000,
    B11111000,
    6,

    B11111000,	//3
    B00010000,
    B00100000,
    B00010000,
    B00001000,
    B10001000,
    B01110000,
    6,

    B00010000,	//4
    B00110000,
    B01010000,
    B10010000,
    B11111000,
    B00010000,
    B00010000,
    6,

    B11111000,	//5
    B10000000,
    B11110000,
    B00001000,
    B00001000,
    B10001000,
    B01110000,
    6,

    B00110000,	//6
    B01000000,
    B10000000,
    B11110000,
    B10001000,
    B10001000,
    B01110000,
    6,

    B11111000,	//7
    B10001000,
    B00001000,
    B00010000,
    B00100000,
    B00100000,
    B00100000,
    6,

    B01110000,	//8
    B10001000,
    B10001000,
    B01110000,
    B10001000,
    B10001000,
    B01110000,
    6,

    B01110000,	//9
    B10001000,
    B10001000,
    B01111000,
    B00001000,
    B00010000,
    B01100000,
    6,

    B00000000,	//:
    B11000000,
    B11000000,
    B00000000,
    B11000000,
    B11000000,
    B00000000,
    3,

    B00000000,	//;
    B11000000,
    B11000000,
    B00000000,
    B11000000,
    B01000000,
    B10000000,
    3,

    B00010000,	//<
    B00100000,
    B01000000,
    B10000000,
    B01000000,
    B00100000,
    B00010000,
    5,

    B00000000,	//=
    B00000000,
    B11111000,
    B00000000,
    B11111000,
    B00000000,
    B00000000,
    6,

    B10000000,	//>
    B01000000,
    B00100000,
    B00010000,
    B00100000,
    B01000000,
    B10000000,
    5,

    B01110000,	//?
    B10001000,
    B00001000,
    B00010000,
    B00100000,
    B00000000,
    B00100000,
    6,

    B01110000,	//@
    B10001000,
    B00001000,
    B01101000,
    B10101000,
    B10101000,
    B01110000,
    6,

    B01110000,	//A
    B10001000,
    B10001000,
    B10001000,
    B11111000,
    B10001000,
    B10001000,
    6,

    B11110000,	//B
    B10001000,
    B10001000,
    B11110000,
    B10001000,
    B10001000,
    B11110000,
    6,

    B01110000,	//C
    B10001000,
    B10000000,
    B10000000,
    B10000000,
    B10001000,
    B01110000,
    6,

    B11100000,	//D
    B10010000,
    B10001000,
    B10001000,
    B10001000,
    B10010000,
    B11100000,
    6,

    B11111000,	//E
    B10000000,
    B10000000,
    B11110000,
    B10000000,
    B10000000,
    B11111000,
    6,

    B11111000,	//F
    B10000000,
    B10000000,
    B11110000,
    B10000000,
    B10000000,
    B10000000,
    6,

    B01110000,	//G
    B10001000,
    B10000000,
    B10111000,
    B10001000,
    B10001000,
    B01111000,
    6,

    B10001000,	//H
    B10001000,
    B10001000,
    B11111000,
    B10001000,
    B10001000,
    B10001000,
    6,

    B11100000,	//I
    B01000000,
    B01000000,
    B01000000,
    B01000000,
    B01000000,
    B11100000,
    4,

    B00111000,	//J
    B00010000,
    B00010000,
    B00010000,
    B00010000,
    B10010000,
    B01100000,
    6,

    B10001000,	//K
    B10010000,
    B10100000,
    B11000000,
    B10100000,
    B10010000,
    B10001000,
    6,

    B10000000,	//L
    B10000000,
    B10000000,
    B10000000,
    B10000000,
    B10000000,
    B11111000,
    6,

    B10001000,	//M
    B11011000,
    B10101000,
    B10101000,
    B10001000,
    B10001000,
    B10001000,
    6,

    B10001000,	//N
    B10001000,
    B11001000,
    B10101000,
    B10011000,
    B10001000,
    B10001000,
    6,

    B01110000,	//O
    B10001000,
    B10001000,
    B10001000,
    B10001000,
    B10001000,
    B01110000,
    6,

    B11110000,	//P
    B10001000,
    B10001000,
    B11110000,
    B10000000,
    B10000000,
    B10000000,
    6,

    B01110000,	//Q
    B10001000,
    B10001000,
    B10001000,
    B10101000,
    B10010000,
    B01101000,
    6,

    B11110000,	//R
    B10001000,
    B10001000,
    B11110000,
    B10100000,
    B10010000,
    B10001000,
    6,

    B01111000,	//S
    B10000000,
    B10000000,
    B01110000,
    B00001000,
    B00001000,
    B11110000,
    6,

    B11111000,	//T
    B00100000,
    B00100000,
    B00100000,
    B00100000,
    B00100000,
    B00100000,
    6,

    B10001000,	//U
    B10001000,
    B10001000,
    B10001000,
    B10001000,
    B10001000,
    B01110000,
    6,

    B10001000,	//V
    B10001000,
    B10001000,
    B10001000,
    B10001000,
    B01010000,
    B00100000,
    6,

    B10001000,	//W
    B10001000,
    B10001000,
    B10101000,
    B10101000,
    B10101000,
    B01010000,
    6,

    B10001000,	//X
    B10001000,
    B01010000,
    B00100000,
    B01010000,
    B10001000,
    B10001000,
    6,

    B10001000,	//Y
    B10001000,
    B10001000,
    B01010000,
    B00100000,
    B00100000,
    B00100000,
    6,

    B11111000,	//Z
    B00001000,
    B00010000,
    B00100000,
    B01000000,
    B10000000,
    B11111000,
    6,

    B11100000,	//[
    B10000000,
    B10000000,
    B10000000,
    B10000000,
    B10000000,
    B11100000,
    4,

    B00000000,	//(Backward Slash)
    B10000000,
    B01000000,
    B00100000,
    B00010000,
    B00001000,
    B00000000,
    6,

    B11100000,	//]
    B00100000,
    B00100000,
    B00100000,
    B00100000,
    B00100000,
    B11100000,
    4,

    B00100000,	//^
    B01010000,
    B10001000,
    B00000000,
    B00000000,
    B00000000,
    B00000000,
    6,

    B00000000,	//_
    B00000000,
    B00000000,
    B00000000,
    B00000000,
    B00000000,
    B11111000,
    6,

    B10000000,	//`
    B01000000,
    B00100000,
    B00000000,
    B00000000,
    B00000000,
    B00000000,
    4,

    B00000000,	//a
    B00000000,
    B01110000,
    B00001000,
    B01111000,
    B10001000,
    B01111000,
    6,

    B10000000,	//b
    B10000000,
    B10110000,
    B11001000,
    B10001000,
    B10001000,
    B11110000,
    6,

    B00000000,	//c
    B00000000,
    B01110000,
    B10001000,
    B10000000,
    B10001000,
    B01110000,
    6,

    B00001000,	//d
    B00001000,
    B01101000,
    B10011000,
    B10001000,
    B10001000,
    B01111000,
    6,

    B00000000,	//e
    B00000000,
    B01110000,
    B10001000,
    B11111000,
    B10000000,
    B01110000,
    6,

    B00110000,	//f
    B01001000,
    B01000000,
    B11100000,
    B01000000,
    B01000000,
    B01000000,
    6,

    B00000000,	//g
    B01111000,
    B10001000,
    B10001000,
    B01111000,
    B00001000,
    B01110000,
    6,

    B10000000,	//h
    B10000000,
    B10110000,
    B11001000,
    B10001000,
    B10001000,
    B10001000,
    6,

    B01000000,	//i
    B00000000,
    B11000000,
    B01000000,
    B01000000,
    B01000000,
    B11100000,
    4,

    B00010000,	//j
    B00000000,
    B00110000,
    B00010000,
    B00010000,
    B10010000,
    B01100000,
    5,

    B10000000,	//k
    B10000000,
    B10010000,
    B10100000,
    B11000000,
    B10100000,
    B10010000,
    5,

    B11000000,	//l
    B01000000,
    B01000000,
    B01000000,
    B01000000,
    B01000000,
    B11100000,
    4,

    B00000000,	//m
    B00000000,
    B11010000,
    B10101000,
    B10101000,
    B10001000,
    B10001000,
    6,

    B00000000,	//n
    B00000000,
    B10110000,
    B11001000,
    B10001000,
    B10001000,
    B10001000,
    6,

    B00000000,	//o
    B00000000,
    B01110000,
    B10001000,
    B10001000,
    B10001000,
    B01110000,
    6,

    B00000000,	//p
    B00000000,
    B11110000,
    B10001000,
    B11110000,
    B10000000,
    B10000000,
    6,

    B00000000,	//q
    B00000000,
    B01101000,
    B10011000,
    B01111000,
    B00001000,
    B00001000,
    6,

    B00000000,	//r
    B00000000,
    B10110000,
    B11001000,
    B10000000,
    B10000000,
    B10000000,
    6,

    B00000000,	//s
    B00000000,
    B01110000,
    B10000000,
    B01110000,
    B00001000,
    B11110000,
    6,

    B01000000,	//t
    B01000000,
    B11100000,
    B01000000,
    B01000000,
    B01001000,
    B00110000,
    6,

    B00000000,	//u
    B00000000,
    B10001000,
    B10001000,
    B10001000,
    B10011000,
    B01101000,
    6,

    B00000000,	//v
    B00000000,
    B10001000,
    B10001000,
    B10001000,
    B01010000,
    B00100000,
    6,

    B00000000,	//w
    B00000000,
    B10001000,
    B10101000,
    B10101000,
    B10101000,
    B01010000,
    6,

    B00000000,	//x
    B00000000,
    B10001000,
    B01010000,
    B00100000,
    B01010000,
    B10001000,
    6,

    B00000000,	//y
    B00000000,
    B10001000,
    B10001000,
    B01111000,
    B00001000,
    B01110000,
    6,

    B00000000,	//z
    B00000000,
    B11111000,
    B00010000,
    B00100000,
    B01000000,
    B11111000,
    6,

    B00100000,	//{
    B01000000,
    B01000000,
    B10000000,
    B01000000,
    B01000000,
    B00100000,
    4,

    B10000000,	//|
    B10000000,
    B10000000,
    B10000000,
    B10000000,
    B10000000,
    B10000000,
    2,

    B10000000,	//}
    B01000000,
    B01000000,
    B00100000,
    B01000000,
    B01000000,
    B10000000,
    4,

    B00000000,	//~
    B00000000,
    B00000000,
    B01101000,
    B10010000,
    B00000000,
    B00000000,
    6,

    B01100000,	// (Char 0x7F)
    B10010000,
    B10010000,
    B01100000,
    B00000000,
    B00000000,
    B00000000,
    5
};

prog_uchar scrollText[] PROGMEM ={
    "  THE QUICK BROWN FOX JUMPED OVER THE LAZY DOG 1234567890 the quick brown fox jumped over the lazy dog   \0"};

// * GLOBAL VARIABLES
unsigned long bufferLong [14] = {0};  //Buffer for scrolling text
LedControl lc=LedControl(DIN,CLK,LOAD,numDevices);

void setup(){
    for (int x=0; x<numDevices; x++){
        lc.shutdown(x,false);       //The MAX72XX is in power-saving mode on startup
        lc.setIntensity(x,8);       // Set the brightness to default value
        lc.clearDisplay(x);         // and clear the display
    }
}

void loop(){
    scrollMessage(scrollText);
    scrollFont();
}

void scrollFont() {
    for (int counter=0x20;counter<0x80;counter++){
        loadBufferLong(counter);
        delay(500);
    }
}

// Scroll Message
void scrollMessage(prog_uchar * messageString) {
    int counter = 0;
    int myChar=0;
    do {
        // read back a char
        myChar =  pgm_read_byte_near(messageString + counter);
        if (myChar != 0){
            loadBufferLong(myChar);
        }
        counter++;
    }
    while (myChar != 0);
}
// Load character into scroll buffer
void loadBufferLong(int ascii){
    if (ascii >= 0x20 && ascii <=0x7f){
        for (int a=0;a<7;a++){                      // Loop 7 times for a 5x7 font
            unsigned long c = pgm_read_byte_near(font5x7 + ((ascii - 0x20) * 8) + a);     // Index into character table to get row data
            unsigned long x = bufferLong [a*2];     // Load current scroll buffer
            x = x | c;                              // OR the new character onto end of current
            bufferLong [a*2] = x;                   // Store in buffer
        }
        byte count = pgm_read_byte_near(font5x7 +((ascii - 0x20) * 8) + 7);     // Index into character table for kerning data
        for (byte x=0; x<count;x++){
            rotateBufferLong();
            printBufferLong();
            delay(scrollDelay);
        }
    }
}
// Rotate the buffer
void rotateBufferLong(){
    for (int a=0;a<7;a++){                      // Loop 7 times for a 5x7 font
        unsigned long x = bufferLong [a*2];     // Get low buffer entry
        byte b = bitRead(x,31);                 // Copy high order bit that gets lost in rotation
        x = x<<1;                               // Rotate left one bit
        bufferLong [a*2] = x;                   // Store new low buffer
        x = bufferLong [a*2+1];                 // Get high buffer entry
        x = x<<1;                               // Rotate left one bit
        bitWrite(x,0,b);                        // Store saved bit
        bufferLong [a*2+1] = x;                 // Store new high buffer
    }
}
// Display Buffer on LED matrix
void printBufferLong(){
  for (int a=0;a<7;a++){                    // Loop 7 times for a 5x7 font
    unsigned long x = bufferLong [a*2+1];   // Get high buffer entry
    byte y = x;                             // Mask off first character
    lc.setRow(3,a,y);                       // Send row to relevent MAX7219 chip
    x = bufferLong [a*2];                   // Get low buffer entry
    y = (x>>24);                            // Mask off second character
    lc.setRow(2,a,y);                       // Send row to relevent MAX7219 chip
    y = (x>>16);                            // Mask off third character
    lc.setRow(1,a,y);                       // Send row to relevent MAX7219 chip
    y = (x>>8);                             // Mask off forth character
    lc.setRow(0,a,y);                       // Send row to relevent MAX7219 chip
  }
}
In the following video you can see the sketch in action with two and one matrix modules:
Where to from here?
The matrix modules can find a wide range of uses, from simple fun and scrolling text to various LED matrix games, status displays and more. They also work well with the XOBXOB IoT USB-connected example. The design files are available for perusal on the friedcircuits github page. And don’t forget the matrix master board in itself is a tiny Arduino-compatible – with the full eight ADCs and digital I/O pins available. Thus you can embed this in another project if so desired.
Conclusion
The LED matrix modules are simple to use and work well together. Plus the matrix master board makes for a neat little Arduino-compatible as well. For more information and to order, visit the friedcircuits.us website. Full-sized images are on flickr. And if you made it this far – check out my new book “Arduino Workshop” from No Starch Press.
In the meanwhile have fun and keep checking into tronixstuff.com. Why not follow things on twitter, Google+, subscribe for email updates or RSS using the links on the right-hand column? And join our friendly Google Group – dedicated to the projects and related items on this website. Sign up – it’s free, helpful to each other – and we can all learn something.
[Note - kits reviewed were a promotional consideration from friedcircuits]
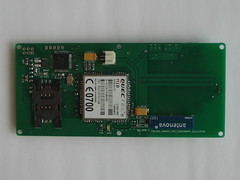
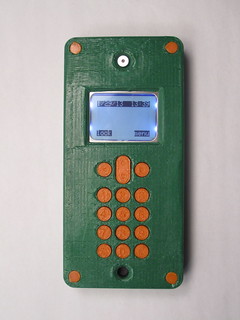
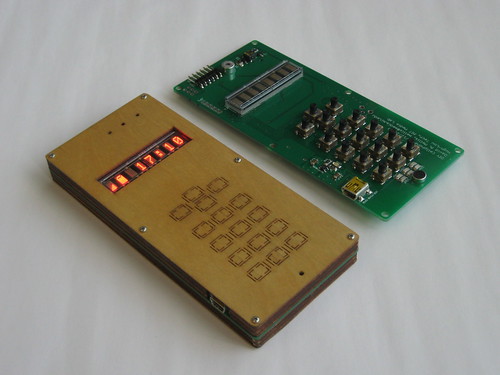
For a little over a year, I’ve been working on an open-source, DIY cellphone as part of my PhD research at the MIT Media Lab. The current version of the phone is based on the Arduino GSM shield and Arduino GSM library. It sports a deliberately low-resolution screen (8 characters, each a 5×7 matrix of LEDs), a laser-cut wooden enclosure, flexure (living hinge) buttons, and a ~1000-line Arduino program that powers the user interface. The phone can make and receive phone calls and text messages, includes a phone book and caller id, and keeps the time. Everything you’d expect from a 20-year old Nokia! (Except snake.) I’ve been using various iterations of the project as my primary cellphone for the past six months or so.
The phone is open-source and the design files are available on GitHub (hardware, software). Assembly instructions are on my website, although I wouldn’t recommend making your own unless you have experience with soldering surface mount components.
Of course, it’s not just me that’s been building these phones. I’ve run twoworkshops in which other people have made them for themselves. A few people have been building them on their own, including someone who posted his result on Twitter.
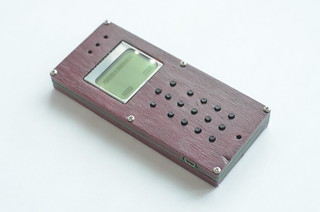
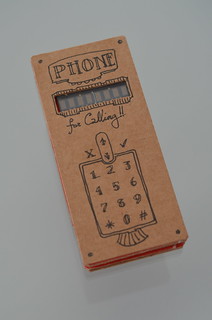
Here you can see some the variations on the enclosure that my friends have made. On the left is a 3d-printed case by Ben Peters, the middle is a CNC-milled purpleheart wood case by Dena Molnar, and on the right is a hand-cut cardboard case by Jeffrey Warren.
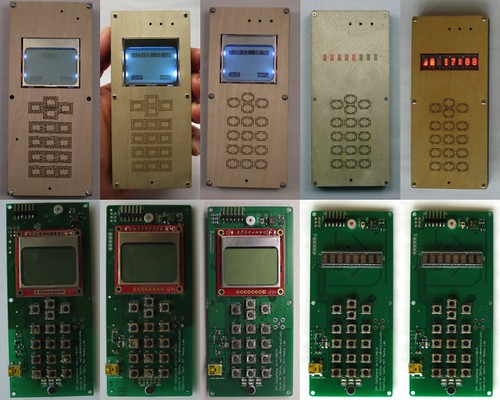
The phone has undergone numerous revisions as I’ve tried to get it into a robust, useable form. Here you can see some of those variations. I started with an LCD screen like those found on old Nokia phones, but it would break after a month or so in my pocket, so I switched to the more-robust LED matrix. The enclosure has had a few tweaks as well, primarily to find a good design for the flexure buttons.
Overall, I’m pretty happy with the current incarnation. It seems to be relatively robust, simple enough to assemble by hand, and functional enough to use everyday (although a long way from a smart phone). That’s my DIY cellphone.
Planet Arduino is, or at the moment is wishing to become, an aggregation of public weblogs from around the world written by people who develop, play, think on Arduino platform and his son. The opinions expressed in those weblogs and hence this aggregation are those of the original authors. Entries on this page are owned by their authors. We do not edit, endorse or vouch for the contents of individual posts. For more information about Arduino please visit www.arduino.cc
You are currently browsing the archives for the matrix category.