Posts | Comments

Planet Arduino

Archive for the ‘Sensor’ Category

There are plenty of PC joysticks out there, but that didn’t stop [dizekat] from building his own. Most joysticks mechanically potentiometers or encoders to measure position. Only a few high-end models use Hall effect sensors. That’s the route [dizekat] took.

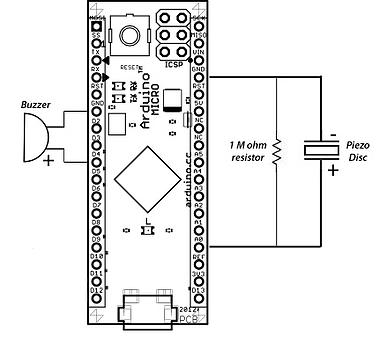
Hall effect sensors are non-contact devices which measure magnetic fields. They can be used to measure the position and orientation of a magnet. That’s exactly how [dizekat] is using a trio of sensors in his design. The core of the joystick is a universal joint from an old R/C car. The center section of the joint (called a spider) has two one millimeter thick disc magnets glued to it. The Hall sensors themselves are mounted in the universal itself. [Dizekat] used a small piece of a chopstick to hold the sensors in position while he found the zero point and glued them in. A third Hall effect sensor is used to measure a throttle stick positioned on the side of the box.

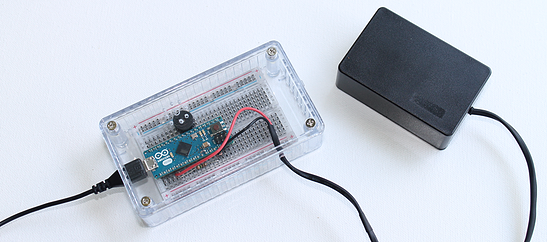
An Arduino micro reads the sensors and converts the analog signal to USB.  The Arduino Joystick Library by [Matthew Heironimus] formats the data into something a PC can understand.

While this is definitely a rough work in progress, we’re excited by how much [dizekat] has accomplished with simple hand tools and glue. You don’t need a 3D printer, laser cutter, and a CNC to pull off an awesome hack!

If you think Hall effect sensors are just for joysticks, you’d be wrong – they work as cameras for imaging magnetic fields too!

From context clues, we can tell that [TVMiller] has been in and around NYC for some time now. He has observed a crucial weakness in the common metropolitan. Namely, they deafen themselves with earphones, leaving them senseless in a hostile environment.

To fix this problem, he came up with a simple hack, the metrophone. An ultrasonic sensor is hung from a backpack. The user’s noise making device of choice is plugged into one end, and the transducer into the other. When the metropolitan is approached from the rear by a stalking tiger or taxi cab, the metrophone will reduce the volume and allow the user to hear and respond to their impending doom. Augmentation successful.

The device itself consists of an off-the-shelf ultrasonic sensor, an Arduino, and a digital potentiometer. It all fits in a custom 3D printed enclosure and runs of two rechargeable coin cells. A simple bit of code scales the volume to the current distance being measured by the ultrasonic sensor once a threshold has been met.

In the video after the break, you can observe [TVMiller]’s recommended method for tranquilizing and equipping a metropolitan in its natural habitat without disturbing its patterns or stressing it unduly.

The HackadayPrize2016 is Sponsored by:

Filed under: Arduino Hacks, robots hacks

An embedded MEMS sensor might be lots of fun to play with on your first foray into the embedded world–why not deploy a whole network of them? Alas, the problem with communicating with a series of identical sensors becomes increasingly complicated as we start needing to handle the details of signal integrity and the communication protocols to handle all that data. Fortunately, [Artem], [Hsin-Liu], and [Joseph] at MIT Media Labs have made sensor deployment as easy as unraveling a strip of tape from your toolkit. They’ve developed SensorTape, an unrollable, deployable network of interconnected IMU and proximity sensors packaged in a familiar form factor of a roll of masking tape.

Possibly the most interesting technical challenge in a string of connected sensor nodes is picking a protocol that will deliver appreciable data rates with low latency. For that task the folks at MIT Media labs picked a combination of I²C and peer-to-peer serial. I²C accomodates the majority of transmissions from master to tape-node slave, but addresses are assigned dynamically over serial via inter-microcontroller communication. The net effect is a fast transfer rate of 100 KHz via I²C with a protocol initialization sequence that accommodates chains of various lengths–up to 128 units long! The full details behind the protocol are in their paper [PDF].

With a system as reconfigurable as SensorTape, new possibilities unfold with a solid framework for deploying sensors and aggregating the data. Have a look at their video after the break to get a sense of some of the use-cases that they’ve uncovered. Beyond their discoveries, there are certainly plenty others. What happens when we spin them up in the dryer, lay them under our car or on the ceiling? These were questions we may never have dreamed up because the tools just didn’t exist! Our props are out to SensorTape for giving us a tool to explore a world of sensor arrays without having to trip over ourselves in the implementation details.

via [CreativeApplications]


Filed under: Arduino Hacks, news

seizurealarm

Chad Herbert’s son Daniel was diagnosed with Benign Rolandic Epilepsy in 2014. It’s a type of epilepsy the Epilepsy Foundation says accounts for about 15 percent of all Epilepsies in children and the good news is that most children grow out of it.

The bad news is that Daniel’s most affected by his condition at night or early morning while he sleeps. That’s why Chad invested in a sleep monitor/alarm for his bed that detects when he’s having a full tonic-clonic seizure.

At the same time though, he decided to work on a DIY version of a seizure alarm  running on Arduino Micro. The starting point was Arduino’s “Knock” example project with the sketch code originally created in 2007 by David Cuartielles and modified by Tom Igoe in 2011:

While shopping around for the exact type of monitor/alarm my wife and I wanted, I found out a few things:

  • They are hard to find. I believe the one we ended up with was manufactured by a company in Great Britain.
  • They are expensive. The one we ended up getting cost in the $400-$500 range.
  • The one we have isn’t totally cumbersome, but it’s not easy to pack up and take with you somewhere.

Figuring these things out, I decided to search for a way to build a simple seizure alam that’s both relatively inexpensive and easy to transport. I’m sure there are people out there who have children that suffer from seizures that simply cannot afford equipment such as this even though they truly need it. Thanks to the folks in the Arduino community, I was able to accomplish both things I was setting out to do.

Discover how it was made on his blog.


seizure2

If someone lobs a grenade, it’s fair to expect that something unpleasant is going to happen. Tear gas grenades are often used by riot police to disperse an unruly crowd, and the military might use a smoke grenade as cover to advance on an armed position, or to mark a location in need of an airstrike. But some gas grenades are meant to help, not hurt, like this talking gas-sensing grenade that’s a 2015 Hackaday Prize entry.

Confined space entry is a particularly dangerous aspect of rescue work, especially in the mining industry. A cave in or other accident can trap not only people, but also dangerous gasses, endangering victims and rescuers alike. Plenty of fancy robots have been developed that can take gas sensors deep into confined spaces ahead of rescuers, but [Eric William] figured out a cheaper way to sniff the air before entering. An MQ2 combination CO, LPG and smoke sensor is interfaced to an Arduino Nano, and a 433MHz transmitter is attached to an output. A little code measures the data from the sensors and synthesizes human voice readings which are fed to the transmitter. The whole package is stuffed into a tough, easily deployed package – a Nerf dog toy! Lobbed into a confined space, the grenade begins squawking its readings out in spoken English, which can be received by any UHF handy-talkie in range. [Eric] reports in the after-break video that he’s received signals over a block away – good standoff distance for a potentially explosive situation.

With the expanding supply of cheap sensors available these days, the possibilities are endless for ideas like this. It wouldn’t be that hard to add temperature, humidity and pressure sensors to the grenade, or maybe even the alcohol and ammonia sensors from this sensor suite. Add in sensors for things like particulates, vibration, and radiation, and pretty soon you’ve got a grenade that could do a lot of good.

The 2015 Hackaday Prize is sponsored by:


Filed under: Arduino Hacks, The Hackaday Prize

If you’ve ever had to move around in a dark room before, you know how frustrating it can be. This is especially true if you are in an unfamiliar place. [Brian] has attempted to help solve this problem by building a vibrating distance sensor that is intuitive to use.

The main circuit is rather simple. An Arduino is hooked up to both an ultrasonic distance sensor and a vibrating motor. The distance sensor uses sound to determine the distance of an object by calculating how long it takes for an emitted sound to return to the sensor. The sensor uses sounds that are above the range of human hearing, so no one in the vicinity will hear it. The Arduino then vibrates a motor quickly if the object is very close, or slowly if it is far away. The whole circuit is powered by a 9V battery.

The real trick to this project is that the entire thing is housed inside of an old flashlight. [Brian] used OpenSCAD to design a custom plastic mount. This mount replaces the flashlight lens and allows the ultrasonic sensor to be secured to the front of the flashlight. The flashlight housing makes the device very intuitive to use. You simply point the flashlight in front of you and press the button. Instead of shining a bright light, the flashlight vibrates to let you know if the way ahead is clear. This way the user can more easily navigate around in the dark without the risk of being seen or waking up people in the area.

This reminds us of project Tacit, which used two of these ultrasonic sensors mounted on a fingerless glove.


Filed under: Arduino Hacks
Jun
21

How to use MQ2 Gas Sensor – Arduino Tutorial

arduino, Gas, MQ-2, Sensor Comments Off on How to use MQ2 Gas Sensor – Arduino Tutorial 

FISYBZAIB2BSPGJ.MEDIUM

by codebender_cc @ instructables.com:

The MQ series of gas sensors use a small heater inside with an electro-chemical sensor. They are sensitive for a range of gasses and are used indoors at room temperature. The output is an analog signal and can be read with an analog input of the Arduino.

The MQ-2 Gas Sensor module is useful for gas leakage detecting in home and industry. It can detect LPG, i-butane, propane, methane ,alcohol, hydrogen and smoke.

Some modules have a built-in variable resistor to adjust the sensitivity of the sensor.

How to use MQ2 Gas Sensor – Arduino Tutorial – [Link]

Jun
18

Arduino Thermometer With LM35

arduino, LM35, Sensor, thermometer Comments Off on Arduino Thermometer With LM35 

FIR8OU1IAY1NUSM.MEDIUM

by PowerBot @ instructables.com:

Hello, everyone !!! Today I’m going to show you how to make thermometer with Arduino and LM35 termperature sensor, builded on bread board and conected together with jumpers (bunch of cables :D).

Arduino Thermometer With LM35 – [Link]

Jun
12

Simple Distance Measuring Device

arduino, distance, HC-SR04, Sensor, ultrasonic Comments Off on Simple Distance Measuring Device 

FTME804IAQMBK1W.MEDIUM

by Samuel_Alexander @ instructables.com:

In this project we are going to learn how to use the HC-SR04 PING))) ultrasonic sensor to measure distance. This sensor is also often used on robots to detect obstacles.

Simple Distance Measuring Device – [Link]

Step18One of our prime passions is to motivate the next great minds and ideas by posting informative step-by-step tutorials. To celebrate the launch of our fourth-generation muscle sensor, the MyoWare, we’ve put together a tutorial that will make you go berserk! This tutorial will teach you to build bionic claws using […]

Read more on MAKE

The post 3D Printed Bionic Claws with MyoWare Muscle Sensors appeared first on Make:.


  • Newsletter

    Sign up for the PlanetArduino Newsletter, which delivers the most popular articles via e-mail to your inbox every week. Just fill in the information below and submit.

  • Like Us on Facebook