
Jan
31
31

Arduino and Silicon Labs are teaming up to make it easier to use the Matter protocol...
The post Arduino and Silicon Labs Collaborate to Embed Matter Protocol into Arduino IDE appeared first on Electronics-Lab.com.
Arduino and Silicon Labs are teaming up to make it easier to use the Matter protocol...
The post Arduino and Silicon Labs Collaborate to Embed Matter Protocol into Arduino IDE appeared first on Electronics-Lab.com.
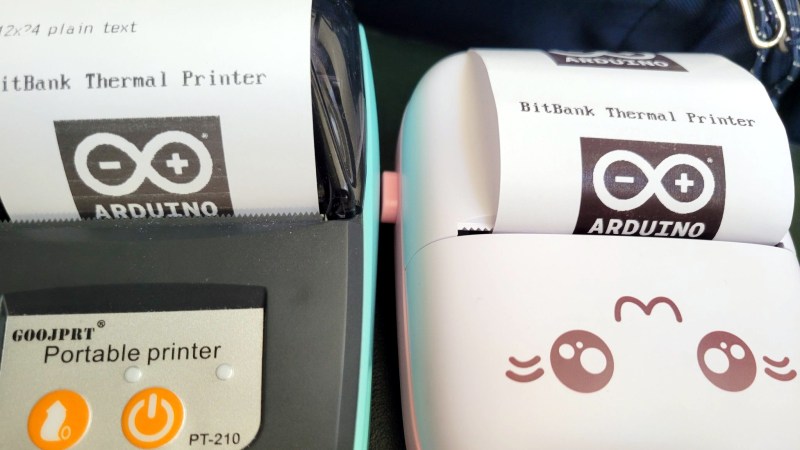
[Larry Bank]’s Arduino library to print text and graphics on BLE (Bluetooth Low Energy) thermal printers has some excellent features, and makes sending wireless print jobs to a number of common models about as easy as can be. These printers are small, inexpensive, and wireless. That’s a great mix that makes them attractive for projects that would benefit from printing out a hardcopy.
It’s not limited to simple default text, either. Fancier output can be done using Adafruit_GFX library-style fonts and options, which sends the formatted text as graphics. You can read all about what the library can do in this succinct list of concise functions.
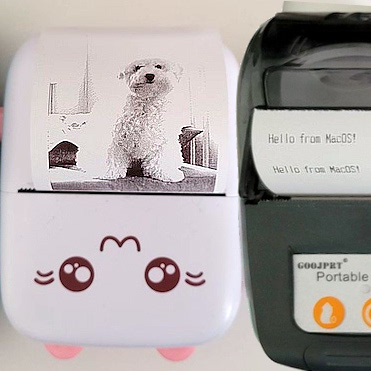
But [Larry] hasn’t stopped there. While experimenting with microcontrollers and BLE thermal printers, he also wanted to explore talking to these printers from his Mac using BLE directly. Print2BLE is a MacOS application that allows dragging image files into the application’s window, and if the preview looks good, the print button makes it come out of the printer as a 1-bpp dithered image.
Small thermal printers make for neat projects, like this retrofitted Polaroid camera, and now that these little printers are both wireless and economical, things can only get easier with the help of a library like this. Of course, if that’s all starting to look a little too easy, one can always put the thermal back in thermal printing by using plasma, instead.
dropController has the kind of documentation we wish would spontaneously generate itself whenever we build something. [Martyn Currey] built a robust rig for water droplet photography, and we don’t want to dismiss the hardware, but the most impressive part might be the website. It might not be very fancy, but it’s thorough and logically organized. You can find parts lists, assembly manuals, tutorials, sketches, and schematics. If only all the projects that came our way were so well detailed.
Water droplet photography is pretty cool, although freehanding it will make your patience fall faster than 9.81 m/s². The concept is that a solenoid valve will flicker open to release a drop of water, wait for a certain number of microseconds, and then trigger your DSLR via a wired remote cable. The tricky part comes from controlling as many as six valves and three flashes. We don’t have enough fingers and toes to press all those buttons.
The bill of materials contains many commonly available parts like an Arduino Nano, an LM2596 voltage regulator, some MOSFETS, an HC-06 Bluetooth module, plus standard audio connectors to hook everything up. Nothing should break the bank, but if money is not an issue, [Martyn] sells kits and complete units.
Waterdrop controllers are not the newest kids on the block, and strobe photography is a time-honored tradition.
All pictures credits are to [Martyn Currey].
Over the last several months, [Aaron Christophel] has been working on creating a custom firmware for cheap fitness trackers. His current target is the “D6 Tracker” from a company called MPOW, which can be had for as little as $7 USD. The ultimate goal is to make it so anyone will be able to write their own custom firmware for this gadget using the Arduino IDE, and with the release of his new Android application that allows wirelessly flashing the device’s firmware, it seems like he’s very close to realizing that dream.
Previously, [Aaron] had to crack open the trackers and physically connect a programmer to update the firmware on the NRF52832-based devices. That might not be a big deal for the accomplished hardware hacker, but it’s a bit of a hard sell for somebody who just wants to see their own Arduino code running on it. But with this new tool, he’s made it so you can easily switch back and forth between custom and original firmware on the D6 without even having to take it off your wrist.
After the break, you can see the video that [Aaron] has put together which talks about the process of flashing a new firmware image. It’s all very straightforward: you simply pick the device from the list of detected BLE devices, the application puts the tracker into bootloader mode, and then you select the DFU file you want to flash.
There are a couple of ready-made firmwares you can put on the D6 right now, but where’s the fun in that? [Aaron] has put together a customized version of the Arduino IDE that provides everything you need to start writing and flashing your own firmware. If you’ve ever dreamed about creating a wearable device that works exactly the way you want, it’s hard to imagine a cheaper or easier way to get in on the action.
When we last heard from [Aaron] earlier this year, he was working on the IWOWN I6HRC tracker. But it looks like the availability of those devices has since dried up. So if you’re going to try your hand at hacking the MPOW D6, it might be wise to buy a few now while they’re still cheap and easy to find.
Considering their hardware specification, graphing calculators surely feel like an anachronism in 2019. There are plenty of apps and other software available for that nowadays, and despite all preaching by our teachers, we actually do carry calculators with us every day. On the other hand, never underestimate the power of muscle memory when using physical knobs and buttons instead of touch screen or mouse input. [epostkastl] combined the best of both worlds and turned his broken HP-48 into a Bluetooth LE keyboard to get the real feel with its emulated counterpart.
Initially implemented as USB device, [epostkastl] opted for a wireless version this time, and connected an nRF52 based Adafruit Feather board to the HP-48’s conveniently exposed button matrix pins. For the software emulation side, he uses the Emu48, an open source HP calculator emulator for Windows and Android. The great thing about Emu84 is that it supports fully customizable mappings of regular keyboard events to the emulated buttons, so you can easily map, say, the cosine button to the [C] key. The rest is straight forward: scanning the button matrix detects button presses, maps them to a key event, and sends it as a BLE HID event to the receiving side running Emu84.
As this turns [epostkastl]’s HP-48 essentially into a regular wireless keyboard in a compact package — albeit with a layout that outshines every QWERTY vs Dvorak debate. It can of course also find alternative use cases, for examples as media center remote control, or a shortcut keyboard. After all, we’ve seen the latter one built as stomp boxes and from finger training devices before, so why not a calculator?
This post is from Martino Facchin, who is in charge of the firmware development team at Arduino. Hopefully this is the first of a series of posts describing the inner workings of what we do.

The new, shiny and tiny Nano 33 BLE and Nano 33 BLE Sense are on their way to becoming a serious threat to any hacker’s summer vacation. (I’d recommend spending a couple of days at the lake or beach anyway despite the board’s awesomeness!)
Quoting Sir Isaac Newton (who walked the same streets of Cambridge, UK that the Arm engineers use to get to work everyday), starting from scratch is not always a clever idea. Tens of thousands of man-hours have been spent since the beginning of computer science to reinvent the wheel, sometimes with great results, other times just bringing more fragmentation and confusion.
Since we didn’t have an official Arduino core for the Nordic nRF52840 Cortex-M4 microcontroller, which the Nano 33 BLE and Nano BLE Sense are based upon, we took a look at the various alternatives:
Option one looks juicy but clashes with a cornerstone of Arduino: open-source software. In fact, softdevice’s closed source approach limits the user’s freedom.
Option two would take a lot of burden on our shoulders for a single board, making the core not very reusable.
So, we went to option three: basing the core on Mbed OS foundation, sharing its drivers and libraries.
As many of you may know, Mbed is a fully preemptive RTOS (real-time operating system), meaning you can run multiple “programs” (more specifically, threads) at the same time, much like what happens in your notebook or smartphone. At Arduino, we have been looking for an RTOS to use on our more advanced boards for a long time but we never found something we liked until we started working with the Mbed OS. Programming an RTOS is usually quite complicated (every university grade course on operating systems will be full of frightening terms like ‘mutex’ and ‘starvation’), but you don’t have to worry if you just want to use it as an Arduino; setup() and loop() are in their usual place, and nobody will mess with your program while it’s running.
But if you want to do MORE, all Mbed infrastructure is there, hidden under the mbed:: namespace. As a side effect of reusing its drivers, we can now support every Mbed board in Arduino with minimal to no effort. Plus, the structure of the core allows any Mbed developer to use Arduino functions and libraries, simply by prepending arduino:: before the actual function call.
Mbed also supports tickless mode; in this way, every time you write delay() in your code, the board will try to go in low power modes, knowing exactly when to wake up for the next scheduled event (or any external interrupt). We are able to achieve an impressive 4.5uA of lower consumption while running a plain old Blink on the Nano 33 BLE (a minimal hardware modification is needed to obtain this value but another blog post is coming). As for Bluetooth support, you can start creating your BLE devices today using the wonderful https://github.com/arduino-libraries/ArduinoBLE but we support plain Cordio APIs as well, in case you need features not yet available in Arduino BLE.
And of course, it’s all open-source!
If you just want to make awesome projects with its plethora of onboard sensors, fire up your Arduino IDE, open the board manager and search for Nano 33 BLE; one click and you are ready to go!
If you want to hack the core, add another Mbed board or merely take a look, your next entry point is the GitHub repo. Don’t be shy if you find a bug or have a suggestion; we love our community, and will try to be as responsive as possible.
As has been made abundantly clear by the advertising department of essentially every consumer electronics manufacturer on the planet: everything is improved by the addition of sensors and a smartphone companion app. Doesn’t matter if it’s your thermostat or your toilet, you absolutely must know at all times that it’s operating at peak efficiency. But why stop at household gadgets? What better to induct into the Internet of Things than 600 year old samurai weaponry?
 Introducing the eKatana by [Carlos Justiniano]: by adding a microcontroller and accelerometer to the handle of a practice sword, it provides data on the motion of the blade as it’s swung. When accuracy and precision counts in competitive Katana exhibitions, a sword that can give you real time feedback on your performance could be a valuable training aid.
The eKatana is powered by an Adafruit Feather 32u4 Bluefruit LE and LSM9DS0 accelerometer module along with a tiny 110 mAh LiPo battery. Bundled together, it makes for a small and unobtrusive package at the base of the sword’s handle. [Carlos] mentions a 3D printed enclosure of some type would be a logical future improvement, though a practice sword that has a hollow handle to hold the electronics is probably the most ideal solution.
A real-time output of sword rotation, pitch, and heading is sent out by the Adafruit Feather over BLE for analysis by a companion smartphone application. For now he just has a running output of the raw data, but [Carlos] envisions a fully realized application that could provide the user with motions to perform and give feedback on their form.
Incidentally this isn’t the first motion-detecting sword we’ve ever covered, but we think this particular incarnation of the concept might have more practical applications.
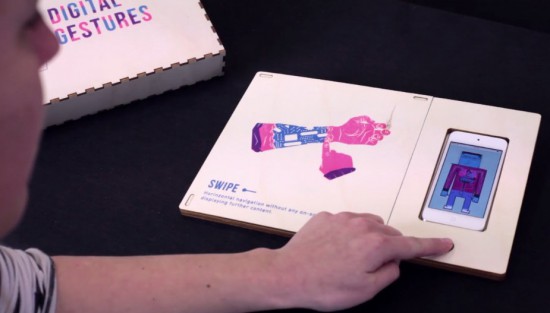
Digital and craft maker lab Tazas recently worked with a group of master students on an interactive book/prototype to reflect on how gestures like swiping have become as natural as shaking hands. Digital Gestures is a metaphor of the human body’s physiological senses, which identifies 10 actions inherent to our daily interactions with technology: drag and drop, spread and squeeze, swipe, double tap, scroll, zoom, rotate, draw, press, press and hold.
The project was brought to life using four basic electronic components and some digital fabrication: a web server (VPS), an AtHeart Blend Micro Bluetooth module linking objects to the elements contained on the server, an iPod Touch connected viewing medium and conductive ink. All the elements are arranged on a laser cut wooden base, while an iPod digitally decrypts the printed* pages filed on its left.
To play, the viewer places an illustrated page on the support and touches a specific key point beforehand determined as conductive. When touching, the viewer has the ability to interact on the screen in order to understand the illustrated use. This experimental reflection raises many questions about the conditioning that man receives from the machine by accepting these precepts without altering their function. What will become of our so-called ‘daily’ gestures? Will our close to real behavioral experiment be upset? Answers that require that ‘use must be done.’
You can see how it magically works below!
Hardware hackers are always looking for devices to tear apart and scavenge from. It’s hardly a secret that purchasing components individually is significantly more expensive than the minuscule cost per unit that goes along with mass manufacturing. Bluetooth devices are no exception. Sure, they’re not exactly a luxury purchase anymore, but they’re still not dirt cheap either.
Luckily for [Troy Denton], it seems dollar stores have started carrying a Bluetooth camera shutter for just a few dollars (it was three bucks, perhaps the dollar store actually means divisible-by). The device is designed to pair with a smart phone, and has two buttons allowing you to control the camera from afar. The fact that it works at all at that price is a small miracle, but the device also has potential for hacking that adds to its appeal.
Inside is a Bluetooth chips with integrated ARM controller. It connects to an EEPROM via I2C. Using an oscilloscope, an Arduino, and a Bus Pirate, [Troy] has so far succeeded in dumping and deciphering the EEPROM and was successful in renaming the device. He has high hopes that he’ll be able to discover something juicy from his preliminary explorations of the USART on the Bluetooth chip.
Ultimately he plans to document his quest to rewrite which keys the device’s buttons emulate. Once that’s accomplished, this dollar store find will have a lot of potential for cheap Bluetooth control. If you’re a reverse engineering veteran we’d love to hear some suggestions of low hanging fruit for him to explore. If you’re eager to learn more about about what you can do with Bluetooth, check out our awesome BLE primer.

 Bluetooth Low-Energy (BLE) is a great bluetooth solution for your electronics product even if energy use isn't a factor.
The post How to Develop a Sellable Bluetooth Low-Energy (BLE) Product appeared first on Make: DIY Projects and Ideas for Makers.
Planet Arduino is, or at the moment is wishing to become, an aggregation of public weblogs from around the world written by people who develop, play, think on Arduino platform and his son. The opinions expressed in those weblogs and hence this aggregation are those of the original authors. Entries on this page are owned by their authors. We do not edit, endorse or vouch for the contents of individual posts. For more information about Arduino please visit www.arduino.cc
You are currently browsing the archives for the BLE category.
 Arduino Blog Make Magazine Blog Hackaday Electronics-Lab Noel Portugal CNX-Software Matthew Rollings Chris Debenham Techatronic Giasone John Boxall Arduino++ Adafruit Blog EngineeringException Mamaus's Blog Tinker Hobby Bits and Pieces Wayne and Layne NerdyTechy Liudr's Blog Steve Marple b7arduino Chipwired Embedded-Lab