Posts | Comments

Planet Arduino

Archive for the ‘load cell’ Category

Some people take their coffee grinding seriously. So what do you do when the hot new grinders automatically weigh coffee, and yours doesn’t? Well, if you are like [Tech Dregs] and the rest of us, you hack your existing grinder, of course. The link is to the source code, but for a quick overview, check out the video below.

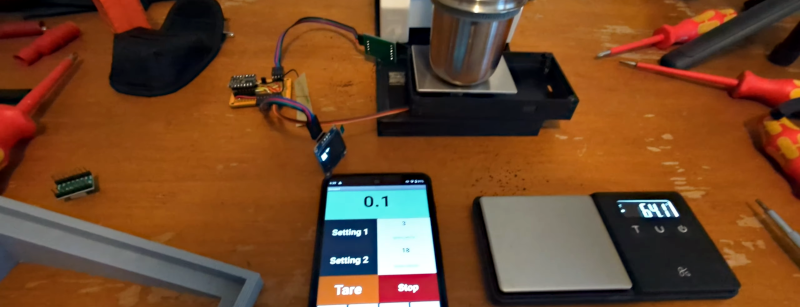
In true hacker fashion, the first order of business was to pull a load cell out of a cheap scale. Originally, he intended to reuse the processor inside, too, but it was epoxied, so it was a good excuse to use some more modules. A load cell amplifier, an OLED display, and a tiny Xiao processor, which he describes as “ridiculous.” From the context, we think he means ridiculously small in the physical sense and ridiculously powerful for such a tiny board.

With the modules, the wiring wasn’t too hard, but you still need some kind of app. Thanks to App Inventor, an Android app was a matter of gluing some blocks together in a GUI. Of course, the devil is in the details, and it took a lot of “focused cursing” to get everything working correctly.

The coffee grinder has a relay to turn the motor on and off, so that’s the point the scale needs to turn the motor on and off. Conveniently, the grinder’s PCB had an unpopulated pin header for just this purpose.

This is one of those simple projects you can use daily if you drink coffee. We are always impressed that the infrastructure exists today and that you can throw something like this together in very little time without much trouble.

WiFi hacking coffee makers is a popular Java project in these parts. Upgrading a machine can get pretty serious with PID control loops and more.
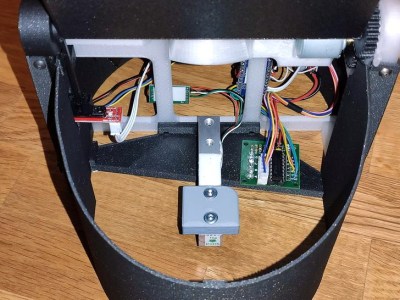

We often like to say that if something is worth doing, then it’s worth overdoing. This automatic cat feeder built by [krizzli] is a perfect example of the principle. It packs in far more sensors and functions than its simple and sleek outward appearance might suggest, to the point that we think this build might just set the standard for future projects.

The defining feature of the project is a load cell located under the bowl, which allows the device to accurately measure out how much feed is being dispensed by weight. This allows the feeder to do things such as detect jams or send an alert once it runs out of food, as well as easily adjust how much is dispensed according to the animal’s dietary needs. To prevent any curious paws from getting into the machine while it’s doling out the food, the lid will automatically open and close during the filling process, complete with optical sensors to confirm that it moved as expected.

All of the major components of the feeder were printed out on a Prusa i3 MK3S, and [krizzli] says that the feed hopper can be scaled vertically if necessary. Though at the current size, it’s already packing around a week’s worth of food. Of course, this does depend on the particular feline you’re dealing with.

In terms of electronics, the feeder’s primary control comes from an ESP8266 (specifically, the Wemos D1 Mini), though [krizzli] also has a Arduino Pro Mini onboard so there’s a few more GPIO pins to play with. The food is dispensed with a NEMA 17, and a 28-BYJ48 stepper is in charge of moving the lid. A small OLED on the side of the feeder gives some basic information like the time until the next feeding and the dispensed weight, but there’s also a simple API that lets you talk to the device over the network. Being online also means the feeder can pull the time from NTP, so kitty’s mealtime will always be on the dot.

Over the years we’ve seen an incredible array of automatic cat feeders, some of which featuring the sort of in-depth metrics possible when you’ve got on onboard scale. But we can’t help but be impressed with how normal this build looks. If nothing else, of all the feeders we’ve seen, this one is probably the most likely to get cloned and sold commercially. They say it’s the most sincere form of flattery.

It always gives us a sense of wonder when we realize that what would be a simple task for a human child is a big deal for a computer. For example, if you asked someone if you or someone else was in bed, that’s a pretty simple thing to check. For you, that is. For a computer, it requires some sort of sensor. [Lewis] used load cells to tell if someone is in a particular bed or not. He uses Home Assistant and has a great post about how he created and interfaced the sensors. Of course, the sensors really only tell you if something heavy is in the bed. It doesn’t know who it is or even that it isn’t an overstuffed suitcase.

Load cells aren’t exactly high tech. There are several different types that use hydraulic pressure or pneumatics to measure force. However, the most common that we encounter use strain gauges. A strain gauge is a resistor that changes value when it deformed and a load cell usually has several strain gauges wired in a bridge configuration so that small forces create larger output changes.

Although a bridge circuit is good for sensitivity, it can be a challenge to measure. [Lewis] used a breakout board with an HX711 amplifier and converter made especially for this purpose. With calibration, the load cells can measure weight accurately, but they are subject to some drift. We suppose if the people usually in your bed have very different weights, you might be able to identify who exactly is in the bed.

The software was simple since the HX711 has an Arduino library available. The hardest part might have been successfully creating a caster for the bed legs to push against the load cells. We saw a bathroom scale built in much the same way a few years ago. Of course, weight isn’t the only force you can measure with a load cell. For example, check out [sbkirby’s] bandsaw.

If you’re into amateur rocketry, you pretty quickly outgrow the dinky little Estes motors that they sell in the toy stores. Many hobbyists move on to building their own homebrew solid rocket motors and experimenting with propellant mixtures, but it’s difficult to know if you’re on the right track unless you have a way to quantify the thrust you’re getting. [ElementalMaker] decided he’d finally hit the point where he needed to put together a low-cost test stand for his motors, and luckily for us decided to document the process and the results.

The heart of the stand is a common load cell (the sort of thing you’d find in a digital scale) coupled with a HX711 amplifier board mounted between two plates, with a small section of vertical PVC pipe attached to the topmost plate to serve as a motor mount. This configuration is capable of measuring up to 10 kilograms with an 80Hz sample rate, which is critically important at this type of rocket motors only burn for a few seconds to begin with. The sensor produces hundreds of data points during the short duration of the build, which is perfect for graphing the motor’s thrust curve over time.

Given such a small window in which to make measurements, [ElementalMaker] didn’t want to leave anything to chance. So rather than manually igniting the motor and triggering the data collection, the stand’s onboard Arduino does both automatically. Pressing the red button on the stand starts a countdown procedure complete with flashing LED, after which a relay is used to energize a nichrome wire “electronic match” stuck inside the motor.

In the video after the break you can see that [ElementalMaker] initially had some trouble getting the Arduino to fire off the igniter, and eventually tracked the issue down to an overabundance of current that was blowing the nichrome wire too fast. Swapping out the big lead acid battery he was originally using with a simple 9V battery solved the problem, and afterwards his first test burns on the stand were complete successes.

If model rockets are your kind of thing, we’ve got plenty of content here to keep you busy. In the past we’ve covered building your own solid rocket motors as well as the electronic igniters to fire them off, and even a wireless test stand that lets you get a bit farther from the action at T-0.

[Thanks to Baldpower for the tip.]

Ever obsessed with stripping the hype from the reality of power tool marketing, and doing so on the cheap, [arduinoversusevil] has come up with a home-brew digital torque meter that does the job of commercial units costing hundreds of times as much.

For those of us used to [AvE]’s YouTube persona, his Instructables post can be a little confusing. No blue smoke is released, nothing is skookum or chowdered, and the weaknesses of specific brands of tools are not hilariously enumerated. For that treatment of this project, you’ll want to see the video after the break. Either way you choose, he shows us how a $6 load cell and a $10 amplifier can be used to accurately measure the torque of your favorite power driver with an Arduino. We’ve seen a few projects based on load cells, like this posture-correcting system, but most of them use the load cell to measure linear forces. [AvE]’s insight that a load cell doesn’t care whether it’s stretched or twisted is the key to making a torque meter that mere mortals can afford.

Looks like low-end load cells might not be up to measuring the output on your high-power pneumatic tools, at least not repeatedly, but they ought to hold up to most electric drivers just fine. And spoiler alert: the Milwaukee driver that [AvE] tested actually lived up to the marketing.


Filed under: Arduino Hacks, tool hacks

SmartLitterBox

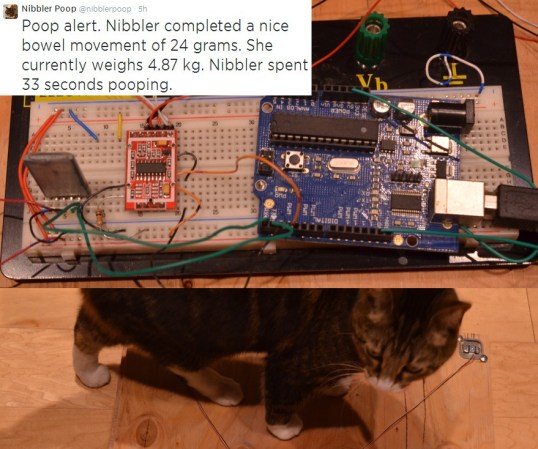
How can you not be interested in a project that uses load cells, Bluetooth, a Raspberry Pi, and Twitter. Even for those of our readers without a cat, [Scott's] tweeting litter box is worth the read.

Each aspect of this project can be re-purposed for almost any application. The inexpensive load cells, which available from eBay and other retailers, is used to sense when a cat is inside the litter box. Typically sensors like the load cell (that contain a strain gauge) this use a Wheatstone bridge, which is very important for maximizing the sensitivity of resistive sensor. The output then goes to a HX711, which is an ADC specifically built for load cells. A simple alternative would be using an instrumentation amplifier and the built-in ADC of the Arduino. Now, the magic happens. The weight reading is transmitted via an HC-06 Bluetooth module to a Raspberry Pi. Using a simple Perl script, the excreted weight, duration, and the cat’s resulting body weight is then tweeted!

Very nice work! This is a well thought out project that we could see being expanded to recognize the difference between multiple cats (or any other animal that goes inside).


Filed under: Arduino Hacks, Raspberry Pi, wireless hacks


  • Newsletter

    Sign up for the PlanetArduino Newsletter, which delivers the most popular articles via e-mail to your inbox every week. Just fill in the information below and submit.

  • Like Us on Facebook