Posts | Comments

Planet Arduino

Archive for the ‘RC’ Category

Oh, dominoes — the fun of knocking them down is inversely proportional to the pain of setting them all up again. [DIY Machines] is saving loads of time by automating the boring part with a remote control domino-laying machine. If only it could pick them back up.
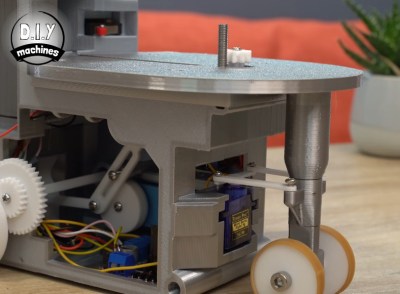
This machine can be driven directly over Bluetooth like an R/C car, or programmed to follow a predetermined path via Arduino code. Here’s how it works: an Arduino Uno drives two servos and one motor. The 1:90 geared motor drives the robot around using a 180° servo to steer. A continuous servo turns the carousel, which holds nearly 140 dominoes. We love that the carousel is designed to be hot-swappable, so you can keep a spare ready to go.

[DIY Machines] really thought of everything. Every dozen or so dominoes, the machine leaves a gap in case one of the dominoes is tipped prematurely. There are also a couple of accessories for it, like a speedy domino loading stick and a fun little staircase bridge to add to your domino creations. Though all the machine files are freely available, [DIY Machines] requests a small donation for the accessories files. Check out the complete build video after the break, followed by a bonus video that focuses on upgrading the machine with an HM10 Bluetooth module for controlling it directly with a phone.

This certainly isn’t the first domino-laying device we’ve seen, though it might be the most accessorized. [Matthias Wandel]’s version uses only one motor to move and deal the dominoes.

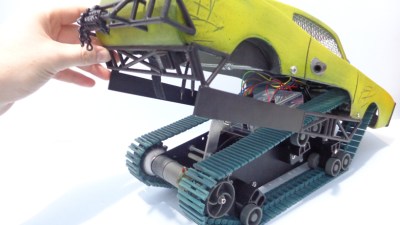
A few years ago, YouTubing madman [Colin Furze] took an old bumper car and made a 600-horsepower beast of a go-kart that managed to clock 100MPH with a headwind. This isn’t that. It’s a miniaturized, remote-control homage to [Colin]’s go-kart that is equally awesome.

[Forsyth Creations] started by CAD-modeling the chassis right on top of a still from the video. The entire body is 3D-printed in four large pieces, which took several days because each piece took around 24 hours. Inside the car there’s an Arduino brain driving a motor in the back and a servo in the front. This bad boy runs on a couple of rechargeable battery packs and can be controlled with either a Wii balance board or a PS2 controller. This thing really moves, although it doesn’t quite reach 100MPH. Watch it zoom around in the video after the break.

Got a Segway lying around that just doesn’t do it for you anymore? You could always turn it into a go-kart. Never had a Segway to begin with? Just roll your own.

[Dickel] always liked tracked vehicles. Taking inspiration from the ‘Peacemaker’ tracked vehicle in Mad Max: Fury Road, he replicated it as the Mad Mech. The vehicle is remote-controlled and the tank treads are partly from a VEX robotics tank tread kit. Control is via a DIY wireless controller using an Arduino and NRF24L01 modules. The vehicle itself uses an Arduino UNO with an L298N motor driver. Power is from three Li-Po cells.

The real artistic work is in the body. [Dickel] used a papercraft tool called Pepakura (non-free software, but this Blender plugin is an alternative free approach) for the design to make the body out of thin cardboard. The cardboard design was then modified to make it match the body of the Peacemaker as much as possible. It was coated in fiberglass for strength, then the rest of the work was done with body filler and sanding for a smooth finish. After a few more details and a good paint job, it was ready to roll.

There’s a lot of great effort that went into this build, and [Dickel] shows his work and process on his project page and in the videos embedded below. The first video shows the finished Mad Mech being taken for some test drives. The second is a montage showing key parts of the build process.

Paper and cardboard are very versatile and accessible materials for making things. It’s what was used to do some target practice with this working paper and cardboard gun. With the right techniques foam core can be worked into an astonishing variety of shapes, and we also made a case for the value of a desktop vinyl cutter on any well-equipped hacker’s workbench.

[Markus Gritsch] and his son had a fun Sunday putting together a little toy airboat from a kit. They fired it up and it occurred to [Markus] that it was pretty lame. It went forward and sometimes sideward when a stray current influenced its trajectory, but it had no will of its own.

The boat was extracted from water before it could wander off and find itself lost forever. [Markus] did a mental inventory of his hacker bench and decided this was a quickly rectified design shortcoming. He applied a cheap knock-off arduino, equally cheap nRF24L01+ chip of dubious parentage, and their equivalent hobby servo to the problem.

Some quick coding later, assisted by prior work from other RC enthusiasts, the little boat was significantly upgraded. Now the boat could be brought back to shore using any R/C controller that supported the, “Bayang,” protocol. He wouldn’t have to face the future in which he’d have to explain to his son that the boat, like treacherous helium balloons, was just gone. Video after the break.


Filed under: Arduino Hacks, toy hacks

RC EyebrowsTurn an old headlamp into a power assist for your eyebrows. Use an infrared remote control to raise, lower, waggle, and adjust.

Read more on MAKE

The post Strap a Robot to Your Face! Your Expressions Are Now Controlled by Technology appeared first on Make: DIY Projects and Ideas for Makers.

The world’s first Android autonomous vehicleLearn how a team of students created the first Google Android-based autonomous R/C car, able to detect lanes, avoid obstacles, self-park, and more.

Read more on MAKE

The post Build Your Own Android-Powered Self Driving R/C Car appeared first on Make: DIY Projects, How-Tos, Electronics, Crafts and Ideas for Makers.

Jul
10

Self-Driving R/C Car Parks Itself Just Like a Lexus

Android, arduino, attiny, autonomous, bluetooth, car, Electronics, motor control IC, RC, Robotics Comments Off on Self-Driving R/C Car Parks Itself Just Like a Lexus 

carSelf-driving cars are in the news almost daily, but they are not exactly in my automotive budget for this decade. Today, that has changed. While this car might be smaller and not capable of giving me a ride, it’s still autonomous and, best of all, it is a project that I […]

Read more on MAKE

The post Self-Driving R/C Car Parks Itself Just Like a Lexus appeared first on Make: DIY Projects, How-Tos, Electronics, Crafts and Ideas for Makers.

Jan
21

3D Print These Custom Cars And Race Them On Your Tabletop

3D printing, 3DHubs, 3DRacers, arduino, DIY Toys, Fun & Games, Open source hardware, Radio Control, RC Comments Off on 3D Print These Custom Cars And Race Them On Your Tabletop 

3D Printed RacersBridging the gap between the virtual world and the real world is a popular topic these days. Augmented reality, Google Cardboard, and games like Skylanders are just a few products that allow us to interact in both the physical and virtual. Now, 3DRacers hope to send your Mario Kart addiction into […]

Read more on MAKE

Gesture Controlled Quadcopter

[grassjelly] has been hard at work building a wearable device that uses gestures to control quadcopter motion. The goal of the project is to design a controller that allows the user to intuitively control the motion of a quadcopter. Based on the demonstration video below, we’d say they hit the nail on the head. The controller runs off an Arduino Pro Mini-5v powered by two small coin cell batteries. It contains an accelerometer and an ultrasonic distance sensor.

The controller allows the quadcopter to mimic the orientation of the user’s hand. The user holds their hand out in front of them, parallel to the floor. When the hand is tilted in any direction, the quadcopter copies the motion and will tilt the same way. The amount of pitch and roll is limited by software, likely preventing the user from over-correcting and crashing the machine. The user can also raise or lower their hand to control the altitude of the copter.

[grassjelly] has made all of the code and schematics available via github.


Filed under: Arduino Hacks, drone hacks


  • Newsletter

    Sign up for the PlanetArduino Newsletter, which delivers the most popular articles via e-mail to your inbox every week. Just fill in the information below and submit.

  • Like Us on Facebook