Posts | Comments

Planet Arduino

Archive for the ‘ATmega’ Category

Jun
11

VGA
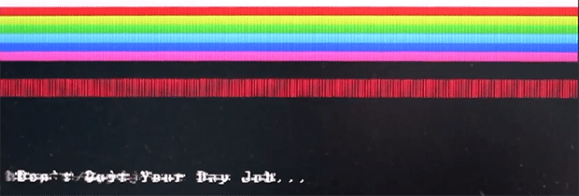
There are dozens, if not hundreds of examples around the Intertubes of an Arduino generating a VGA video output. The Arduino isn’t the fastest chip by far, and so far, all of these VGA generation techniques have peaked out at lower resolutions if you want to control individual pixels.[PK] has an interesting technique to generate 640×480 VGA at 60 frames per second without overclocking. It’s hacky, it’s ugly, but surprisingly, it actually works.

The VGA standard of 640×480 @ 60 fps requires pixels to be clocked out at 25.175 MHz, and the ATMega chips found in Arduinos top out at 20 MHz. [PK] wanted to generate VGA signals without overclocking, He did this by doubling the clock frequency with digital logic. The ATMega generates a clock, an inverter delays that clock so it is 90 degrees out of phase, and the two clocks are XORed, doubling clock output of the micro. It produces a very ugly square wave at 32 MHz – an error of 27% compared to the VGA spec. Somehow it still works.

With a hilariously out of spec clock, the rest of the project was pulled together from [Nick Gammon]‘s VGA library, a 16×16 font set, and a project from [lft]. Video below.


Filed under: Arduino Hacks
Mar
27

What is Arduino – Introduction to Arduino for Beginners

arduino, ARM, ATmega Comments Off on What is Arduino – Introduction to Arduino for Beginners 

Arduino-Uno-Photograph

In this article, circuitstoday.com explain the basics surrounding arduino. As the title indicates, this article is for absolute beginners in the world of electronics and for people who are beginning with arduino boards.

Arduino is an electronics prototyping platform based on a micro controller. Arduino boards are usually made using Atmel’s Atmega series micro controllers or ARM micro controllers. Arduino is an open source hardware project which means the designs of board (the hardware architecture, CAD files) are available to public with open source license. Anyone can modify the hardware designs and the associated software.

What is Arduino – Introduction to Arduino for Beginners - [Link]

En la anterior entrada he hablado de como convertir una pantalla LCD para comunicarse con nuestras placas Arduino a través del protocolo de comunicación I2C, la cual podéis ver aquí. Entonces decidí investigar acerca de como realizar un teclado I2C para poder trabajar con nuestro Arduino sin necesidad de utilizar un montón de pines digitales, […]
En esta entrada os voy a enseñar como poder adaptar vuestras pantallas LCD a una pantalla que se comunique a través del protocolo I2C (empleando sólo dos pines SDA y SCL). En una anterior entrada hemos hablado de un módulo que permite realizar esta operación de manera sencilla y económica, pero y si queremos montarnos […]
Nov
22

Building a self balancing bot

Accelerometer, arduino, ATmega, ATmega328, Bajduino, IMU, motor, MPU6050 Comments Off on Building a self balancing bot 

self-balancing-bot-1-600x400

Bajdi documented his Arduino self balancing bot build:

For the electronics I used one of my own PCB creations, a Bajduino of course It’s just a small (50x50mm) break out board for an ATmega328. I’m running the ATmega @ 16MHz and 3.3V. It’s out of spec according to the datasheet but it works… I also needed an IMU of course. I found a MP6050 sensor in my parts box. The MPU6050 combines a 3 DOF gyro and 3 DOF accelerometer in a small package, ideal for a self balancing bot.

[via]

Building a self balancing bot - [Link]

Gracias a los compañeros de Spainlabs me he enterado de la existencia de un muy buen software de programación, Sublime Text 2, con el que podemos programar nuestras placas Arduino de una forma que a mí parecer es más sencilla, ya que incorpora las siguientes características: Presenta un minipama, que nos permite una previsualización de […]
Vamos a ver como poder realizar mediciones de temperatura con nuestro Arduino y el sensor LM35. Dicho sensor es un sensor analógico de la casa Texas Instruments, que nos permite realizar medidas de temperatura de una forma bastante precisa a través de las entradas analógicas de nuestro Arduino (pines A0-A5) sin necesidad de emplear ninguna […]
Los chicos de la Maker Fire durante la realización de la misma en Roma han hecho un tour por la fábrica de Arduino (sitúada en Ivrea – Italia), en este vídeo podemos ver el funcionamiento de la misma explicada de la mano de Davide Gomba. Espero que os guste!! Si te ha servido de ayuda […]
Jul
31

Standalone Arduino / ATMega chip on breadboard

arduino, ATmega, breadboard, duemilanove Comments Off on Standalone Arduino / ATMega chip on breadboard 

F8KVZ5SG51GEUYU.LARGE

domiflichi @ instructables.com writes:

If you’re like me, after I got my Arduino and performed a final programming on my first chip, I wanted to pull it off my Arduino Duemilanove and put it on my own circuit. This would also free up my Arduino for future projects.

The problem was that I’m such an electronics newbie that I didn’t know where to start. After reading through many web pages and forums, I was able to put together this Instructable. I wanted to have the information I learned all in one place, and easy to follow.

Standalone Arduino / ATMega chip on breadboard - [Link]

Jul
10

From PWM to voltage

arduino, ATmega, Basic Electronics, PWM Comments Off on From PWM to voltage 

SCR80

jeelabs.org writes:

The Arduino library has always had an “analogWrite()” function, even though the ATmega doesn’t have any way to generate a varying voltage. So why the name?

Well, what most microcontrollers can do is generate a pulse-width modulated signal, also known as PWM. That’s just a fancy way of saying that the microcontroller periodically generates a pulse, of which the width can be varied under software control.

From PWM to voltage - [Link]


  • Newsletter

    Sign up for the PlanetArduino Newsletter, which delivers the most popular articles via e-mail to your inbox every week. Just fill in the information below and submit.

  • Like Us on Facebook