Posts | Comments

Planet Arduino

Archive for the ‘car hacks’ Category

Whether we like it or not, eventually the day will come where we have to admit that we outgrew our childhood toys — unless, of course, we tech them up in the name of science. And in some cases we might get away with simply scaling things up to be more fitting for an adult size. [kenmacken] demonstrates how to do both, by building himself a full-size 1:1 RC car. No, we didn’t forget a digit here, he remodeled an actual Honda Civic into a radio controlled car, and documented every step along the way, hoping to inspire and guide others to follow in his footsteps.

To control the Civic with a standard RC transmitter, [kenmacken] equipped it with a high torque servo, some linear actuators, and an electronic power steering module to handle all the mechanical aspects for acceleration, breaking, gear selection, and steering. At the center of it all is a regular, off-the-shelf Arduino Uno. His write-up features plenty of videos demonstrating each single component, and of course, him controlling the car — which you will also find after the break.

[kenmacken]’s ultimate goal is to eventually remove the radio control to build a fully autonomous self-driving car, and you can see some initial experimenting with GPS waypoint driving at the end of his tutorial. We have seen the same concept in a regular RC car before, and we have also seen it taken further using neural networks. Considering his background in computer vision, it will be interesting to find out which path [kenmacken] will go here in the future.

If you are working with OBD2 hardware or software, it’s easy enough to access test data, simply plug into a motor vehicle with an OBD2 socket. If, however, you wish to test OBD2 software under all possible fault conditions likely to be experienced by an engine, you are faced with a problem in that it becomes difficult to simulate all faults on a running engine without breaking it. This led [Fixkick] to create an OBD2 simulator using a secondhand Ford ECU supplied with fake sensor data from an Arduino to persuade it that a real engine was connected.

The write-up is quite a dense block of text to wade through, but if you are new to the world of ECU hacking it offers up some interesting nuggets of information. In it there is described how the crankshaft and camshaft sensors were simulated, as well as the mass airflow sensor, throttle position, and speedometer sensors. Some ECU inputs require a zero-crossing signal, something achieved with the use of small isolating transformers. The result is a boxed up unit containing ECU and Arduino, with potentiometers on its front panel to vary the respective sensor inputs.

We’ve brought you quite a few OBD2 projects over the years, for example, there was this LED tachometer, and a way into GM’s OnStar.

Thanks [darkspr1te] for the tip.


Filed under: Arduino Hacks, car hacks

M2 by Macchina

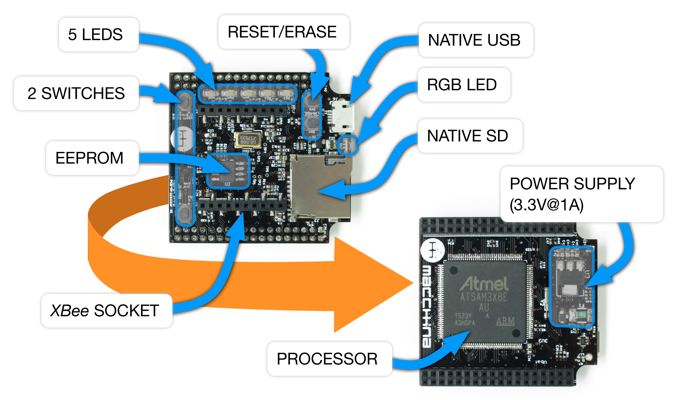
We’re excited to announce the latest member of Arduino’s AtHeart program. M2 by Macchinanow live on Kickstarter–is an open-source, versatile development platform for hacking and customizing cars.

M2’s design is compact, modular, wirelessly connectable, and built on the popular Arduino Due. The device can be wired under the hood for a more permanent installation or plugged into the OBD2 port, enabling you to do virtually anything with your vehicle’s software. 

Macchina, a Minnesota-based company, has partnered with Arduino, Digi and Digi-Key to develop M2, and believes that its highly-adaptable hardware will most benefit hot rodders, mechanics, students, security researchers, and entrepreneurs by providing them access to the inner workings of their rides.

M2 accommodates a wide variety of wireless options thanks to its Digi XBee form-factor socket, allowing you to easily connect your car to the Internet, smartphone, satellites, or the cloud using BLE, WiFi, GSM, LTE, and other modules.

The platform can be programmed using the latest Arduino IDE, and is compatible with a number of software packages. Moreover, given its open-source nature, potential applications are bounded only by the collective imagination of the coding community.

Interested? Check out Macchina’s Kickstarter page to learn more or pre-order your M2 today!

nfcphoneAdding an NFC unlocker to your car allows you to open your vehicle with your phone, or an NFC ring.

Read more on MAKE

The post Use Your Smartphone as Your Car Key with an NFC Lock appeared first on Make: DIY Projects and Ideas for Makers.

display1Harin De Mel could have hacked his car to display something "useful", but where's the challenge in that? Shower thoughts, it is!

Read more on MAKE

The post Hack Your Car’s Dashboard to Display Reddit Shower Thoughts appeared first on Make: DIY Projects and Ideas for Makers.

The subreddit for Shower Thoughts offers wisdom ranging from the profound to the mundane. For example: “Every time you cut a corner you make two more.” Apparently, [Harin] has a bit of an addiction to the subreddit. He’s been sniffing the CAN bus on his 2012 Hyundai Genesis and decided to display the top Shower Thought on his radio screen.

To manage the feat he used both a Raspberry Pi and an Arduino. Both devices had a MCP2515 to interface with two different CAN busses (one for the LCD display and the other for control messages which carries a lot of traffic.

The code is available on GitHub. There’s still work to do to make the message scroll, for example. [Harin] has other posts about sniffing the bus, like this one.

We’ve covered CAN bus quite a bit, including some non-automotive uses. We’ve even seen the CAN bus for model railroading.


Filed under: Arduino Hacks, car hacks, Raspberry Pi

It’s a dream come true: remote control of a real car. Besides being a lot of fun, a life-size RC vehicle has some practical applications, like performing rescue operations or delivering supplies to dangerous areas. For [Carter], [Dave], [Ryan], and [Sean], the dream became reality in the span of 24 caffeine-and-chicken-finger-fueled hours during an Ohio State University hackathon. They dubbed the system MagiKarpet because it sits in place of the floor mat and runs on pixies.

The plan was to control the throttle, brake, and steering of a Chevy Cobalt using a PlayStation controller. For added fun, a camera mounted high above the back bumper would provide a third-person view, and this feed would be displayed on a monitor in the backseat. Everything is controlled by an Arduino Mega. A beefy linear actuator works the brake and is attached temporarily with a band of Shapelock that slips around the pedal. The throttle is pushed by a lever attached to a car window motor. Another motor connects to the steering wheel with cables that can turn it 90° left and right. Although the build was successful, they ran into a couple of issues. But what’s a hackathon experience without a few problems?

The linear actuator was jammed for about an hour after some early testing, but they got it unstuck. The PS controller was borked, so they had to roll their own joysticks. The school wouldn’t let them actually drive it around because of safety (killjoys but we get it), so they put it up on a jack to demonstrate it for the judges. They took second place, though we can’t imagine what would have beat this. Check out the complete build video after the break.

You might remember these guys from last year around this time. They took first place at the same hackathon with Robottermilk Puncakes, a app-controlled pancake machine. Now that you’re hungry for pancakes, feast your eyes on this endless one.


Filed under: Arduino Hacks, car hacks

In the dark ages, you had to use a key to lock and unlock your car doors. Just about every car now has a remote control on the key that lets you unlock or lock with the push of a button. But many modern cars don’t even need that. They sense the key on your person and usually use a button to do the lock or unlock function. That button does nothing if the key isn’t nearby.

[Pierre Charlier] wanted that easy locking and unlocking, so he refitted his car with a Keyduino to allow entry with an NFC ring. What results is a very cool fistbump which convinces your car to unlock the door.

Keyduinio is [Pierre’s] NFC-enabled project, but you can also use a more conventional Arduino with an NFC and relay shield. The demo also works with a smartphone if you’re not one for wearing an NFC ring. Going this round, he even shows how to make it work with Bluetooth Low Energy (BLE).

In the video below, you can see how he removed the car’s internal lock switch and modified the wire harness to take the connection to the Arduino. He’s also included all the code. About the only tricky part is doing the actual wiring in your car and finding a suitable source of power. That varies from car to car, so it isn’t easy to give specific instructions.

Opening doors of one kind or another is a popular project theme. While [Pierre’s] project might open the door on a coupe, we’ve seen another project that works on a coop.


Filed under: Arduino Hacks, car hacks, wireless hacks

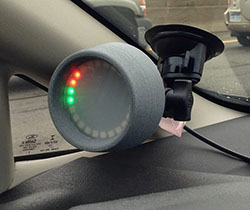
tach[Pete Mills] recently bought the all-new Ford Fiesta, which offers impressive fuel economy over that of his Jeep. He soon figured out that he has real time access to a wealth of engine and chassis data through Ford’s OpenXC platform and used it to build blueShift, a neopixel tachometer. The car already has a tach, but this one is more visual, can be seen in periphery, and is just plain fun.

In case you hadn’t heard, the OpenXC platform is Ford’s consumer key to the kingdom of OBD2 treasures. It unlocks the magic through its Vehicle Interface, which plugs into the OBD2 port and translates the CAN bus messages to OpenXC format. These messages are packaged into JSON format and can be sent over Bluetooth or Ethernet/Wi-Fi to an Android, Python, or iOS device.

[Pete] went with Bluetooth and used a BlueSMiRF with an Arduino Pro Mini. He derives power from the car’s on-board USB port, but has future plans to use the OpenXC VI port. blueShift reads the RPM data and displays a green trail as the engine revs up. At the peak revolution, it shows a red LED. This one is sticky and will persist for the lesser of three seconds or the time elapsed to a new positive RPM. [Pete] is also reading the headlight status of the car. As soon as they come on, the RGB LEDs dim to avoid blinding him at night.

[Pete] wanted to make an enclosure more finished-looking than a Tupperware box. He nearly detoured into 3D-printer design, but ended up putting together a Prusa i3v and came up with this RAM mount-compatible enclosure. His fantastic write-up and code are on his blog, but you can make the jump to see a short demo and a full explanation video. You can also make smart brake lights or even create art with OpenXC.

Demo video of blueShift:

Full explanation:


Filed under: Arduino Hacks, car hacks


  • Newsletter

    Sign up for the PlanetArduino Newsletter, which delivers the most popular articles via e-mail to your inbox every week. Just fill in the information below and submit.

  • Like Us on Facebook