Like a lot of 16-year-olds, [Maxime Coutée] wanted an Oculus Rift. Unlike a lot of 16-year-olds, [Maxime] and friends [Gabriel] and [Jonas] built one themselves for about a hundred bucks and posted it on GitHub. We’ll admit that at 16 we weren’t throwing around words like quaternions and antiderivatives, so we were duly impressed.
Before you assume this is just a box to put a phone in like a Google Cardboard, take a look at the bill of materials: an Arduino Due, a 2K LCD screen, a Fresnel lens, and an accelerometer/gyro. The team notes that the screen is what will push the price unpredictably, but they got by for about a hundred euro. At the current exchange rate, if you add up all the parts, they went a little over $100, but they were still under $150 assuming you have a 3D printer to print the mechanical parts.
The system uses two custom libraries that you could use even if you wanted a slightly different project. FastVR creates 3D virtual reality using Unity and WRMHL allows Unity to communicate with an Arduino. Both of these are on the team’s GitHub page, as well.
There was one other member of the team, their math teacher [Jerome Dieudonne] who they call [Sensei]. According to [Jerome] he is “… the theoretician of the team. I teach them math and I help them solving algorithm issues.” He must be very proud and we always applaud when someone takes the time to share what they know with students.
We don’t know what’s next for this group, but we will be keeping an eye on them to see what’s next. Maybe they’ll work on smell-o-vision.
It wasn’t too long ago that one could conjecture that most hackers are not avid video game players. We spend most of our free time taking things apart, tinkering with microcontrollers and reading the latest [Jenny List] article on Hackaday.com. When we do think of video games, our neurons generally fire in the direction of emulating a console on a single board computer, such as a Raspberry Pi or a Beaglebone. Or even emulating the actual console processor on an FPGA. Rarely do we venture off into 3D programs meant to make modern video games. If we can’t export an .STL with it, we’re not interested. It’s just not our bag.
Oculus Rift changed this. The VR headset was originally invented for 3D video games, but quickly became a darling to hackers the world over. Virtual Reality technology is far bigger than just video games, and brings opportunity to many fields such as real estate, construction, product visualization, education, social interaction… the list goes on and on.
The Oculus team got together with the folks over at Unity in the early days to make it easy for video game makers to make content for the Rift. Unity is a game engine designed with a shallow learning curve and is available for free for non-commercial use. The Oculus Rift can be integrated into a Unity environment with the check of a setting and importing a small package, available on the Oculus site. This makes it easy for anyone interested in VR technology to get a Rift and start pumping out content.
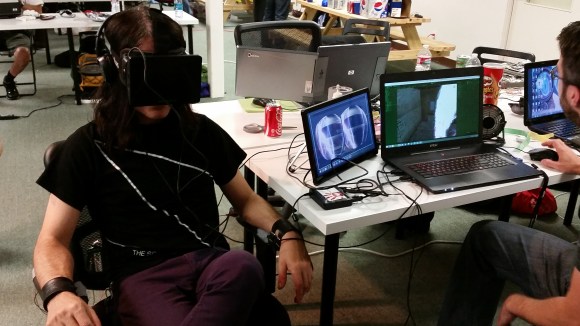
Hackers have taken things a step further and have written scripts that allow Unity to communicate with an Arduino. VR is fun. But VR plus physical reality is just down right exciting! In this article, we’re going to walk you through setting up your Oculus Rift and Unity game engine to communicate with the outside world via an Arduino.
Off the Shelf Options
If you head over to the Unity Asset page and run a search for Arduino, you get a few options. Sadly, searches for Raspberry Pi do not yield any fruit. There are a few generic serial communication options such as Simple Serial and SD Serial, but these options are not free and do not, at face value, appear to be well supported. Unidino looks promising, but it’s thirty bucks and there’s not much activity on the forum. The obvious choice to play around with on a rainy day is ARDunity. There’s a free version that still has plenty of capability to experiment with, and it’s well supported and documented. It’s written in more of a WYSIWYG style that can be off-putting to coders, but it will have to suffice until someone bangs out more advanced version.
Getting Started
We’re assuming that you already have Arduino and Oculus setup on your PC. If you don’t have an Oculus Rift, we recommend to go to the Oculus site and install the software anyway. It will allow you to test the Unity/Arduino communication through the Oculus run-time even if you don’t have the hardware. This way when you do get a headset, you won’t have to do anything. Just execute the .exe and you’ll see your work in VR. Note that they used to prevent the software from installing on computers that did not meet the minimum requirements. Oculus has since toned down this nuisance, and now allows the software to be installed on most computers, including laptops!
Setting up Unity is straight forward – simply go to the site and download the installer. The latest version at the time of this article is 5.6.1. You’ll want to grab the personal version – it’s about five Gigabytes, so give it some time to download. Once installed, head over to the Oculus site and grab the Unity tools import package.
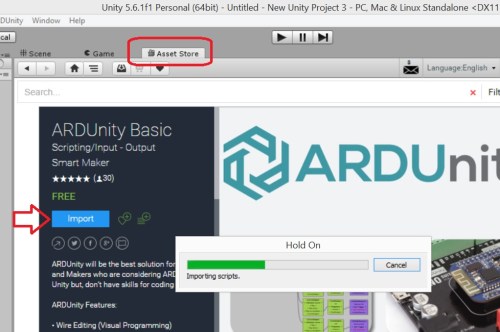
Open Unity and open a new project. Then head back to the Unity Asset store and install the ARDunity Basic Import package. This will open Unity, and you should see a tab called Asset Store. Click on the tab and then import the package. Then go to Edit–>Project Settings–>Player and set the API compatibility level to .NET 2.0. This will clear the error you see in the bottom of the screen. Then under Other Settings, be sure to select the Virtual Reality Supported option.
Now import the Oculus package by going to Asset–>Import Package–>Custom Package and point towards the Oculus package you downloaded earlier. Restart the Unity program if needed.
Putting It All Together
At this point, everything should be set to get Unity talking to your Arduino through the Oculus Rift. Put an LED on D2 and note your comm port. From the Project tab (lower left), expand the folders ARDunity–>Examples–>LED–>Digital. Double click the last example – ReactingTrigger(DigitalLED).unity.
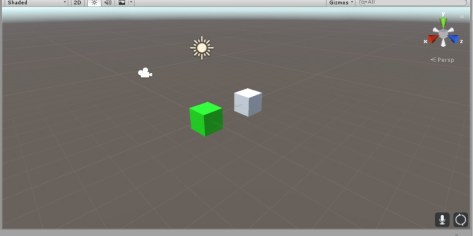
That will load the example. You should now see two cubes in the view window, and a new folder called ARDunity under the hierarchy tab on the top left. Click on ARDunity and you’ll see the inspector tab (far right) change to include a button that says “Export Sketch”. Hit the button and it will export the Arduino sketch to a place of
View of scene after opening LED example
your choosing. The .ccp and .h files will be generated automatically, along with some other dependencies. I shouldn’t have to tell you to have a look around, but don’t forget to compile and upload it after you’ve had your fill.
Just below the Export Sketch button will be the Comm Serial (Script) window. Search for and select the comm port for you Arduino. After you find your comm port, hit the little play button on top of the main scene window. Once you do this, you’ll see a “Connect” button appear where the Export Sketch was. Go ahead and connect. Now click on the Scene tab above the main viewing window. This will allow you to manipulate the cubes. Go ahead and grab the white cube and run it into the green one. If you did everything right, you’ll see your LED light when the two cubes collide.
The gears in your noggin should be turning right about now… if you can toggle IO from within a game engine; there is some seriously cool stuff you can do! But we’ve only scratched the surface. Let’s get this working in Virtual Reality!
Enter the Rift
In order to enter the virtual world, you need a couple of things. One is a character controller and the other is something to walk on. Hit the play button again if you haven’t already. This will disconnect everything and allow you to edit the world. Go to Game Object–>3D Object–>Plane and adjust the plane so the two cubes are hovering above it. Then un-collapse the ARDuino and expand the OVR folder to OVR–>Prefabs. Select the OVRPlayerController.prefab and drag it into the main hierarchy in the upper left. You’ll see the player controller appear in the main scene window. Drag it away from the cubes, and then under the inspector tab on the right hand side, de-select the Use Profile Data option in the OVR Player Controller (Script) section.
Now, select ARDuino under the hierarchy tab, press play and then connect. If you have an Oculus Rift connected, you should be able to put it on and run into the green cube and light the LED on the Arduino. If you don’t have one, just use the arrow keys to do the same.
Conclusion
So where can you go with this? The biggest thing that jumps out to us is haptic feedback. Imagine instead of a cube, you have a wall or table or something of that nature. Have the Arduino trigger some type of feedback when you touch or bump into the object.
Dig into the code and let us know of any bugs or improvements. Be sure to follow some other examples as well, and check out the video below for a demonstration. If you’ve done anything cool with Unity, show us in the comments.
There are lots of reasons that someone might want a head-mounted display. Camera operators and radio-controlled vehicle enthusiasts typically like these because they keep the sun off of their screen while working outdoors. Aside from those practical purposes, strapping a high-definition display to your head is just cool. Add some motion […]
[Arman] works in a small prototyping shop, so when a few guys from the local VR group called to ask for help building a non-lethal electric chair, he thought they were joking — until they showed up at the shop! Finally understanding what they really wanted to do, he hooked them up with an EL wire power supply (high voltage AC, low amperage) for their first prototype.
Unfortunately the EL power supply driver took too much juice, so they called [Arman] back the next day to hack together some of those joke gum shockers instead — he hooked them up to an Arduino and they work like a charm.
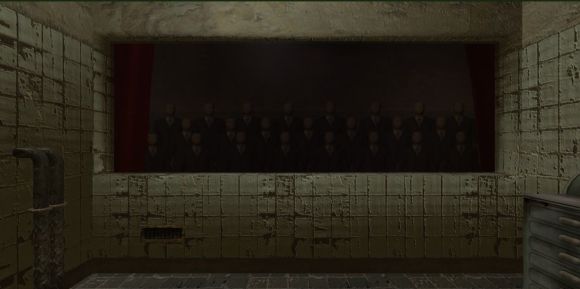
The experience (sadly, not video recorded) went like this. Brave testers would sit in the chair with the Oculus rift on and they would see that they are in a strange room with a red curtain across the window. After a bit of time passed the curtain would open, revealing an audience of faceless men…
This is about when you realize you’re in death row. ZAP!
Planet Arduino is, or at the moment is wishing to become, an aggregation of public weblogs from around the world written by people who develop, play, think on Arduino platform and his son. The opinions expressed in those weblogs and hence this aggregation are those of the original authors. Entries on this page are owned by their authors. We do not edit, endorse or vouch for the contents of individual posts. For more information about Arduino please visit www.arduino.cc
You are currently browsing the archives for the oculus rift category.

 time of this article is 5.6.1. You’ll want to grab the personal version – it’s about five Gigabytes, so give it some time to download. Once installed, head over to the Oculus site and grab the