Hello readers
Today you can follow making a simple 5V DC power supply from initial idea to finished product. This is not an exercise in making a flash power supply, just solving a problem with the parts at hand.
When writing my Arduino tutorials, or generally experimenting with the breadboards – and more often both – I have needed 5V DC to power something, or in the case of working with two Arduinos at once, having to run USB cables all around the place just to power them. Some may say “Oh, just get another couple of wall warts/plug packs”. True, but good ones are over Au$20 here… and buying cheap ones have not been so successful in the past. However, I do have a collection of odd-voltage plug packs from old cordless phones and so on.. 12V AC, 15V DC etc. And to be honest, right now the bbbooost project is in pieces in a box as I’ve run out of breadboards at the moment working on other things.
So while at my desk I thought “How can I combine my need for 5V, my cheapness and use one of these plugpacks?”. Easy!
After perusing my stock database it turned out that all the parts were already around me to make a simple 5V supply using an LM7805 voltage regulator. It is quite versatile, can accept voltages up to 35V, and I have some in the drawer. Here is the data sheet: LM7805.pdf.
Following this it occurred to me that it would be nice to not have to worry about the type of current from the plug pack – AC or DC. So my circuit needs a bridge rectifier. That can be made with four 1N4004 diodes. And it would be nice to have a power-on indicator that isn’t a tiny speck of light. Thankfully I bought some 20mm red LEDs when Farnell had a crazy sale last year. Perfect.
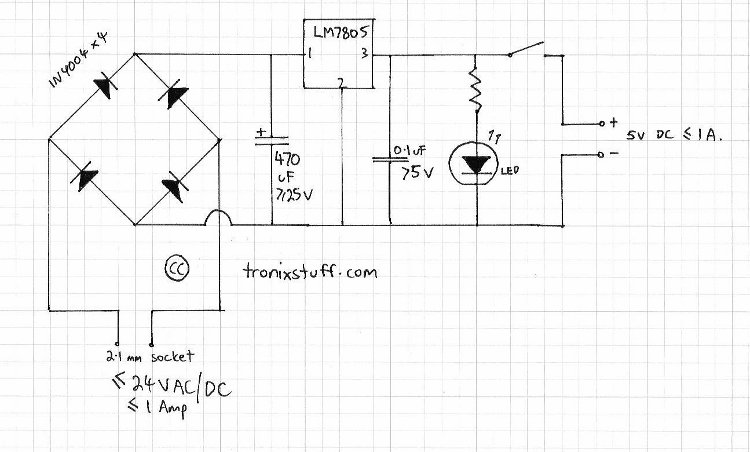
And finally, a nice enclosure. Or anything really, to hold it all together. A small semi-opaque jiffy box was hiding in the cupboard with some veroboard, so they will be used. How? Here is my schematic: (click to enlarge)
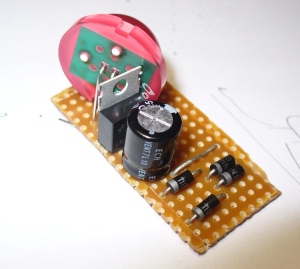
Oh – the resistor is 560 ohms. And here are the participants in this project:

The black stuff at the top-right is heatshrink. The next though was how to mount the board in the box – I don’t have any standoffs, but the box does have some slots to hold the board. So this tells me how much space there is to use on the board, as I will trim it down to fit the space available:

But before hacking things up with the tinsnips, it pays to see if your circuit will actually fit in the board space available. (However my circuit was quite small, so I knew it would fit). This can be done by laying out your parts on a sheet of paper that has a grid of dots at 2.54mm intervals. Next was to measure the internal dimensions of the box in order to cut the veroboard. Then out with the tinsnips and chop chop chop. When using tinsnips or a saw of some sort, try and cut a little outside of the line – as the PCB material does flex a little .This means that you may lose 2~3 mm at the edges, so make allowances for that.
Moving on, I now have the board sized for the box and can start component placement:

The parts just fit in together nicely. I will have to drill the holes for the 7805 regulator so it can fit, however it doesn’t really leave room for the 0.1uF capacitor. However it is not really necessary, the output will be ok without it. The leads from the power socket, and to the switch and output lead will feed from the bottom of the PCB.

Now for one final visual check, and then to solder in the components.
After doing so, then it was time to put the link in and cut the tracks. I use a sanding bit on the drill to cut the tracks, completely removing the copper. 
After cutting the tracks on the solder side, it was a good time to use the continuity function of the multimeter to check for shorts between tracks and other errors. The soldering proved to be fine, and the track cuts worked. Now it was time to position the DC socket and switch in order to wire them in, then drill their holes. The output wire is to come out of the top:
Now all there is to do is solder the connecting wires from the DC socket to the rear of the circuit board, and the output wire via the switch. At this point the unit was also tested. Naturally my eyesight had failed me and a short had appeared. However it was sorted out with the solder sucker:

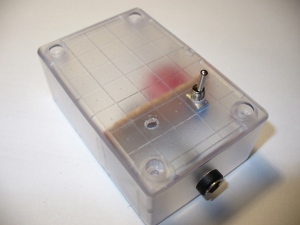
Notice how I tied a know in the output lead before it passes through the lid – this is to stop accidental damage to the board caused by someone pulling the wire out. Here is the finished product, with a nice red glow for a power-available indicator:

Hooray – finished. What else was there to do on a Tuesday night? The LED indicates power is supplied to the box, and the switch just controls the load. Not too happy about that 5.05V reading… but then again, that meter was somewhat inexpensive.
I hope you enjoyed peering into my electronic life once again. The purpose of this post was more of a confidence-builder than anything, but hopefully someone out there read this and thought “Yes, I can do that”. So go for it!
As always, thank you for reading and I look forward to your comments and so on. Furthermore, don’t be shy in pointing out errors or places that could use improvement. Please subscribe using one of the methods at the top-right of this web page to receive updates on new posts. Or join our new Google Group. High resolution images can be found on flickr.
Otherwise, have fun, be good to each other – and make something!


 The Atmospheric Gas Detector Kit, found in the Makershed, gives you the components needed to detect different kinds of gases. In this episode of "Projects with Ryan Slaugh", we will go through the steps of setting up the base experiment from the book included with the kit.