Posts | Comments

Planet Arduino

Archive for the ‘Charger’ Category

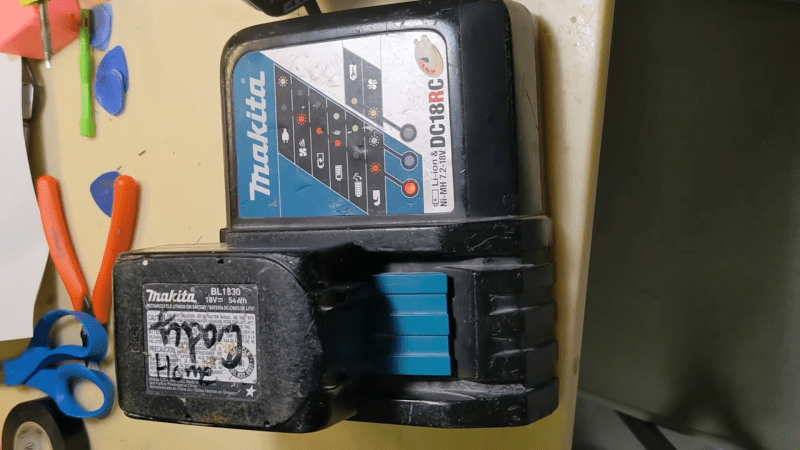
Lots of things beep these days. Washing machines, microwaves, fridge — even drill battery chargers. If you’re on Team Makita, it turns out you can actually change the melody of your charger’s beep, thanks to a project from [Real-Time-Kodi].

The hack is for the Makita DR18RC charger, and the implementation of the hack is kind of amusing. [Real-Time-Kodi] starts by cutting the trace to the buzzer inside the charger. Then, an Arduino is installed inside the charger, hooked up to the buzzer itself and the original line that was controlling it. When it detects the charger trying to activate the buzzer, it uses this as a trigger to play its own melody on the charger instead. The Arduino also monitors the LEDs on the charger in order to determine the current charge state, and play the appropriate jingle for the situation.

It’s an amusing hack, and one that could certainly confuse the heck out of anyone expecting the regular tones out of their Makita charger. It also shows that the simple ways work, too — there was no need to dump any firmware or decompile any code.

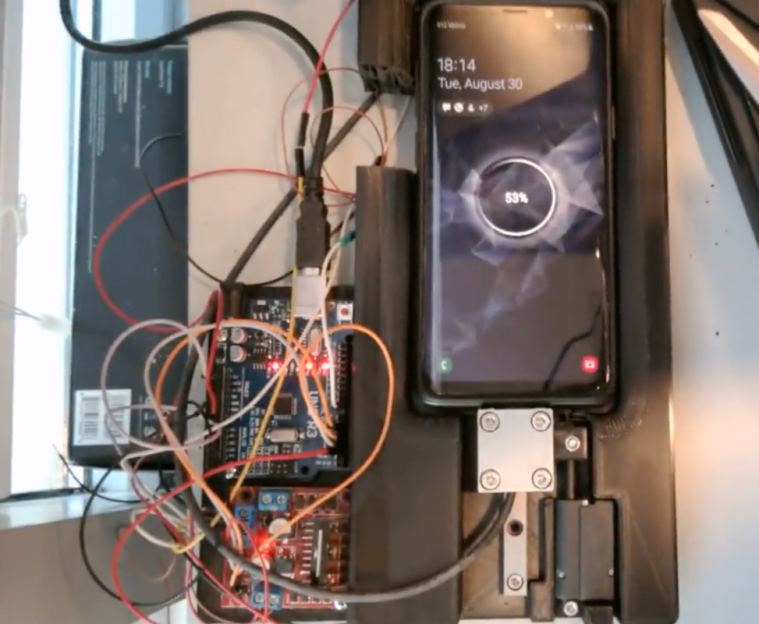
Historically, there have been a few cases of useful wireless power transmission over great distances, like a team at MIT that was able to light up a 60 W bulb at several meters, and of course Nikola Tesla had grand dreams of drawing energy from the atmosphere. But for most of us wireless power is limited to small, short-range devices like cellphone chargers. While it’s not a lot of work to plug in a phone when it needs a charge, even this small task can be automated.

This build begins with a 3D printed cradle for the smartphone to sit in. When the device detects that the phone has been placed in the cradle, it uses a linear actuator to drive a custom-built charging cable into the phone’s USB port. Similarly, when the phone is lifted from the cradle the cable is automatically removed. It appears that there is some play in the phone’s position that lets the charger be plugged in smoothly, and the project’s creator [Larpushka] points out that the linear actuator is not particularly strong so we don’t imagine the risk of damage is very high.

While wireless charging still may have the edge when it comes to keeping debris out of the port, we still really enjoy a project like this that seems to be done for its own sake. There are some improvements that [Larpushka] plans to make, but for now we’re delighted by this build. For anyone looking to add true wireless charging to any phone that doesn’t have it, though, it’s not too difficult to accomplish either.

Feb
24

Maximize Your Solar Charging With a DIY Arduino Controller

arduino, Charger, Electronics, MPPT, solar Comments Off on Maximize Your Solar Charging With a DIY Arduino Controller 

Here’s how to build a buck converter using an Arduino Nano (as well as another 28 listed components) to supply the maximum power that you can to your PV cell. This is known as maximum power point tracking, abbreviated MPPT. Photovoltaic (PV) cells produce different amounts of current and voltage depending […]

Surely you need yet another way to charge your lithium batteries—perhaps you can sate your desperation with this programmable multi (or single) cell lithium charger shield for the Arduino?! Okay, so you’re not hurting for another method of juicing up your batteries. If you’re a regular around these parts of the interwebs, you’ll recall the lithium charging guide and that rather incredible, near-encyclopedic rundown of both batteries and chargers, which likely kept your charging needs under control.

That said, this shield by Electro-Labs might be the perfect transition for the die-hard-’duino fanatic looking to migrate to tougher projects. The build features an LCD and four-button interface to fiddle with settings, and is based around an LT1510 constant current/constant voltage charger IC. You can find the schematic, bill of materials, code, and PCB design on the Electro-Labs webpage, as well as a brief rundown explaining how the circuit works. Still want to add on the design? Throw in one of these Li-ion holders for quick battery swapping action.

[via Embedded Lab]


Filed under: Arduino Hacks, Microcontrollers
Nov
13

DIY Lithium Battery Charger Shield for Arduino

arduino, battery, Charger, Li-Ion, LT1510, Nokia 5110 LCD Comments Off on DIY Lithium Battery Charger Shield for Arduino 

intrologo-lithium-battery-charger

by electro-labs.com:

In this project, we are building a programmable single/multi cell lithium battery charger shield for Arduino. The shield provides LCD and button interface which let the user set the battery cut-off voltage from 2V to 10V and charge current from 50mA to 1.1A. The charger also provides the ability to monitor the battery status before and during charge.

The charger is based on LT1510 Constant Current/Constant Voltage Battery charger IC and controlled by Arduino UNO. The display on the shield is Nokia 5110 LCD which is very simple to use and still available on the market. There are two different battery connectors available on the shield, a two contact screw terminal block and a right angle 2mm JST-PH connector.

DIY Lithium Battery Charger Shield for Arduino - [Link]

Sep
08

Solar battery charge controller

arduino, arduino nano, battery, Charger, Lead Acid, Photovoltaic, power, solar Comments Off on Solar battery charge controller 

SolarBatteryCharger

by embedded-lab.com:

This Arduino Nano controlled solar battery charger can charge a standard lead acid 12V battery and runs with 90% efficiency under 70ᵒC (158ᵒF). The circuit can take up to 24V input from the solar panels. The maximum power point tracking is implemented in the circuit by measuring the output voltage and current from the solar panel to get the maximum possible power from it.

Solar battery charge controller - [Link]

Aug
08

Beach Buddy, a 3-in-1 solar phone charger, boombox, and sunburn timer calculator

arduino, Charger, Sensor, UV Comments Off on Beach Buddy, a 3-in-1 solar phone charger, boombox, and sunburn timer calculator 

F138XW2HYHGEPC4-600x450

An all-in-one, water and sand resistant, solar charger, audio speaker system, and sunburn timer calculator by starwisher. Check out the project’s instructables page here:

This Instructable harnesses the power of Arduino, a UV sensor, and simple mathematics to make one nifty gadget sure to boost your outdoor summer fun – and minimize your indoor summer recovery!

[via]

Beach Buddy, a 3-in-1 solar phone charger, boombox, and sunburn timer calculator - [Link]


  • Newsletter

    Sign up for the PlanetArduino Newsletter, which delivers the most popular articles via e-mail to your inbox every week. Just fill in the information below and submit.

  • Like Us on Facebook