Posts | Comments

Planet Arduino

Archive for the ‘table’ Category

Some hackers make functional things that you can’t allow to be seen in polite company. Others make beautiful things that could come from a high-end store. [Marija] falls into the second category and her interactive LED coffee table would probably fetch quite a bit on the retail market. You can see a video of the awesome-looking table, below.

It isn’t just the glass, MDF, and pine construction. There’s also a Bluetooth interface to a custom Android application from [Dejan], who collaborated on the project. However, if you aren’t comfortable with the woodworking, [Marija’s] instructions are very detailed with great pictures so this might be a good starter project.

On the electronics side, there are addressable LEDs (WS2812Bs), a Bluetooth module, IR proximity sensors, and an Arduino. The proximity sensors needed a little hacking so the sensor can mount in a way that it can detect things through the glass top.

This is one of those projects that really points out how some relatively simple components can combine with software and mechanical construction to really create an eye-popping result. We were really impressed with the documentation, too, and if you are unsure about how to do the woodworking or the electronics, you’ll find a great guide with helpful pictures.

Now, if you don’t hang out with polite company, but only other hackers, you’ll probably opt for an EPROM table. If you get hooked on lighting up tables, you can move on to the mega LED desk after you finish this project, although that’s more of a metal project.

Infinity mirrors are some far-out table mods and make a great centerpiece. Instructables user [bongoboy23] took a couple steps beyond infinity when designing this incredible table tailor-made for our modern age.

Poplar and pine wood make up the framing, and red oak — stained and engraved — make for a chic exterior. Programmed with Arduino and run on a Teensy 3.1, the tabletop has 960 LEDs in forty sections. There are, four USB ports hidden behind sliding panels, as well as a two-port AC outlet and an inductive charging pad and circuit.  A hidden Adafruit TFT touchscreen display allows the user to control the table’s functions. Control is limited to changing lighting functions, but Pac-Man, Snake, and text features are still to come!

Weighing in at $850, it’s not a cheap build, but it looks amazing.

This is one of the most extensive Instructables you may happen across, containing dozens of pictures, CAD files, diagrams, appendices, and a change log, with tips besides; if you want one just like this at home, you are in good hands, here. Or try an easier build, we won’t judge. However, maker beware — you may be stepping through a portal that’s difficult to return from.

[Thanks for the tip, JohnL!]


Filed under: Arduino Hacks, how-to, led hacks

playA kid's homework table lifts up to reveal a NASA-inspired mission control center. Follow along for help in building your own.

Read more on MAKE

The post How to Build a Mission Control Desk appeared first on Make: DIY Projects, How-Tos, Electronics, Crafts and Ideas for Makers.

Sep
08

End Table Kegerator Hides the Tap when You’re Not Looking

arduino, arduino hacks, beer, beer hacks, Furniture, kegerator, LCD, refrigerator, table, temperature Comments Off on End Table Kegerator Hides the Tap when You’re Not Looking 

kegerator

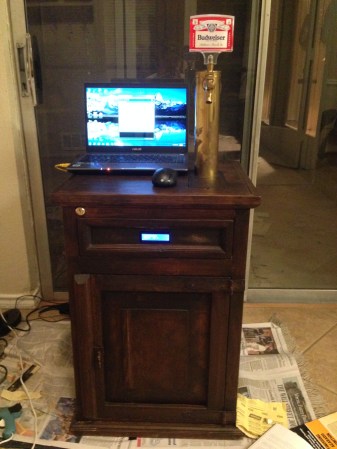
What’s better than an ordinary end table? How about an end table that can serve you beer? [Sam] had this exact idea and used his skills to make it a reality. The first step of the build was to acquire an end table that was big enough to hold all of the components for a functional kegerator. This proved to be a bit tricky, but [Sam] got lucky and scored a proper end table from a garage sale for only $5.00.

Next, [Sam] used bathroom sealant to seal up all of the cracks in the end table. This step is important to keep the inside cold. Good insulation will keep the beer colder, while using less electricity. Next, a hole was cut into the top of the table for the draft tower.

The draft tower is mounted to a couple of drawer slides. This allows the tower to raise up and down, keeping it out of sight when you don’t want it. The tower raises and lowers using a simple pulley system. A thin, high strength rope is attached to the tower. The other end is attached to a spool and a small motor. The motor can wind or unwind the spool in order to raise and lower the tower.

The table houses an Arduino, which controls the motor via a homemade H bridge. The Arduino is hooked up to a temperature sensor and a small LCD screen. This way, the users can see how cold their beer will be before they drink it.

To actually keep the beer cold, [Sam] ripped apart a mini fridge. He moved the compressor and condenser coils to the new table. He had to bend the coils to fit, taking care not to kink them. Finally he threw in the small keg, co2 tank and regulator. The final product is a livingroom gem that provides beer on demand.

Demo video (which is going the wrong way) can be found after the break.


Filed under: Arduino Hacks, Beer Hacks


  • Newsletter

    Sign up for the PlanetArduino Newsletter, which delivers the most popular articles via e-mail to your inbox every week. Just fill in the information below and submit.

  • Like Us on Facebook