The Whiskey Tango Hotel blog looks to simulate the lights of fireworks with a single long strip of NeoPixels, aka WS2812B addressable LEDs.
Fireworks are also pretty cool. On the downside they can be dangerous, scare wildlife, start fires, be expensive, illegal, etc. So, until we can afford our own fleet of drones we settled on this alternative.
The hardware is an ESP8266 and a WS2812B LED-strip with 300 LEDs (16.5 feet). We wanted to use a Arduino Nano (because we had one), but due to the amount of memory needed to define the arrays for the 300 LEDs we went with an ESP8266 (because we had one).
See the video below and the post with Arduino source code.
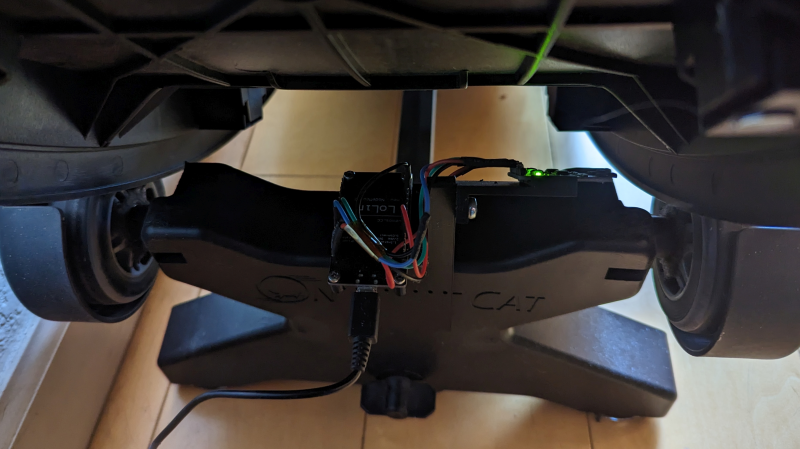
[Scott Cutler] has a young cat, [Cygnus], that loves to run on a cat wheel and [Scott] had some some important questions about [Cygnus]’s usage of the cat wheel like, how often it’s used, what direction is preferred and how fast does [Cygnus] go. To answer these questions, [Scott] put some telemetry sensors onto the cat wheel and analyzed the results.
An ESP8266 microcontroller and two 3144E hall effect modules were used to sense eight magnets glued onto the outer housing of a “One Fast Cat” cat wheel. [Scott] installed the ESP8266 and hall effect modules onto the base support for the wheels, using 3D printed brackets to secure them.
For the software side, the ESP8266 attaches an interrupt handler whenever a sensor passes by, recording a window of three previous measurements for valid sample determination and, if accepted, uses the time between samples to infer direction and speed. The ESP8266 connects to a pre-configured local WiFi network and has a telnet interface to extract stored log information, in the form of JSON data.
[Scott] has some nice graphs and other data visualizations on [Cygnus]’s usage, including a preference for running at 3 AM, achieving a maximum speed of 14 mph and an average of 4 seconds per run. The source is available on GitHub and the STL files are available embedded in [Scott]’s write-up. We’ve featured cat exercise trackers before with a giant hamster wheel outfitted with a Raspberry Pi and it’s nice to see some options that allow for a retrofit option in addition to a complete DIY solution.
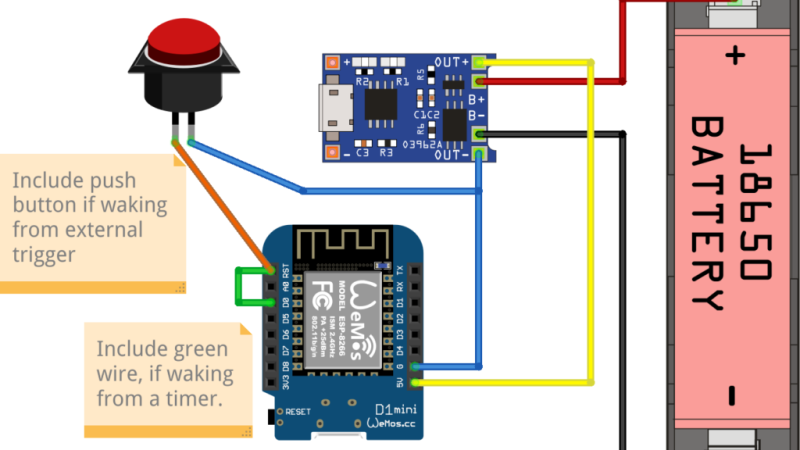
Say, you’re starting your electronics journey with a few projects in mind. You have an ESP8266 board like the Wemos D1, a LiIon battery, you want to build a small battery-powered sensor that wakes up every few minutes to do something, and you don’t want to delve into hardware too much for now. Well then, does [Mads Chr. Olesen] have a tutorial for you! Here, you’ll learn the quick and easy way to get your sensor up and running, learn a few tricks for doing sleep Arduino environment, and even calculate how long your specific battery could last.
You’ll need a TP4056 board, providing charging and battery protection features, a jumper, and maybe a pushbutton – the Fritzing diagram shows everything you’d like to know. From there, you have examples on using deep sleep, do pushbutton or sensor-driven wakeup, manage WiFi, and even read the battery voltage – all of these are a single line of code away, and you learn the few important caveats there are. In the end, there’s even an embedded calculator for how long your Wemos D1 board can survive on a single charge – enter your capacity, the amount of time between wakeups, and see just how long your board will last.
This tutorial is truly accessible if you never touched ESP8266 deep sleep before but would like to start – it’s short and sweet, and you’ll have your battery-powered sensor up and running in no time. It doesn’t go into topics like optimizing the onboard hardware, but in all fairness, you don’t have to do that until you’re ready, and sometimes, it’s really software optimizations that will have a hefty payoff . And, if you ever want to learn more about LiIon-powered devices, our tutorials are there for you.
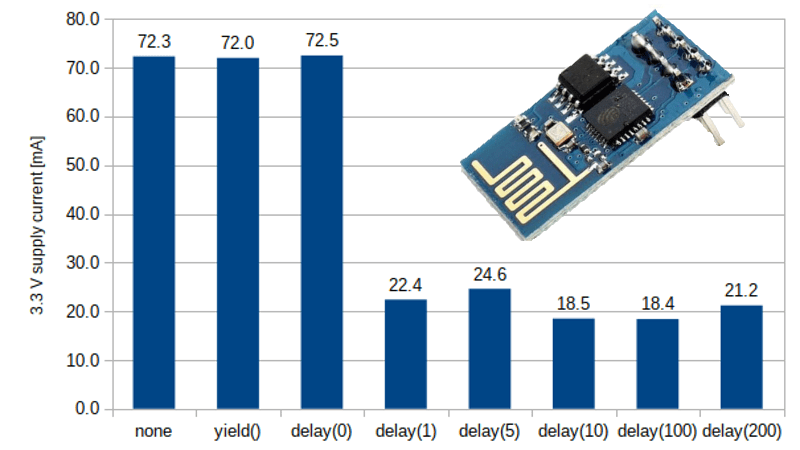
[Tomaž] uses the “hello world” example from ESP8266WebServer to explain. In it, the main loop essentially consists of calling server.handleClient() forever. That process checks for incoming HTTP connections, handles them, sends responses, exits — and then does it all over again. A simple web server like this one spends most of its time waiting.
A far more efficient way to handle things would be to launch server.handleClient() only when an incoming network connection calls for it, and put the hardware to sleep whenever that is not happening. However, that level of control just isn’t possible in the context of the Arduino’s ESP8266WebServer library.
So what’s to be done? The next best thing turns out to be a simple delay(1) statement right after each server.handleClient() call in the main loop.
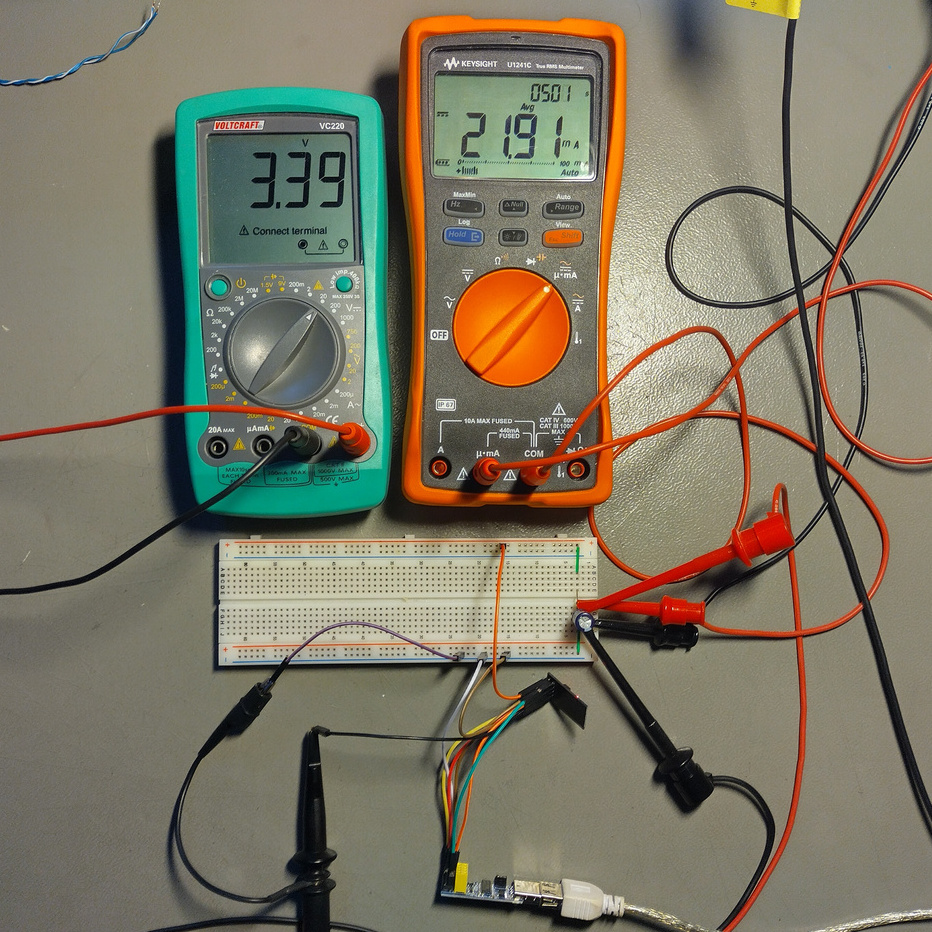
Why does this work? Adding delay(1) actually causes the CPU to spend the vast majority of its time in that one millisecond loop. And counting microseconds turns out to be a far less demanding task, power-wise, than checking for incoming network requests about a hundred thousand times per second. In [Tomaž]’s tests, that one millisecond delay reduced idle power consumption at 3.3 V from roughly 230 mW to around 70 mW — about 60% — while only delaying the web server’s response times by 6-8 milliseconds.
There are dozens, if not hundreds of amazing Arduino Cloud features. So it’s perfectly understandable if you’ve missed some of them.
So we’ve put together a list of our favorite Arduino Cloud features that you might not know existed.
1) Auto-generate Sketches
We’ve talked elsewhere about getting an understanding of what cloud computing really is, and how it’s not just the domain of experts. The cloud is how total beginners can get started much more easily. There’s no better demonstration of that than our first top Arduino Cloud feature; auto-generated sketches.
When you create a new “Thing” in your Arduino Cloud, you add various bits of info to it. Wi-Fi connection credentials, and any variables you want to control or monitor. The Cloud automatically generates a starting sketch from this info. That sketch can then be sent to your boards, so all your initial configuration is taken care of, without a single line of code.
2) Device-to-Device Communication
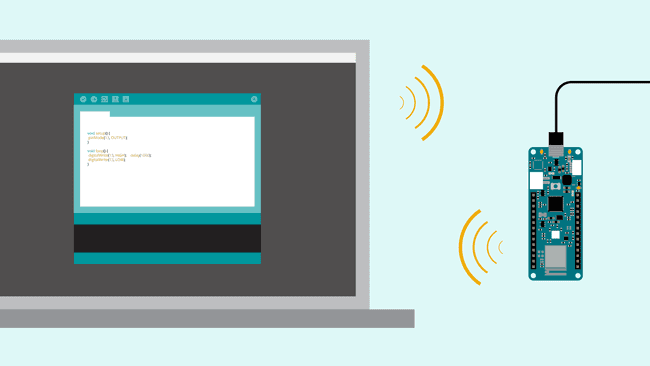
There’s simply no easier way to make two microcontroller boards talk to each other than Arduino Cloud. We’ve covered in detail how easy it is to wirelessly connect your boards.
This isn’t just for Arduino devices either. If you want any combination of Arduino, ESP32 and ESP8266 devices to work together, this is how you do it.
3) Over-the-Air Updates
Working through your Arduino Cloud means you don’t have to disconnect any Arduino boards when updating them. If you want to edit or add a new sketch, it can all be done wirelessly, over-the-air.
Anyone who’s had to dismantle a project or device to get to a board’s USB socket will appreciate the simple, vital value of this feature. It’s one of those things that you’ll wonder how you ever lived without.
4) Support for ESP Boards
There’s a reason we call it the Arduino IoT Cloud. This is an all-encompassing platform for Internet of things, home automation, and electronics project control and management. So first we added support for ESP8266 devices. More recently, experimental support for ESP32 boards became available.
So even if your project doesn’t actually have any Arduino products in there, the Cloud is just as useful. Secure, private, and accessible to all kinds of IoT and maker devices.
5) Trigger Actions on Cloud Events
Arduino Cloud makes it super easy to do things that you might normally need the IDE for. But it’s also got lots of exclusive features that you only get in the Cloud.
For example, there are actions that can be triggered based on your board’s interactions with your Arduino Cloud. You can include actions within your sketches when a Cloud connection is successful, and when the Cloud has synced with a device. Or perhaps most useful of all, trigger an action if Cloud connectivity is lost. Getting an indication that a project has disconnected could be incredibly useful!
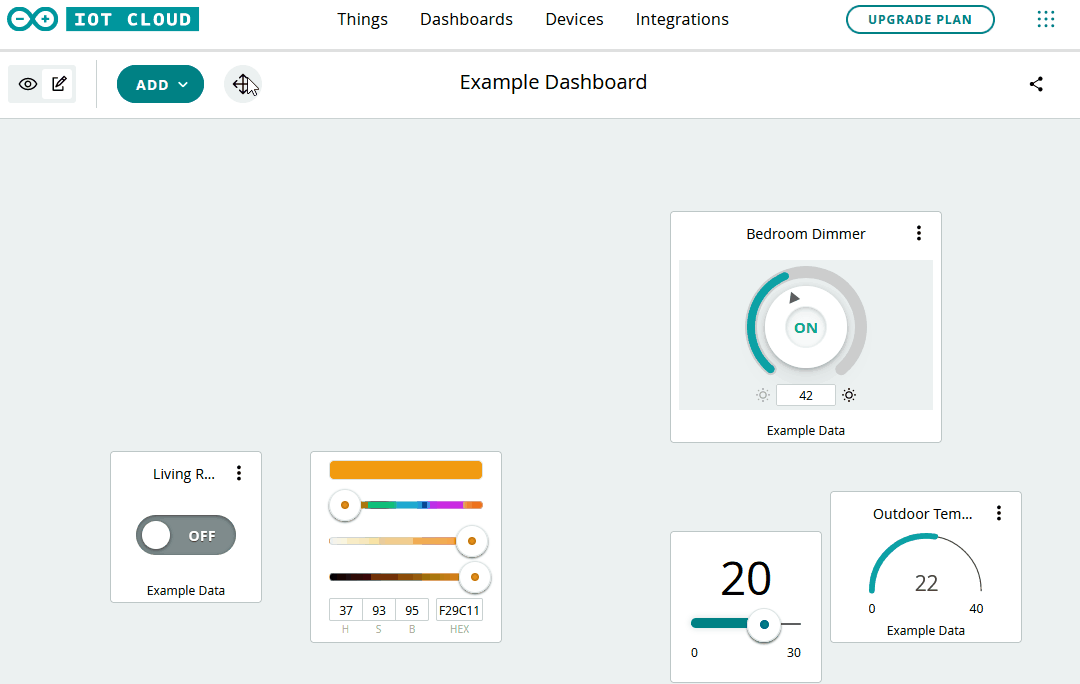
Dashboards are control panels within your Arduino Cloud. It’s one of the most powerful Arduino Cloud features, and essential to making full use of Cloud control. But what’s often overlooked is that you can share dashboards with anyone you want.
For example, let’s say you’re using Arduino Cloud to control your home automation. You can set up a dashboard for a tablet in the living room that the whole family can use, but doesn’t have sensitive admin controls in there. And then another for people to use on their phones.
All Cloud plans include unlimited dashboards. And anyone can have a free Cloud account. So you can create as many dashboards as you like, and share them with literally anyone, anywhere.
7) Alexa Integration
Natural language voice control is genuine Star Trek stuff. So it’s no wonder people love the functionality of Alexa. Did you know it’s incredibly easy to connect your Arduino Cloud to Alexa? And once you have, it effectively adds voice control to every board, and every project. Nothing else needed.
There’s literally no easier way to make an Alexa-controlled device or project than with your Arduino Cloud. You’ll never look back, and you’ll always have someone to talk to.
8) Full API Integration
For the engineers, coders, developers and those among you who’ve been using Arduino for a long time, API integration is the powerhouse secret feature you’ve been looking for.
The API can be called with any HTTP client, or with languages like Javascript, Python, Golang and more. It’s what you need to incorporate the power of Arduino Cloud features into your systems, platforms and projects.
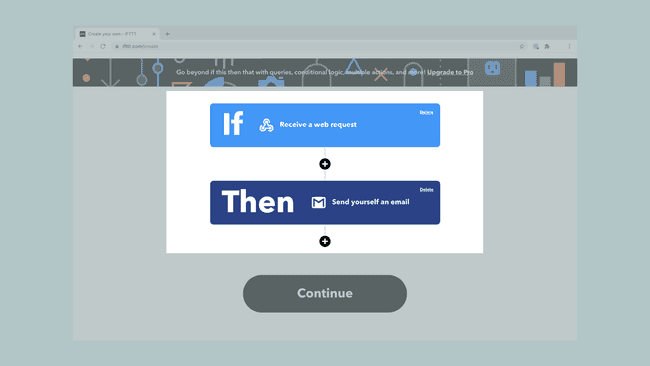
9) Use IFTT, Zapier and More with Webhooks
There are lots of reasons you might want to include control platforms outside of your Arduino Cloud. Like sending an email or a Tweet when you press a button on a Nano, or a device disconnects from the Cloud (see above).
That’s what webhooks are for, and they give you a universal way to send commands out of Arduino Cloud, and into… well, anything!
IFTTT and Zapier are great examples of services that can do almost anything from a webhook. Get to know this feature, and connected projects suddenly have easy access to the whole web.
10) Easy Firmware Updates
When you connect a new Arduino board, your Arduino Cloud automatically checks its firmware version. If there’s an update available, it offers you the option of applying that update.
Very easy, and you don’t have to worry about finding the correct/latest firmware version yourself. This simple, background function makes sure your boards and projects always have the latest features, security updates and bug fixes.
For people who use a lot of Arduino devices, it’s worth adding them to the Cloud for this feature alone.
11) Full Dashboard Customization
We’ve already talked about unlimited dashboards in your Arduino Cloud. Creating them is easy, but did you know you can customize them too?
Anyone who’s dipped their toe in the home automation waters knows how essential dashboard editing is. Some platforms work great, but offer very little when it comes to controlling your dashboard layout. For many people, that’s a deal breaker.
Your Arduino Cloud widgets can easily be added, edited, removed, repositioned and resized in any configuration you want. It’s as simple as drawing and resizing boxes, but the result makes your Cloud projects infinitely more useable.
12) Watchdog Timer
The Arduino Cloud automatically runs a watchdog timer that will reset your board, hardware or project if it crashes. This is a small feature, but a powerful one that can keep your projects running while unattended.
It means you never have to manually reset it when you eventually realize it’s not been running all day. You can have devices running remotely (very remotely, with SIM or LoRa connectivity) and be sure they’re robust enough to keep on ticking.
It’s included and running automatically, but can easily be disabled if you don’t need it.
13) Node-RED Integration
Arduino provides a super easy way to use Node-RED for IoT automations. This is a powerful, but very easy-to-use visual programming platform specifically designed for IoT projects.
Complex automations using advanced triggers like sunrise or sunset, presence detection, combined actions or sensor readings and so much more. The possibilities are endless, and learning Node-Red is incredibly easy. Get to grips with this feature, and you’ll be creating IoT automations that would otherwise need an experienced coder.
13A) Fully Functional Free Account
One of the best kept secrets of the Arduino Cloud is that if you’re registered on the Arduino website or forum, you already have a free Cloud waiting for you. Simply head on over to the Cloud site and get started with unlimited dashboards and unlimited sketches. The free tier of Arduino Cloud is fully functional, and it’s ready and waiting for you to give it a try.
In fact, it’s the perfect option especially if you haven’t used Arduino before! Give it a shot and let us know what you think. No credit card required; just your creativity and a passion for connected projects.
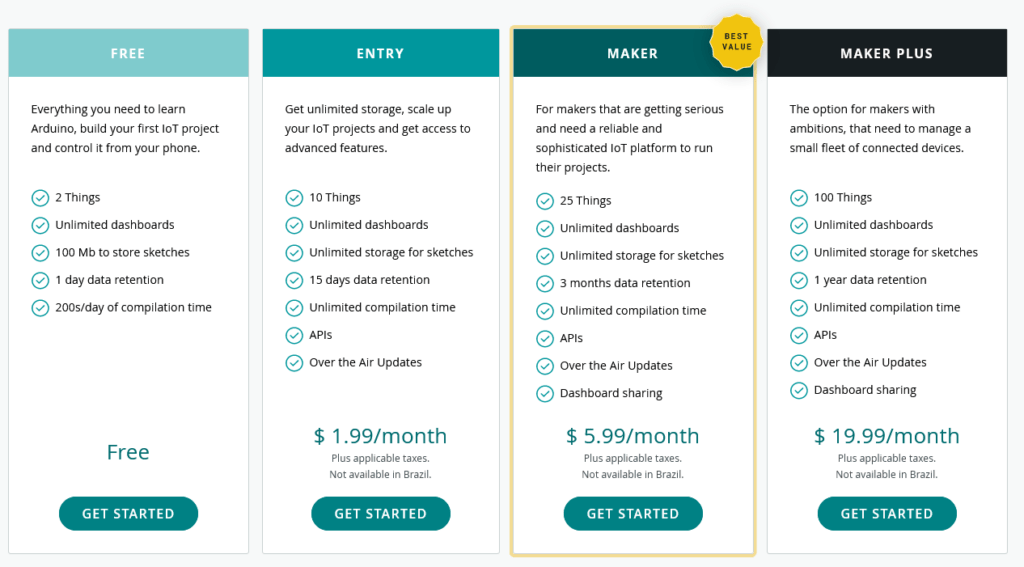
Support for ESP32 devices is now available on the Arduino IoT Cloud. It’s a huge step forward in bringing IoT devices of all kinds together, and giving them a way to get connected, communicate with each other, and offer new levels of convenience and control.
A new world of IoT connectivity
Arduino’s been working on this for some time, and we’re really excited to introduced ESP32 support by including the Arduino Core developed by Espressif on the Arduino Cloud platform. This opens up cloud-connected projects to a whole new world of IoT devices, projects and possibilities. Web Editor is by far the most convenient way to program an ESP32, and to connect it and control it via a cloud platform.
Support for ESP8266 devices is already available, and was recently moved into the free Arduino Cloud tier. The addition of ESP32 boards, along with the wide range of Cloud-compatible Arduino devices, adds some serious power to a Cloud account.
It’s all about communication. There’s never been an easier way to program your boards, or implement device-to-device communication in IoT. Once your devices are hooked up to an IoT Cloud account, they can talk to each other, sync variables, share data and be combined into powerful dashboards. You even get seamless smartphone control through the Arduino IoT Remote apps. Or if you just want a simpler, easier way to program your ESP32 boards, the Arduino Cloud Web Editor makes it a walk in the park.
It’s the next step in making Arduino Cloud into a secure, ubiquitous platform for all connected devices. It’s still early days, but that’s where the community comes in. We want you guys to get on there, hook up your boards, and test the limits of what’s possible in Cloud-connected projects.
Connect Your ESP32 to the Cloud
There are only a couple of things you need to get an ESP32 board onto Arduino Cloud.
An account on the Arduino IoT Cloud, of course. You’ve got multiple options, so plenty of ways to tailor the subscription to exactly what you need. Get started with the free plan, and then just bump it up to the next level once you’re ready.
Grab the Arduino Create Agent, which runs in the background on your computer. It lets Arduino IoT Cloud detect and communicate with supported boards. It makes it a doddle to upload sketches from your web browser using the Web Editor IDE, as well as read and write data.
Note: It’s possible your computer might need drivers to recognize your ESP32 board on the serial port. If you’re having difficulties, check in with the board manufacturer to get the necessary drivers.
And then you’re good to go! Follow the Arduino IoT Cloud process just as you would with any other board. Create a device, select “ESP32 device”, and take note of your secret key during this setup process.
Your contribution and tests will really help to build on this exciting evolution of Arduino IoT Cloud. So we want to hear all about it. Join us over on the forum to share your experiences.
This is a great way to upgrade existing projects, home automation or other applications. It makes it so easy to take advantage of IoT Cloud’s powerhouse features. With almost no code, you can have any combination of Arduino, ESP8266 and ESP32 boards communicating and working together seamlessly and wirelessly. It’ll cut the time it takes to build adventurous new projects while expanding the possibilities and significantly reducing the legwork.
Once you’re in the Cloud, there’s no looking back!
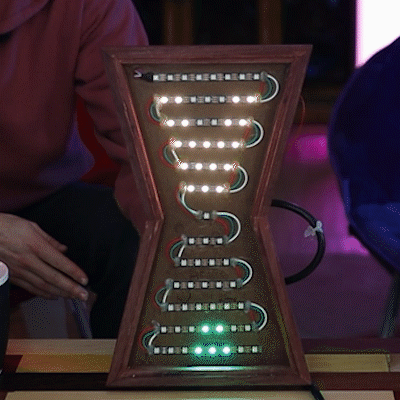
If you want to waste time in a meaningful way, get yourself an hourglass. It’s simultaneously mesmerizing and terrifying to sit there and watch the seconds slip through the threshold that separates possibility from missed opportunity.
[Ty and Gig]’s LED hourglass is equally beautiful to watch. It doesn’t actually tell time, but that’s perfectly fine by us. What it does do is animate the LEDs to approximate grains of sand in gravity, no matter how the hourglass is tilted.
In either vertical orientation, the sand falls as long as there is some in the top. When the hourglass is horizontal, the LEDs settle just like real sand does. [Ty and Gig] achieved this with a whole lot of code that breaks the animation frames into structure arrays.
By contrast, the hardware part of this build is fairly simple: all that’s needed to replicate this build is some RGB LEDs a beefy power supply to drive them, an accelerometer, and a microcontroller.
[Ty and Gig] were planning to use an ESP8266, but misplaced it and went with an Arduino Mega instead. (You know what they say — buy a replacement and the one you lost will turn up almost immediately.) The beautiful frame is made from leftover purpleheart, a hardwood that turns purple with exposure to air. Check out the build video after the break.
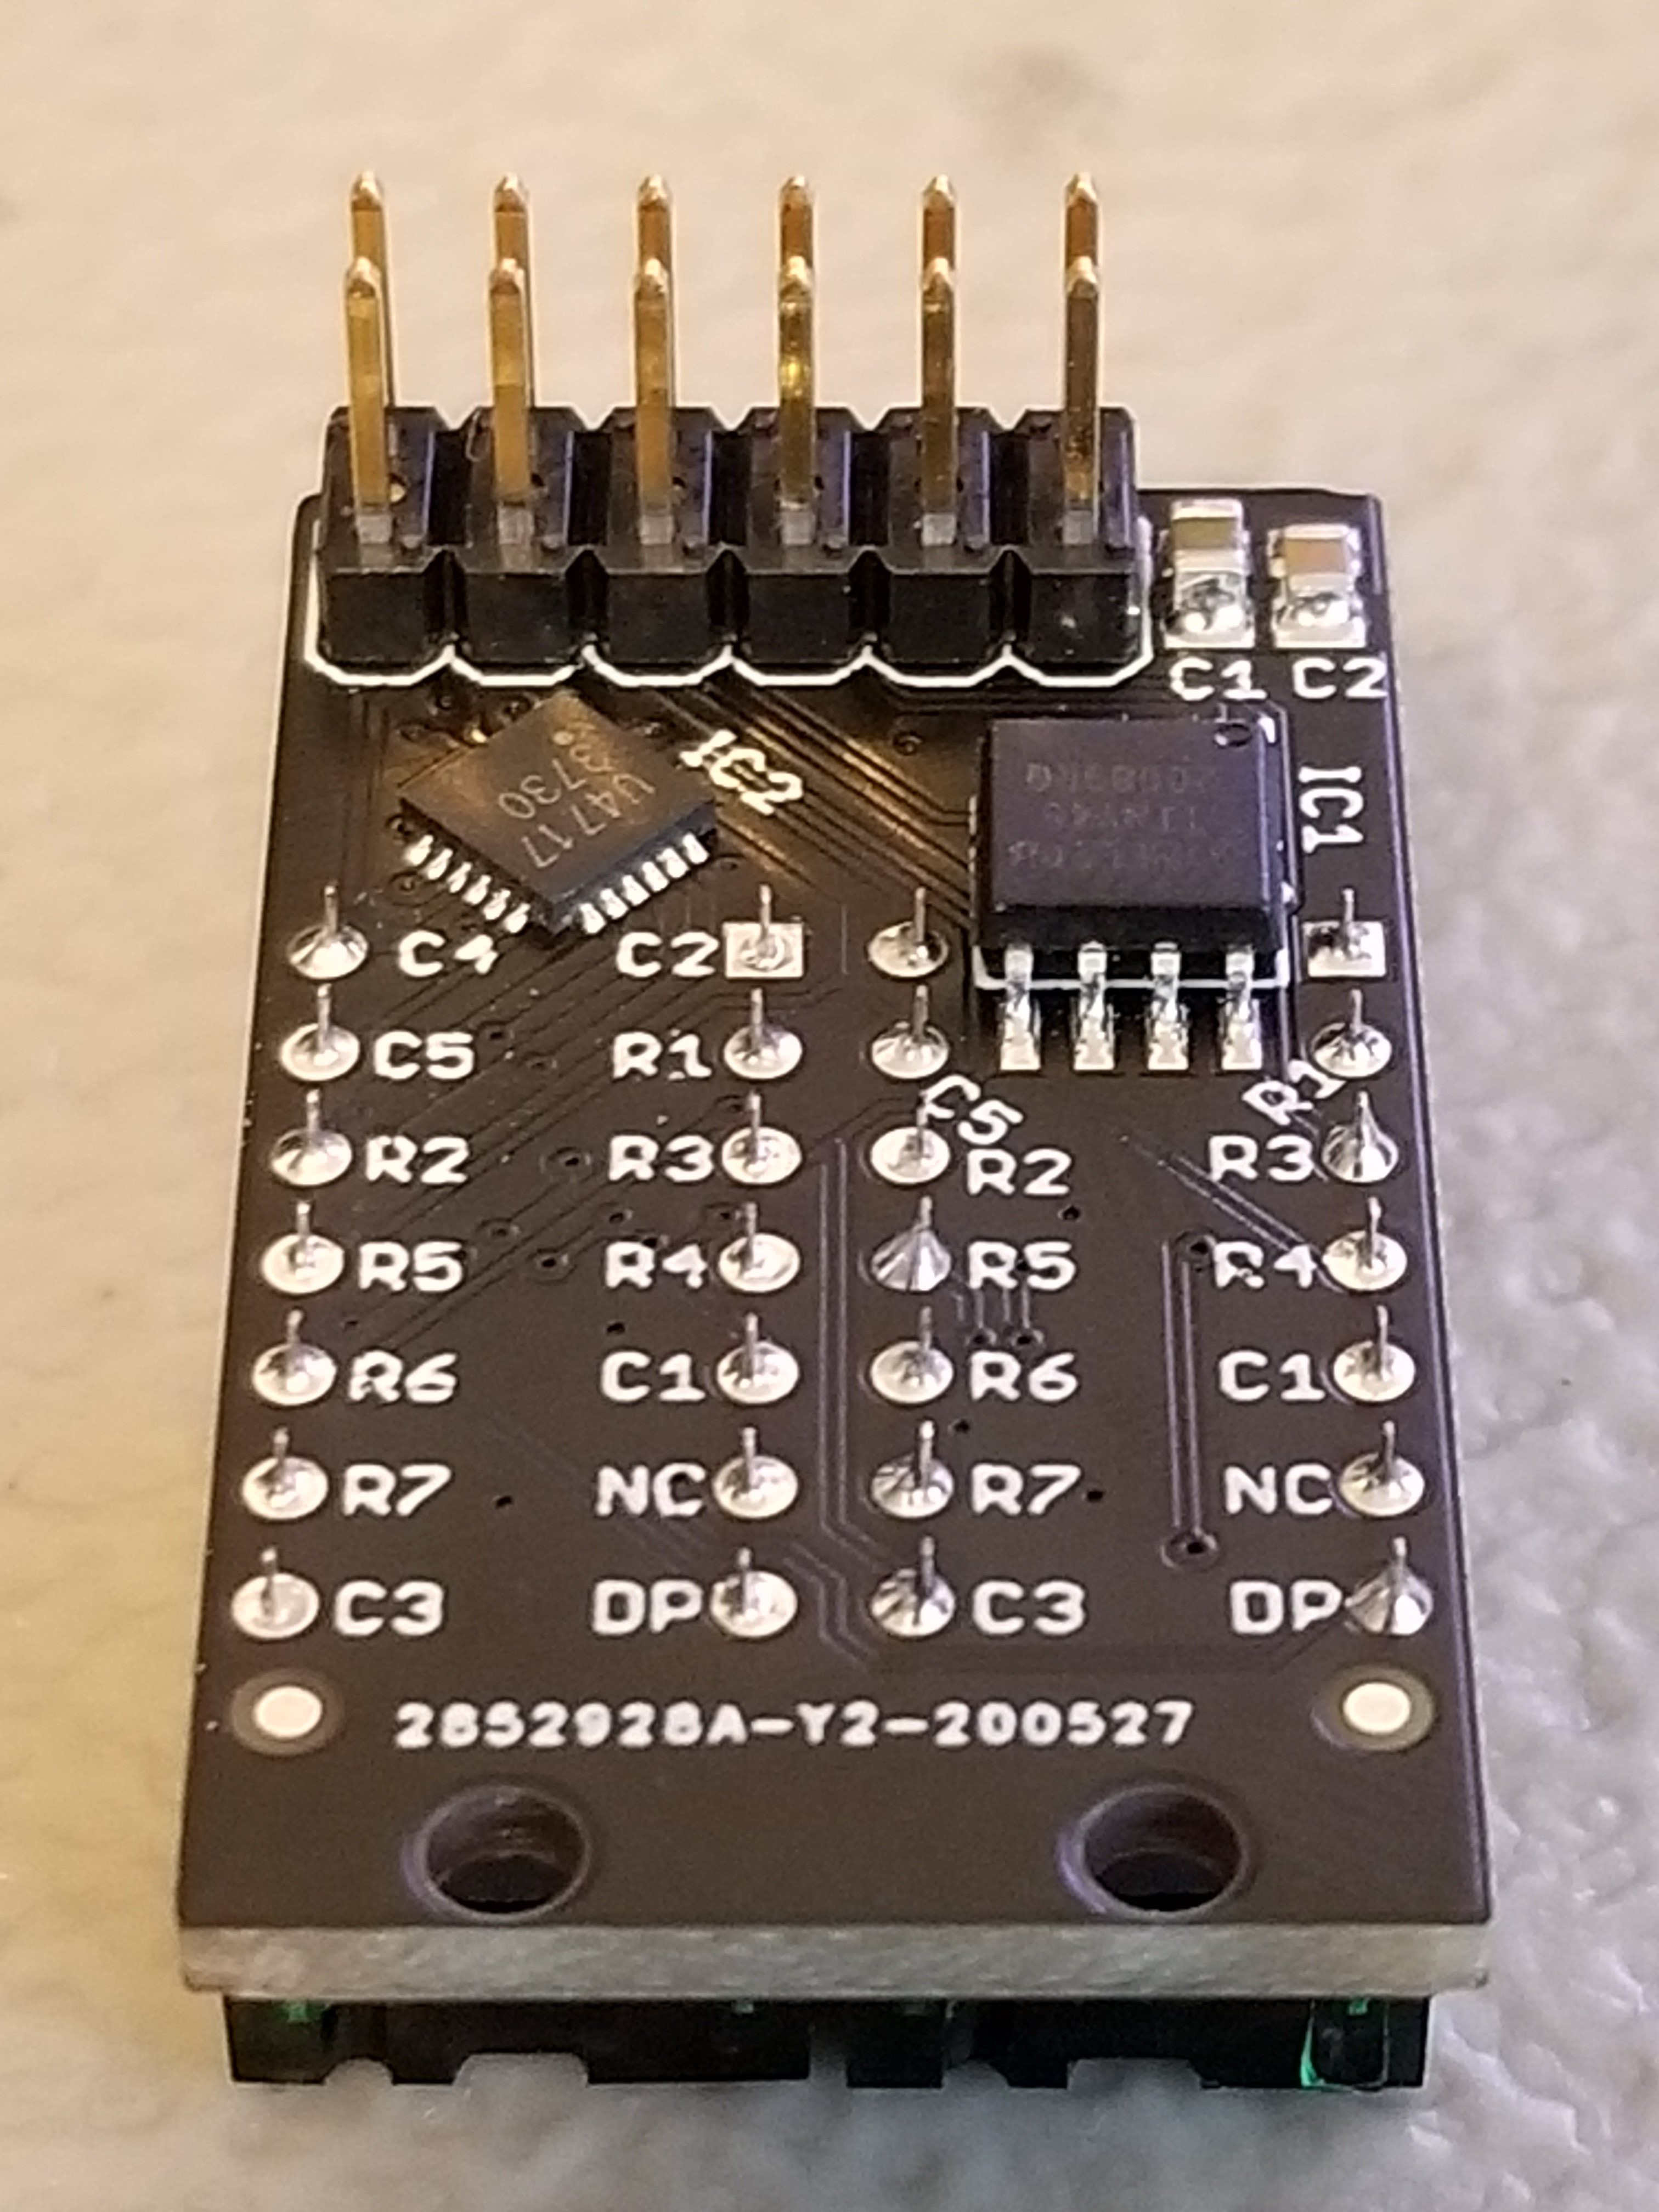
When we last heard from [lixielabs] he was building Nixie tube replacements out of etched acrylic and LEDs. Well he’s moved forward a few decades to bring us the Pixie, a chainable, addressable backpack for tiny LED matrix displays.
Each Pixie module is designed to host two gorgeous little Lite-On LTP-305G/HR 5×7 LED dot matrix displays, which we suspect have been impulse purchases in many a shopping cart. Along with the displays there is a small matrix controller and an ATTINY45 to expose a friendly electrical interface. Each module is designed to be mounted edge to edge and daisy chained out to 12 or more (with two displays each) for a flexible display any size you need. But to address the entire array only two control pins are required (data and clock).
[lixielabs] has done the legwork to make using those pins as easy as possible. He is careful to point out the importance of a good SDK and provides handy Arduino libraries for common microcontrollers and a reference implementation for the Raspberry Pi that should be easy to crib from to support new platforms. To go with that library support is superb documentation in the form of a datasheet (complete with dimensions and schematic!) and well stocked GitHub repo with examples and more.
To get a sense of their graphical capabilities, check out a video of 6 Pixie’s acting as a VU meter after the break. The Pixie looks like what you get when a hacker gets frustrated at reinventing LED dot matrix control for every project and decided to solve it once and for all. The design is clean, well documented, and extremely functional. We’re excited to see what comes next!
Planet Arduino is, or at the moment is wishing to become, an aggregation of public weblogs from around the world written by people who develop, play, think on Arduino platform and his son. The opinions expressed in those weblogs and hence this aggregation are those of the original authors. Entries on this page are owned by their authors. We do not edit, endorse or vouch for the contents of individual posts. For more information about Arduino please visit www.arduino.cc
You are currently browsing the archives for the ESP8266 category.


 Each Pixie module is designed to host two gorgeous little
