We love the ingenuity at work in this cuckoo clock project from maker oliverb.
Using an ESP32 WROOM 32D Microprocessor & Stepper Motor to Repair & NTP Time Synchronize a Worn Out Regula 25 Cuckoo Clock. This modification contains 3D printed parts but the parts could be faily easily made from wood/metal.
This project uses a Regula 25 Cuckoo Clock movement which are very common and worn out ones should be cheap and easy to find.
Brian Dorey documents building a remote controller for three Elgato Key Lights using a low-cost ESP32 WiFi module with push switches and indicator LEDs.
This project is an upgrade to the previous blog post where I created a simple remote-control switch to turn on and off a single WiFi-connected Elgato Key Light.
The lights do not have any buttons for manual control, and you need to either use the Elgato Control Center app on a mobile device or the desktop software to change the settings or turn the lights on and off.
The lights retain their previous light level and colour temperature settings, so a simple controller with three push buttons would be ideal to allow remote control without needing to use the mobile app or start the main PC every time we wanted to use the lights.
A 3D printed case encloses the project electronics. The code is written in Arduino.
The project is documented here and the code is on GitHub.
Squirrels can definitely be a bit divisive. There’s a very vocal squirrels are rats with bushy tails camp. There are also those enamored with squirrels’ cute little features and nut harvesting skills (years ago my roommate made a nest for a squirrel on our fire escape, I never opened that window again). No matter how you feel, in many parts of the world, if you have a backyard, you likely have a bunch of squirrel neighbors, and should probably just make the most of it. Maker David McDaid did just that (and more) when he built this charming IOT Squirrel House for his back garden:
The goal here was to introduce myself to the world of IOT by creating a squirrel house in our back garden that would be equipped with an ESP32, a camera, motion sensor, solar power, and would integrate with my Home Assistant OS, all using as many off-the-shelf components as possible. I also opted to design and build a custom housing from scratch.
Fun project video from maker Lukas Deem on YouTube based on this tutorial on Instructables by alstroemeria. We appreciate how well the project challenges are documented.
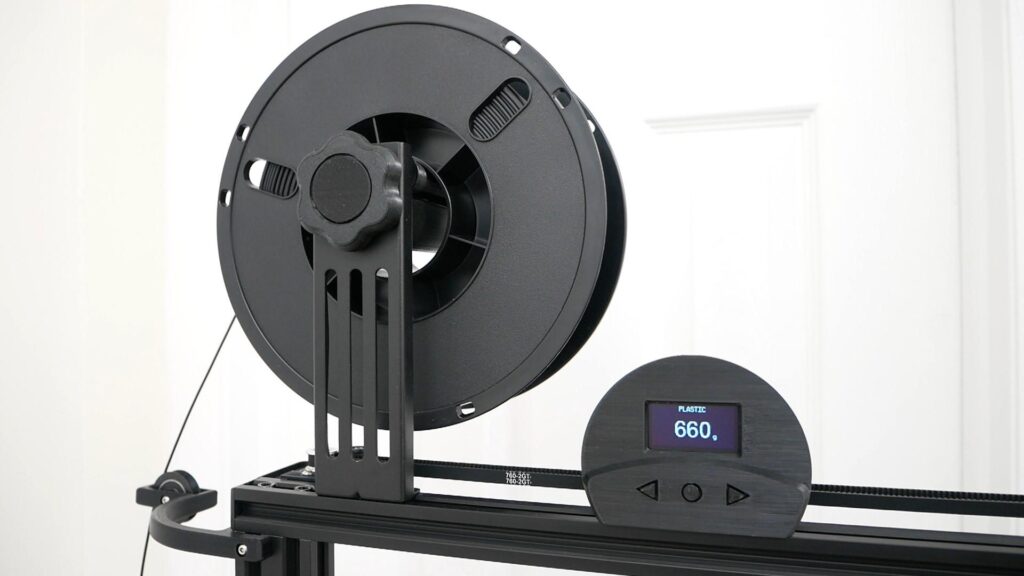
We’ve all been there: you’re about to start a new print job and the filament on the spool is looking pretty sparse. You start the print hoping that there is enough filament for the job, but it runs out 90% of the way through and your part is ruined. A filament runout sensor will help you address this problem when it occurs, but this DIY digital spool scale will prevent the problem altogether.
Every popular slicer on the market will provide a fairly accurate estimate of the amount of filament (in mass and length) that a job will require. To determine if you have enough filament, you just need to know the length of the filament left on the spool or its weight. Figuring out the length is almost impossible unless you track the feed over time, but it is easy to weigh the filament. As long as you can subtract the weight of the spool (set the tare), you can determine if you have enough filament. This device both weighs the current spool and subtracts the tare.
This device contains an Arduino Nano, a load cell, buttons, and an OLED screen on a custom PCB. It fits into a custom spool holder and weighs whatever spool is in place. The cool thing is that it stores profiles in EEPROM, so it can remember the weight of empty spools from different manufacturers. You can either weigh an empty spool to get the tare value (the most accurate) or weigh a new spool and subtract the specified weight of the filament (such as 1kg). The latter is less accurate, since manufacturers tend to add a little extra filament to be safe. But you’d be erring on the side of caution, so that method shouldn’t cause any print failures.
If you do a lot of 3D printing and end up with a pile of partial spools, this scale device would make a perfect weekend project to improve your life.
3D printing, the stuff of science fiction only a few short years ago, is becoming more widely available all the time. Buying your own 3D printer to keep in your home is now fairly accessible, with entry-level printers available for just a few hundred dollars.
But why would you buy one? It’s easy to think 3D printers are still a niche toy, exciting for a few enthusiasts but largely useless for the general population. But this couldn’t be more wrong — 3D printers have a wide range of very practical uses for everyday households.
In this article, we’ll take a look at why 3D printing is so useful and some of the many reasons to consider adding a 3D printer to your own smart home.
Why 3D printing is so useful
It’s fast and convenient. With a 3D printer, you can produce simple objects, creations, and components for existing items in a fairly short amount of time — much quicker than ordering the same things online or heading to a local store.
You get a ton of control over what you print. Need a very specific shaped object to repair a broken item in your home? It may be impossible to buy what you need anywhere, but a 3D printer allows you to create exactly the right size and shape you need.
It’s relatively affordable. As mentioned, basic 3D printers can be had for fairly cheap nowadays, and printing — for smaller objects, at least — costs very little.
It’s sustainable. It’s much more sustainable to print your own things than order them across large distances, and this is especially true for niche items that might need to be shipped across the globe to reach you.
Using 3D printing in your smart home
So what can you use a 3D printer for? There are many potential uses for a 3D printer in your smart home, and they range from practical tasks like repairing broken furniture to more creative hobbies. Let’s take a look at some of the main reasons to own a 3D printer.
Create useful items for your home
3D printers are perfect for creating small, useful items to use around the home. Some examples are coasters, decorations, lampshades, stationery, and small kitchen tools. This is a great way to combine practical use with a fun creative hobby, putting your own personal spin on the little items you use every day.
Repair items
You know that table you have that just never sits right? The door handle that doesn’t quite match the others in the house? The light switch that doesn’t fit exactly flush with the wall?
3D printing is the perfect solution to many of these small defects and faults. Because you have so much control over what you print — 3D printers can print according to virtually any instructions — it’s easy to create components to fix and spruce up the objects and appliances around your smart home.
Education
3D printers aren’t a regular fixture in classrooms around the world just yet, but it’s only a matter of time. These machines allow students to take a more hands-on and creative approach to their learning. Some examples could be:
Science projects like creating models of the solar system of the structure of an atom
Geography work like printing detailed models of mountains or volcanoes
All kinds of product design work
Creative work like art
Arts and creative projects
Creative projects aren’t just for the classroom — many people own 3D printers purely for their own artistic work. There’s almost no limit to what a 3D printer can do in this area, and with a little experience, it’s possible to create truly beautiful and incredibly detailed works of art at home.
Build your own smart home with Arduino
3D printing is just one aspect of a smart home. There’s an almost endless list of things you can do with the right home automation tools — from growing a smart garden to keeping your pets entertained and fed.
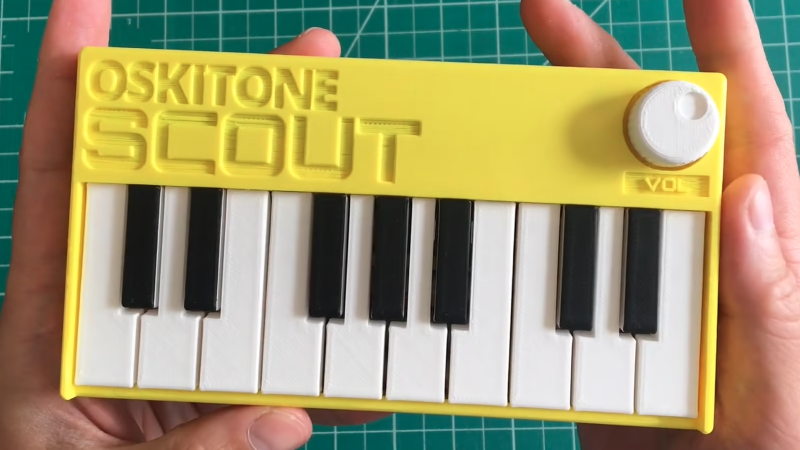
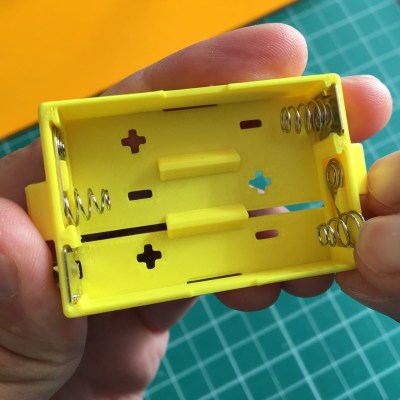
We’ve always been delighted with the thoughtful and detailed write-ups that accompany each of [Tommy]’s synth products, and the background of his newest instrument, the Scout, is no exception. The Scout is specifically designed to be beginner-friendly, hackable, and uses 3D printed parts and components as much as possible. But there is much more to effectively using 3D printing as a production method than simply churning out parts. Everything needed to be carefully designed and tested, including the 3D printed battery holder, which we happen to think is a great idea.
3D printed battery holder, with spring contacts inserted by hand.
[Tommy] also spends some time explaining how he decided which features and design elements to include and which to leave out, contrasting the Scout with his POLY555 synth. Since the Scout is designed to be affordable and beginner-friendly, too many features can in fact be a drawback. Component costs go up, assembly becomes less straightforward, and more complex parts means additional failure points when 3D printing.
[Tommy] opted to keep the Scout tightly focused, but since it’s entirely open-sourced with a hackable design, adding features is made as easy as can be. [Tommy] designed the PCB in KiCad and used OpenSCAD for everything else. The Scout uses the ATmega328, and can be easily modified using the Arduino IDE.
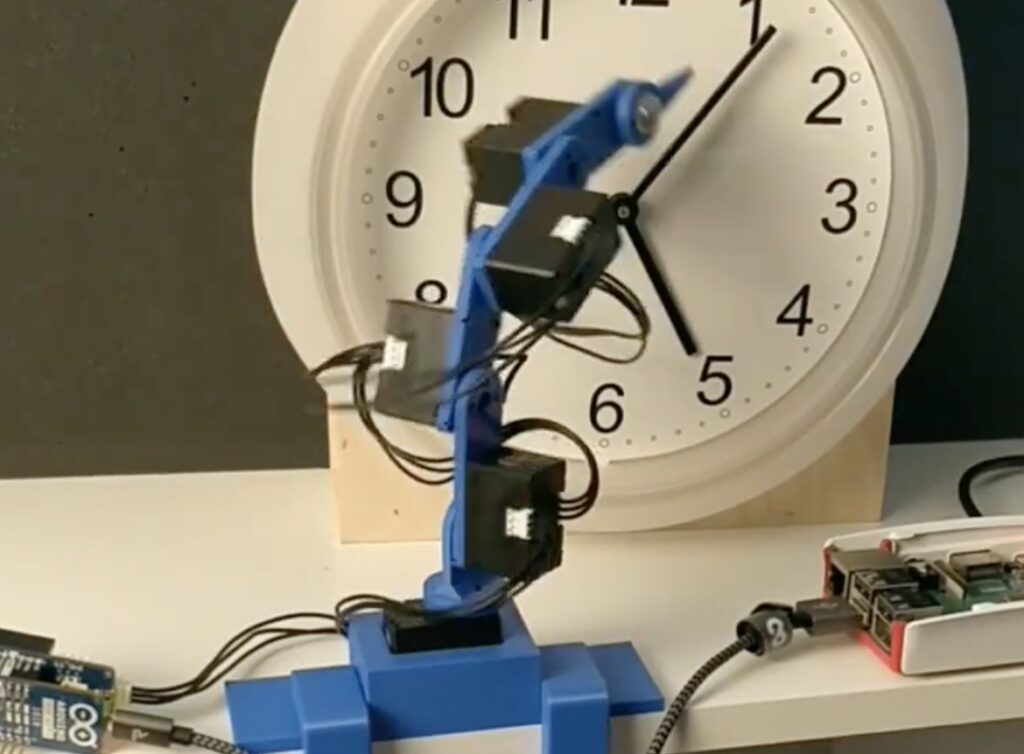
Normally when an inexpensive wall clock stops ticking, you simply buy a new one. However, ‘Developer Hendrik’ decided to bring his broken clock back to life, or some semblance thereof, using a 3D-printed four-axis robot arm dubbed “Serworm Michael.”
Under the control of a MKR 1010 WiFi and DYNAMIXEL MKR Shield, along with a Raspberry Pi, Serworm Michael is set up to push the minute hand into the next position. Five DYNAMIXEL XL330-M288-T servos drive the robot, which are programmed by physically moving the arm and using a command line interface.
You can see it in action in the video below, while more details on Serworm Michael are available on GitHub.
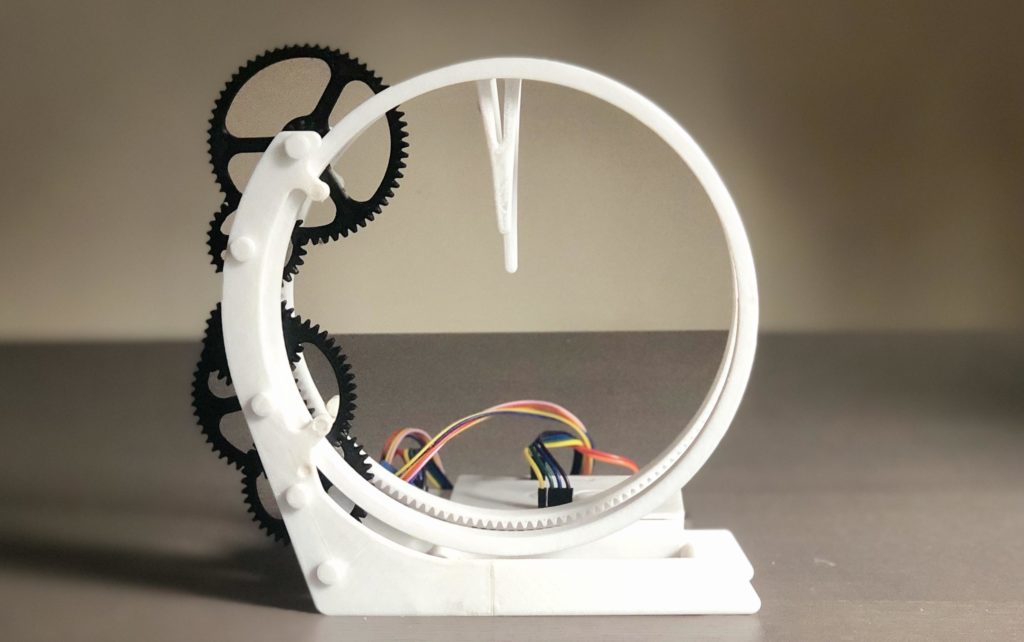
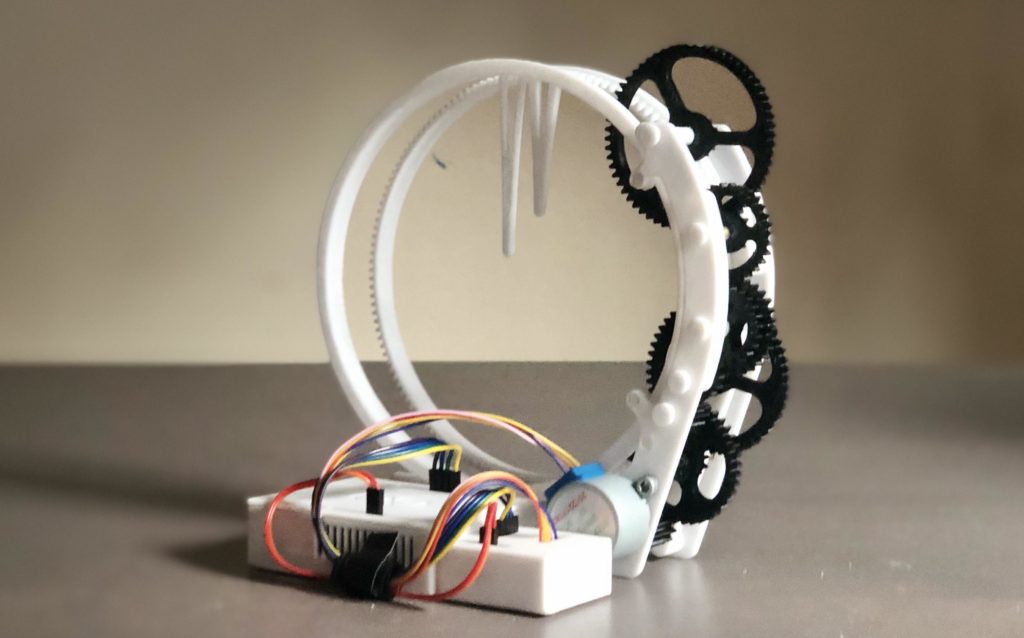
Simply looking at a traditional analog clock sitting on a wall somewhere got pretty boring for one Instructables user who goes by saulemmetquinn, which is partially why they wanted to create a novel design instead. Their device uses almost entirely 3D-printed components that come together to form the “Holo Clock,” since it seems holographic with its floating minute and hour hands.
The Holo Clock project started with a surprisingly complex design in CAD software. There are two rings that are lined with teeth that sit stacked horizontally. The back ring is the minute hand, and because it is moved almost directly by the stepper motor, it spins more quickly. The hour hand is driven by a set of gears that reduce the output of the minute hand’s cogs by a factor of 60, thus making it turn at the correct rate.
The electronics for the clock are extremely simple. It uses an Arduino Uno with a set of four output wires, along with power and ground, to control a ULN2003 stepper motor driver. This in turn outputs current to a generic 5V stepper motor that spins the first drive gear at a known, precise rate for consistent timing. Likewise, the code is also straightforward, as all it must do is step the motor a certain amount depending on how many steps are left within the loop.
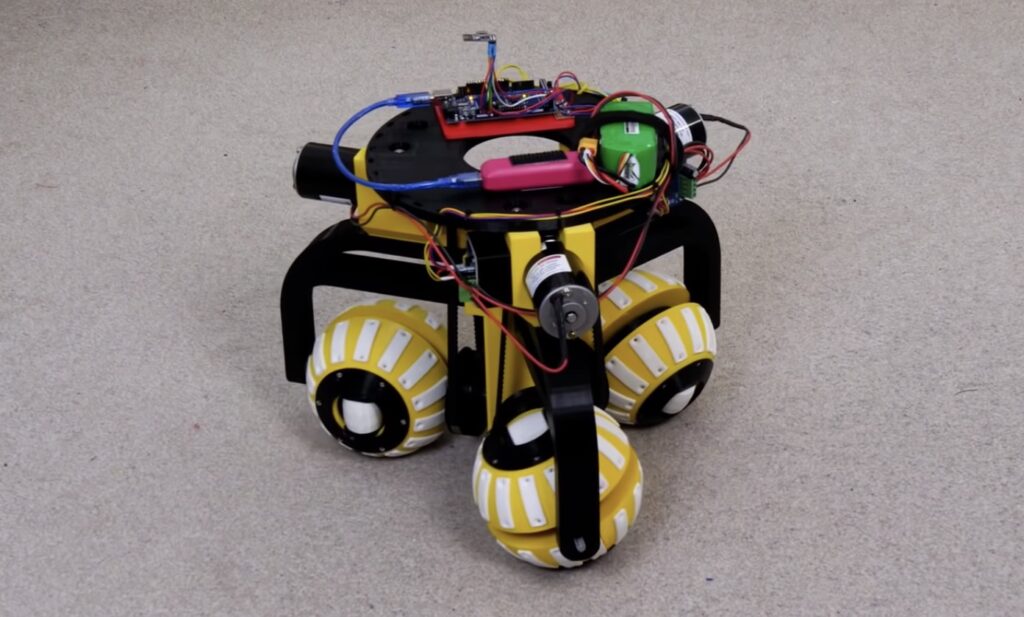
Wheeled robots normally have wheels that move in a single axis and steer by using either differential speeds or by pivoting some kind of guide wheel. However, this leads to some drawbacks, the most obvious being an inability to move in really tight spaces. When presented with this challenge, YouTuber James Bruton came up with a great design for a highly mobile robot platform that employs a novel setup to move in any direction. Inspired by the work of researchers at Osaka University in Japan, the omni wheel uses a single drive shaft to spin, yet nearly every surface has a way to move along the ground.
After designing his robot in Fusion 360 and 3D printing each part, Bruton assembled the wheels and added a pulley to each drive shaft which could be spun by a motor sitting directly above. An Arduino Mega is tasked with controlling each of the three BTS7960 motor drivers and it receives commands via an nRF24L01 radio module. All of the drive components are powered by a single 3-cell LiPo battery pack, while the main board is supplied current by a USB battery bank.
By spinning certain wheels at the correct speed, straight line motion can be produced, as shown in the video below. Bruton tested his robot by driving over carpet, tile, aluminum extrusions, and even a plastic lid, which did very well across everything except the lid. This robot has countless potential uses, such as a garbage collection device for around the house.
Planet Arduino is, or at the moment is wishing to become, an aggregation of public weblogs from around the world written by people who develop, play, think on Arduino platform and his son. The opinions expressed in those weblogs and hence this aggregation are those of the original authors. Entries on this page are owned by their authors. We do not edit, endorse or vouch for the contents of individual posts. For more information about Arduino please visit www.arduino.cc
You are currently browsing the archives for the 3D printing category.