Posts | Comments

Planet Arduino

Archive for the ‘digital camera’ Category

Industrial hardware needs to be reliable, tough, and interoperable. For this reason, there are a series of standards used for command & control connections between equipment. One of the more widespread standards is ModBus, an open protocol using a master-slave architecture, usually delivered over RS-485 serial. It’s readily found being used with PLCs, HMIs, VFDs, and all manner of other industrial equipment that comes with a TLA (three letter acronym).

[Absolutelyautomation] decided to leverage ModBus to control garden variety digital cameras, of the type found cluttering up drawers now that smartphones have come so far. This involves getting old-school, by simply soldering wires to the buttons of the camera, and using an Arduino Nano to control the camera while talking to the ModBus network.

This system could prove handy for integrating a camera into an industrial production process to monitor for faults or defective parts. The article demonstrates simple control of the camera with off-the-shelf commercial PLC hardware. Generally, industrial cameras are very expensive, so this hack may be useful where there isn’t the budget for a proper solution. Will it stand up to industrial conditions for 10 years without missing a beat? No, but it could definitely save the day in the short term for a throwaway price. One shortfall is that the camera as installed will only save pictures to its local memory card. There’s a lot to be said for serving the images right to the engineer’s desk over a network.

We’ve seen [Absolutelyautomation]’s work before – check out this implementation of Pong on an industrial controller.


Filed under: Arduino Hacks, digital cameras hacks

The well-dressed hacker [Sean Hodgins] has put together a neat little project: a battery powered remote shutter. He built it for use with Beme, the latest Snapchat clone that all of the cool kids are now using.

This service is designed to get away from the selfie culture by starting to record when you hold your phone against your chest, so you are looking at the thing being recorded, not your phone. [Sean] wanted a bit more control than that, so he built a remote control that starts the recording by moving the servo arm over the proximity sensor.

He built this neat little device from an Arduino Pro Mini, a battery, a small servo, a couple of power control boards and a cheap RF link from SeedStudio, all glued onto an iPhone case. It’s a bit rough around the edges (the servo makes some noise that is picked up on the recording, for one thing), but it is a great example of how to lash together a quick prototype to test a project out.


Filed under: Arduino Hacks, digital cameras hacks
pixel

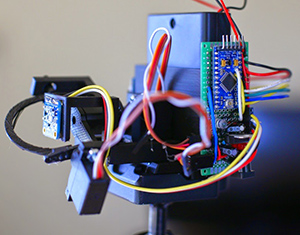
[Ben] has written all sorts of code and algorithms to filter, sort, and convolute images, and also a few gadgets that were meant to be photographed. One project that hasn’t added a notch to his soldering iron was a camera. The easiest way to go about resolving this problem would be to find some cardboard and duct tape and built a pinhole camera. [Ben] wanted a digital camera. Not any digital camera, but a color digital camera, and didn’t want to deal with pixel arrays or lenses. Impossible, you say? Not when you have a bunch of integral transforms in your tool belt.

[Ben] is only using a single light sensor that outputs RGB values for his camera – no lenses are found anywhere. If, however, you scan a scene multiple times with this sensor, each time blocking a portion of the sensor’s field of view, you could reconstruct a rudimentary, low-resolution image from just a single light sensor. If you scan and rotate this ‘blocking arm’ across the sensor’s field of view, reconstructing the image is called a Radon transform, something [Ben] has used a few times in his studies.

camera [Ben]‘s camera consists of the Adafruit RGB light sensor, an Arduino, a microSD card, a few servos, and a bunch of printed parts. The servos are used to scan and rotate the ‘blocking arm’ across the sensor for each image. The output of the sensor is saved to the SD card and moved over to the computer for post-processing.

After getting all the pixel data to his laptop, [Ben] plotted the raw data. The first few pictures were of a point source of light – a lamp in his workspace. This resulted in exactly what he expected, a wave-like line on an otherwise blank field. The resulting transformation kinda looked like the reference picture, but for better results, [Ben] turned his camera to more natural scenes. Pointing his single pixel camera out the window resulted in an image that looked like it was taken underwater, through a piece of glass smeared with Vaseline. Still, it worked remarkably well for a single pixel camera. Taking his camera to the great outdoors provided an even better reconstructed scene, due in no small part to the great landscapes [Ben] has access to.


Filed under: Arduino Hacks, digital cameras hacks, Software Development


  • Newsletter

    Sign up for the PlanetArduino Newsletter, which delivers the most popular articles via e-mail to your inbox every week. Just fill in the information below and submit.

  • Like Us on Facebook