Posts | Comments

Planet Arduino

Archive for the ‘capacitive sensing’ Category

A lot of consumer gadgets use touch sensors now. It is a cheap and reliable way to replace a variety of knobs and switches on everything from headphones to automobiles. However, creating a custom touch controller for a one-off project can be daunting. A recent ACM paper shows how just about any capacitive sensor can work as a multitouch sensor with nothing more than an Arduino although a PC running processing interprets the data for higher-level functions.

The key is that the Arduino excites the grid using PWM and then examines the signal coming out of the grid. Finger poking changes the response quite a bit and the Arduino can sense it using the analog to digital converters onboard. You can find the actual software kit online. The tutorial document is probably more interesting than the ACM paper if you only want to use the kit.

The optimum drive frequency is 10 MHz. The examples rely on harmonics of a lower frequency PWM signal to get there. The analog conversion, of course, isn’t that fast but since your finger touch rate is relatively slow, they treat the signal as an amplitude-modulated input which is very easy to decode.

The sensors can be conductive ink, thread, or copper strips. There are several example applications, including a 3D printed bunny you can pet, a control panel on a sleeve, and an interactive greeting card.

The sensor forms an image and OpenCV detects the actual touch configuration. It appears you can use the raw data from the Arduino, too, but it might be a little harder.

We imagine aluminum foil would work with this technique. If you get to the point of laying out a PCB, this might come in handy.

mitosis

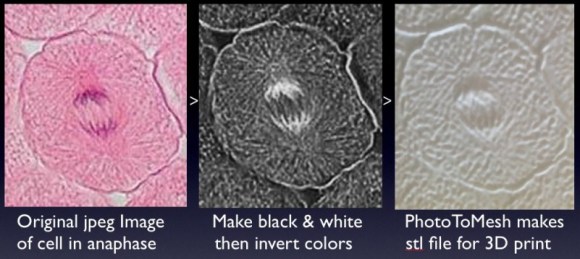
Cell biology professor [Mike] has created a way for blind students to decipher microscope slides using 3D prints and the magic of capacitive sensing. His write-up focuses on a slide showing the anaphase stage of mitosis in whitefish blastula, a popular choice for studying cell division. When a student touches a certain area of the print, the capacitive sensor triggers audio playback to tell them what they’re feeling.

[Mike] started by turning a 2D image of a cell into a 3D print. To do this, he made the image black and white, and then inverted the colors so that the 3D print’s topography will correspond correctly. The talking part is handled by an Arduino Duemilanove and a Spikenzie voice shield. The latter has a somewhat limited amount of space, but is more than adequate for the audio labels [Mike] made, which are all less than three seconds long.

A hard copy of the 2D file comes in handy for making sure the cap sensors are in the right places. To make those, [Mike] cut up some floor protector pads and covered the sticky side with copper tape. These are held on the 2D image with double-sided tape. The 3D print sits on top, separated by more furniture pads at the corners. He labeled this scientific sandwich model with a 3D printed Braille label that reads ‘anaphase’. [Mike] has made the referenced STL file along with a few others available at the National Institutes of Health’s 3D print exchange site.


Filed under: Arduino Hacks


  • Newsletter

    Sign up for the PlanetArduino Newsletter, which delivers the most popular articles via e-mail to your inbox every week. Just fill in the information below and submit.

  • Like Us on Facebook