Posts | Comments

Planet Arduino

Archive for the ‘prototyping’ Category

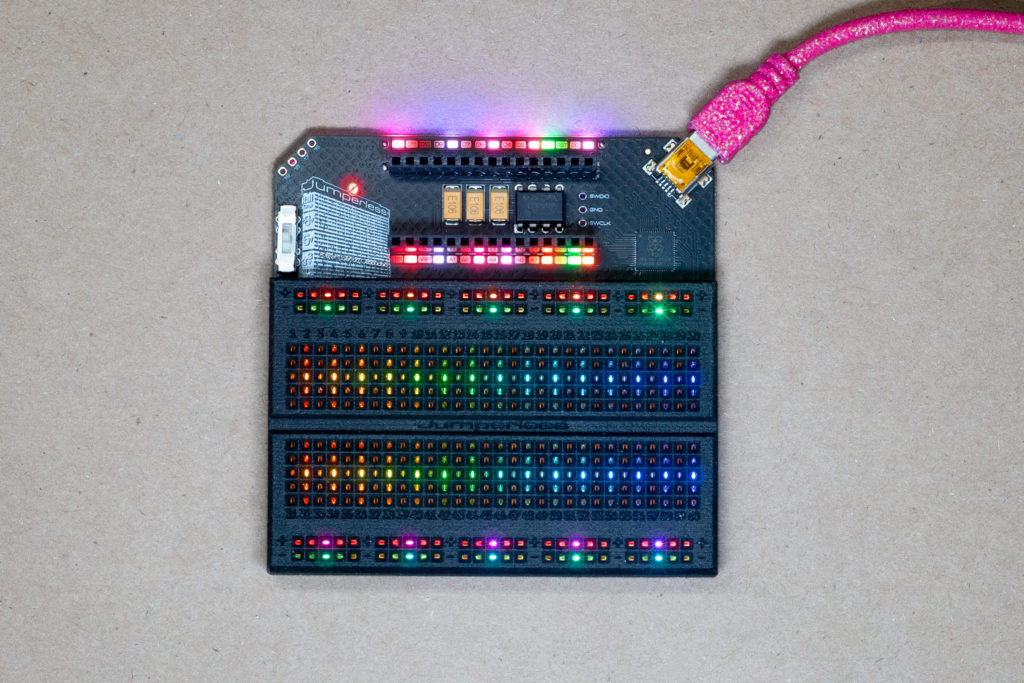
Most makers start their initial electronics prototypes on a breadboard, which is great for quickly setting up temporary circuits. But forming the connections requires jumper wires and even a basic project quickly becomes a rats’ nest of wiring that is difficult to manage. Tracking down issues within that tangle of wires is a massive headache, which is why Architeuthis Flux designed this jumperless breadboard to make prototyping a breeze.

In some ways, the aptly named Jumperless is similar to an FPGA. That’s because it allows for real hardware connections that the user can reconfigure with the push of a button. But Jumperless trades the power and flexibility of an FPGA for ease of use. Instead of the thousands of logic blocks you get in an FPGA, Jumperless gives you just enough to mimic a traditional breadboard. The benefit is in the user-friendly setup. Using a simple netlist file, users can specify which rows on the breadboard should connect to each other and which should connect to the pins of an Arduino Nano board.

This works using a whole bunch of analog crosspoint switches set by an RP2040 microcontroller based on the netlist file. The PCB contains a plethora of RGB LEDs to indicate which connections are active, as well as information about those connections. To use Jumperless, you simply plug in your components and then enter the connecting rows or Arduino pins via a Wokwi CLI (Command Line Interface) that creates the netlist file for you.

If you want Jumperless, it is available on Tindie for $299. Or, because this is an open source project, you can build one yourself using the files on GitHub.

The post Jumperless breadboard makes prototyping a breeze appeared first on Arduino Blog.

While circuit simulation tools become more accessible all the time, at some point it’s necessary to actual build your device and test it. Proxino, developed by researchers at Dartmouth College, takes a different approach, and enables you to virtually create a circuit, then test parts of it as needed with electronic components via physical proxies. 

To accomplish this, Proxino hardware sits on an Arduino Uno as a shield, and generates the virtual circuit’s responses to inputs. This setup allows for the implementation of physical elements like buzzers, lights, and sensors to complement the simulated environment, which can even be shared by remote collaborators in different locations. 

Proxino certainly looks like it could be an excellent instructional tool, or perhaps more!

You’d be hard pressed to find a carpenter who didn’t own a hammer, or a painter that didn’t have a couple of brushes kicking around. Some tools are simply so fundamental to their respective craft that their ownership is essentially a given. The same could be said of the breadboard: if you’re working with electronics on the hobby or even professional level, you’ve certainly spent a decent amount of time poking components and wires into one of these quintessential prototyping tools.

There’s little danger that the breadboard will loose its relevance going forward, but if [Andrea Bianchi] and her team have anything to say about it, it might learn some impressive new tricks. Developed at the Korean Advanced Institute of Science and Technology, VirtualComponent uses augmented reality and some very clever electronics to transform the classic breadboard into a powerful mixed-reality tool for testing and simulating circuits. It’s not going to replace the $3 breadboard you’ve got hiding at the bottom of your tool bag, but one day it might be standard equipment in electronics classrooms.

The short version is that VirtualComponent is essentially a dynamic breadboard. Holes in the same row are still electrically linked like in the classic breadboard, but with two AD75019 cross-point switch arrays and an Arduino in the base, it has the ability to virtually “plug in” components at arbitrary locations as selected by the user. So rather than having to physically insert a resistor, the user can simply tell the software to connect a resistor between two selected holes and the cross-point array will do the rest.

What’s more, many of those components can be either simulated or at least augmented in software. For example, by using AD5241 digital potentiometers, VirtualComponent can adjust the value of the virtual resistor. To provide variable capacitance, a similar trick can be pulled off using an array of real capacitors and a ADG715 digital switch to connect them together; essentially automating what the classic “Decade Box” does. In the demonstration video after the break, this capability is extended all the way out to connecting a virtual function generator to the circuit.

The whole system is controlled by way of an Android tablet suspended over the breadboard. Using the tablet’s camera, the software provides an augmented reality view of both the physical and virtual components of the circuit. With a few taps the user can add or edit their virtual hardware and immediately see how it changes the behavior of the physical circuit on the bench.

People have been trying to improve the breadboard for years, but so far it seems like nothing has really stuck around. Given how complex VirtualComponent is, they’ll likely have an even harder time gaining traction. That said, we can’t help but be excited about the potential augmented reality has for hardware development.

[Dickel] always liked tracked vehicles. Taking inspiration from the ‘Peacemaker’ tracked vehicle in Mad Max: Fury Road, he replicated it as the Mad Mech. The vehicle is remote-controlled and the tank treads are partly from a VEX robotics tank tread kit. Control is via a DIY wireless controller using an Arduino and NRF24L01 modules. The vehicle itself uses an Arduino UNO with an L298N motor driver. Power is from three Li-Po cells.

The real artistic work is in the body. [Dickel] used a papercraft tool called Pepakura (non-free software, but this Blender plugin is an alternative free approach) for the design to make the body out of thin cardboard. The cardboard design was then modified to make it match the body of the Peacemaker as much as possible. It was coated in fiberglass for strength, then the rest of the work was done with body filler and sanding for a smooth finish. After a few more details and a good paint job, it was ready to roll.

There’s a lot of great effort that went into this build, and [Dickel] shows his work and process on his project page and in the videos embedded below. The first video shows the finished Mad Mech being taken for some test drives. The second is a montage showing key parts of the build process.

Paper and cardboard are very versatile and accessible materials for making things. It’s what was used to do some target practice with this working paper and cardboard gun. With the right techniques foam core can be worked into an astonishing variety of shapes, and we also made a case for the value of a desktop vinyl cutter on any well-equipped hacker’s workbench.

sound-570x321

Sound Blocks is a tool to teach children and adults what sound is made of. The project was shortlisted in the Expression category of the IXDA Interaction Awards and it was developed by John Ferreira, Alejandra Molina, Andreas Refsgaard at the CIID using Arduino.

soundblocks

The device allows people to learn how, with a few parameters, it’s possible to create new sounds and, also, imitate real world sounds. Users can control waveform, sound decay or wave length and volume of three channels, all mixed together:

Sound blocks first and foremost was created as a tool to experiment with sound, it is playful and engaging.

Watch the video interview to discover more about the project and hear some noise:

DSC_0515Makers hacked real problems faced by people with special needs to create tools that will help improve mobility, independence, and comfort.

Read more on MAKE

The post 5 Life-Changing Accessibility Inventions Made in 72 Hours appeared first on Make: DIY Projects, How-Tos, Electronics, Crafts and Ideas for Makers.

seizurealarm

Chad Herbert’s son Daniel was diagnosed with Benign Rolandic Epilepsy in 2014. It’s a type of epilepsy the Epilepsy Foundation says accounts for about 15 percent of all Epilepsies in children and the good news is that most children grow out of it.

The bad news is that Daniel’s most affected by his condition at night or early morning while he sleeps. That’s why Chad invested in a sleep monitor/alarm for his bed that detects when he’s having a full tonic-clonic seizure.

At the same time though, he decided to work on a DIY version of a seizure alarm  running on Arduino Micro. The starting point was Arduino’s “Knock” example project with the sketch code originally created in 2007 by David Cuartielles and modified by Tom Igoe in 2011:

While shopping around for the exact type of monitor/alarm my wife and I wanted, I found out a few things:

  • They are hard to find. I believe the one we ended up with was manufactured by a company in Great Britain.
  • They are expensive. The one we ended up getting cost in the $400-$500 range.
  • The one we have isn’t totally cumbersome, but it’s not easy to pack up and take with you somewhere.

Figuring these things out, I decided to search for a way to build a simple seizure alam that’s both relatively inexpensive and easy to transport. I’m sure there are people out there who have children that suffer from seizures that simply cannot afford equipment such as this even though they truly need it. Thanks to the folks in the Arduino community, I was able to accomplish both things I was setting out to do.

Discover how it was made on his blog.


seizure2

Jul
22

Explaining the misterious technologies driving everyday objects

arduino, CIID, Copenhagen, education, Featured, Interaction Design, prototyping Comments Off on Explaining the misterious technologies driving everyday objects 

DSC08759

Every year the students of the Copenhagen Institute of Interaction Design (CIID) attend the Physical Computing class as part of their curriculum.

Having a small delegation of the Arduino team teaching this class has become quite a ritual. This past March Ubi De Feo, Alice Pintus, and Lorenzo Romagnoli runned the two-weeks-long intensive class.

Teaching at CIID is great experience, since you are surrounded by incredibly motivated and curious students, that are doing everything possible to design amazing projects and prototypes.

The topic of this year was prototyping interactive installations for a Science Center that would explain in a playful and engaging way how a technology works. For most of the students this was the first experience with physical computing, but even in such short time they were able to build eight different prototypes. The projects explain in an interactive way the science behind computer viruses, allergies, video compression, machine learning, laser printing, digital music synthesis, binary numbers and neuroprosthetic.

In Explaining laser printing Victoria Hammel, Chelsey Wickmark, Ciaràn Duffy, Feild Craddock demonstrate how the laser printer works. By using 16 servomotors connected to an Arduino UNO to move a matrix of magnets they were able to attract iron filings and draw letters on paper.

In Troyan 77 Karan Chaitanya Mudgal, Liliana Lambriev, Gunes Kantaroglu, Dhruv Saxena visualize the effects of a Trojan Virus harming your computer. Connecting Processing to Arduino they were able to create an overlay projection on top of the maze representative of the effect of the viruses on a computer.

Sound Blocks by John Ferreira, Alejandra Molina and Andreas Refsgaard is an musical instrument that explain how to compose sounds combining multiple soundwaves. The prototype was built using Arduino as a midi controller for Ableton.


  • Newsletter

    Sign up for the PlanetArduino Newsletter, which delivers the most popular articles via e-mail to your inbox every week. Just fill in the information below and submit.

  • Like Us on Facebook