Posts | Comments

Planet Arduino

Archive for the ‘ultrasonic sensor’ Category

Sure, [Ty Palowski] could have just hung a tennis ball from the ceiling, but that would mean getting on a ladder, testing the studfinder on himself before locating a ceiling joist, and so on. Bo-ring. Now that he finally has a garage, he’s not going to fill it with junk, no! He’s going to park a big ol’ Jeep in it. Backwards.
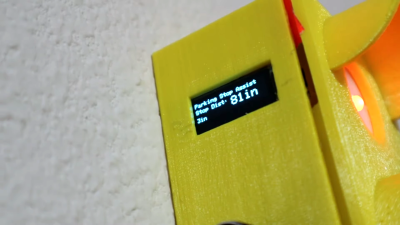
The previous owner was kind enough to leave a workbench in the rear of the garage, which [Ty] has already made his own. To make sure that he never hits the workbench while backing into the garage, [Ty] made an adorable stoplight to help gauge the distance to it. Green mean’s he’s good, yellow means he should be braking, and red of course means stop in the name of power tools.

Inside the light is an Arduino Nano, which reads from the ultrasonic sensor mounted underneath the enclosure and lights up the appropriate LED depending on the car’s distance. All [Ty] has to do is set the distance that makes the red light come on, which he can do with the rotary encoder on the side and confirm on the OLED. The distance for yellow and green are automatically set from red — the yellow range begins 24″ past red, and green is another 48″ past yellow. Floor it past the break to watch the build video.

The humble North American traffic signal is widely recognized, so it’s a good approach for all kinds of applications. Teach your children well: start them young with a visual indicator of when it’s okay to get out of bed in the morning.

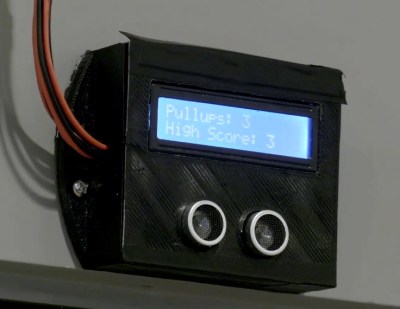
Most gyms are closed right now due to social distancing rules, which is what we’re using as our latest excuse to justify our sloth-like lifestyle. But apparently some people miss working out enough that they’re putting together impromptu home gyms. [Michael Pick] has even outfitted his DIY pull-up station with an Arduino to keep track of his exercise while on lockdown. You may not like it, but this is what peak performance looks like.

Can you beat the HaD high score?

In the video after the break, [Michael] explains the design and construction of the bar itself which technically could be thought of as its own project. Obviously the Arduino counter isn’t strictly necessary, so if you just wanted to know how to put some scraps of wood and suitably beefy rod together in such a way that it won’t rip off the wall when you put your weight on it, this video is for you.

Towards the end of the video, he gets into an explanation of the electronic side of the project. Inside the 3D printed enclosure is an Arduino Pro Mini, a HC-SR04 ultrasonic sensor, and a 1602 serial LCD. Once the gadget has been mounted in the proper position and activated, it will count how many pull-ups [Michael] has done on the screen.

While we historically haven’t seen a whole lot in the way of homebrew exercise equipment, the current COVID-19 situation does seem to be getting the adrenaline flowing for some of you. We recently covered some DIY dumbbells made from hardware store finds that would be an excellent first project for any hackers who’ve recently been ejected from the Matrix and are trying to use their muscles for the first time.

If you’re going outside (only for essential grocery runs, we hope) and you’re having trouble measuring the whole six feet apart from other people deal by eye, then [Guido Bonelli] has a solution for you. With a standard old HC-SR04 ultrasonic sensor, an audio module and a servo to drive a custom gauge needle he’s made a device which can warn people around you if they’re too close for comfort.

As simple as this project may sound like for anyone who has a bunch of these little Arduino-compatible modules lying around and has probably made something similar to this in their spare time, there’s one key component that gives it an extra bit of polish. [Guido] found out how intermittent the reliability of the ultrasonic sensor was and came up with a clever way to smooth out its output in order to get more accurate readings from it, using a bubble sort algorithm with a twist. Thirteen data points are collected from the sensor, then they are sorted in order to find a temporal middle point, and the three data points at the center of that sort get averaged into the final output. Maybe not necessarily something with scientific accuracy, but exactly the kind of workaround we expect around these parts!

Projects like these to help us enforce measures to slow the spread of the virus are probably a good bet to keep ourselves busy tinkering in our labs, like these sunglasses which help you remember not to touch your face. Make sure to check out this one in action after the break!

Digital White/Black Boards or “Smart Boards” are very useful in modern classrooms, but their high cost often makes it difficult to convince administrators from loosening their purse strings. Cooper Union’s 2nd annual HackCooper event in New York wanted students to design and build hardware and software projects that both solve real problems and spark the imagination. At the 24 hour hackathon, the team of [harrison], [david] and [caleb] decided to put together a low-cost and simple solution to digitizing classroom black board content.

A chalk-holder is attached to two strings, each connected over a pulley to a weight. The weights slide inside PVC pipes at the two sides of the black board. Ultrasonic sensors at the bottom of each tube measure the distance to the weights. The weights sit in static equilibrium, so they serve the purpose of keeping the string taut without negatively interfering with the writer.

With a couple of calibration points to measure the extent of displacement of each weight, board width can be determined, making it easy to adapt to different sizes of boards. Once calibrated, the system can determine position of the chalk over the board based on some trigonometrical calculations. Since they had just 24 hours to hack the system together, they had to use a hand operated radio with a couple of buttons to provide user control. Pressing the “Write” button starts transmitting chalk movements to the digital screen. A second button on the radio remote serves to “Erase” the digital screen. After receiving the chalk position data, they had to do a fair amount of processing to eliminate noise and smooth out the writing on the digital screen.

A server allows the whole class to receive the chalk board data in real time. After each “Erase” command, the chalk board state is saved and logged on the server, thus allowing previous content to be viewed or downloaded. If only text is written, optical character recognition can be used to further digitize the content.

What makes the project really useful is the low cost. The sensors cost a dollar. The other parts – PVC pipe, weights/pulleys, Arduino and the Radio key fob – were all bought for under 40 dollars. For some additional cost (and maybe more time in their case) they could have automated the detection of when the chalk was actually doing the writing. The team have made their code available on Github. For a Chalk board at the other end of the cost spectrum, check this one out. Video below.


Filed under: Arduino Hacks


  • Newsletter

    Sign up for the PlanetArduino Newsletter, which delivers the most popular articles via e-mail to your inbox every week. Just fill in the information below and submit.

  • Like Us on Facebook