Posts | Comments

Planet Arduino

Archive for the ‘pro mini’ Category

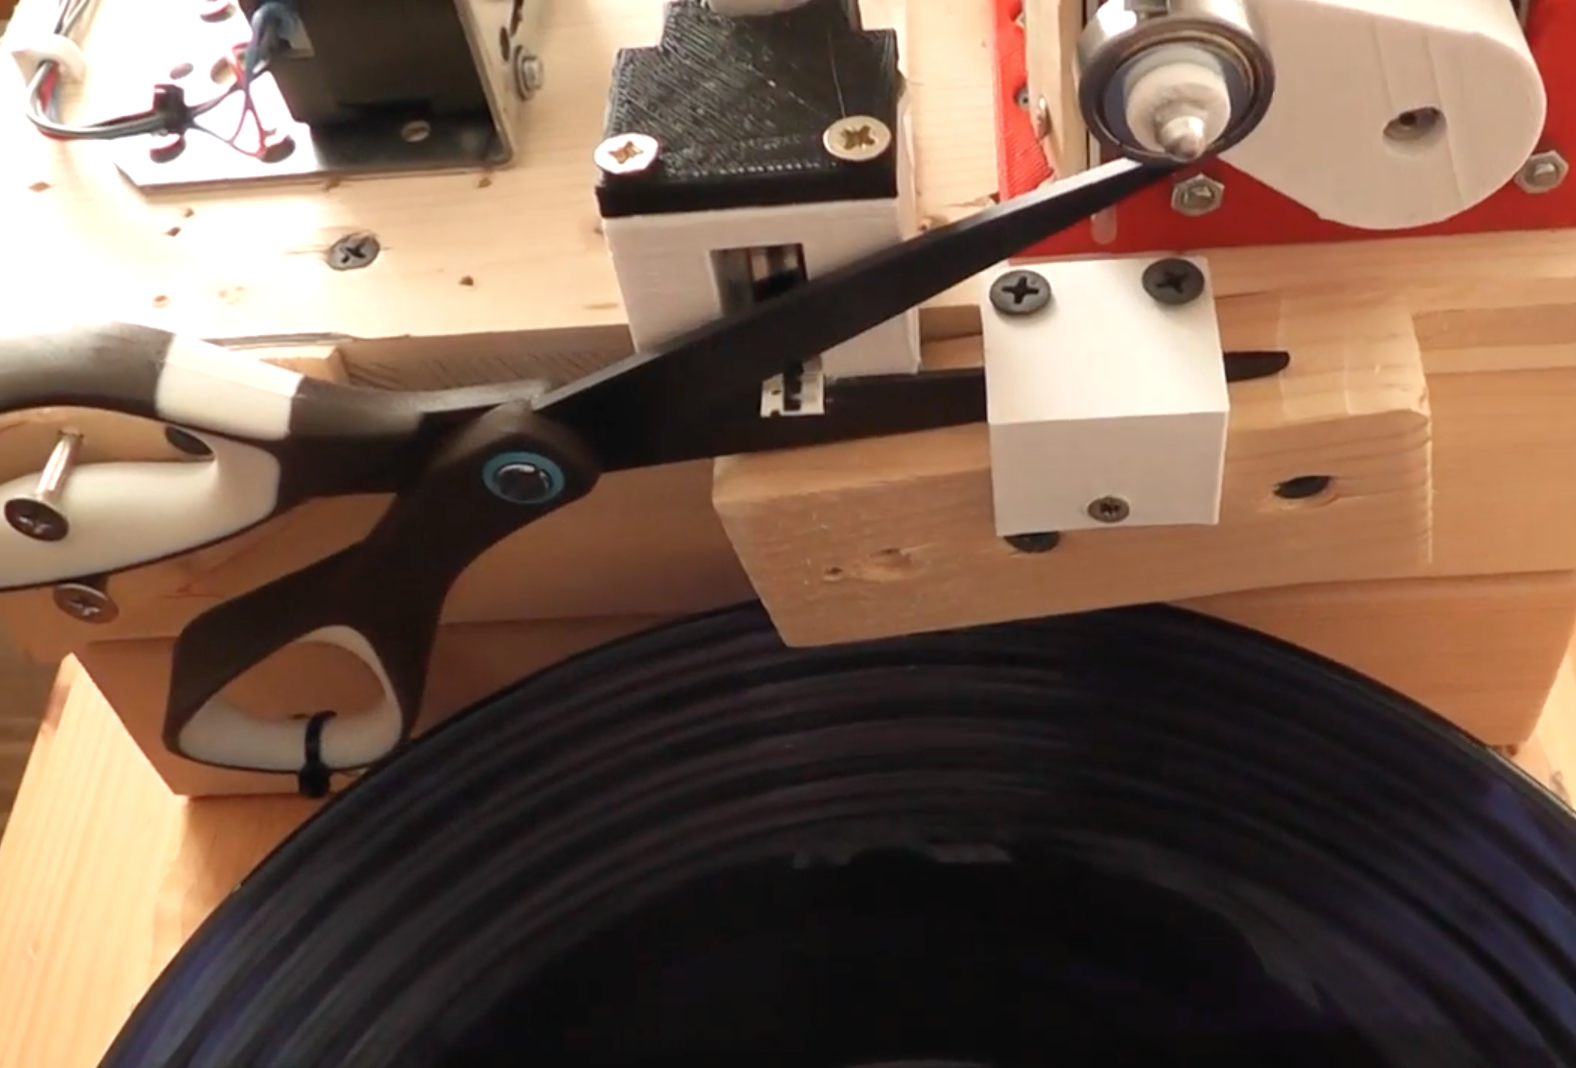
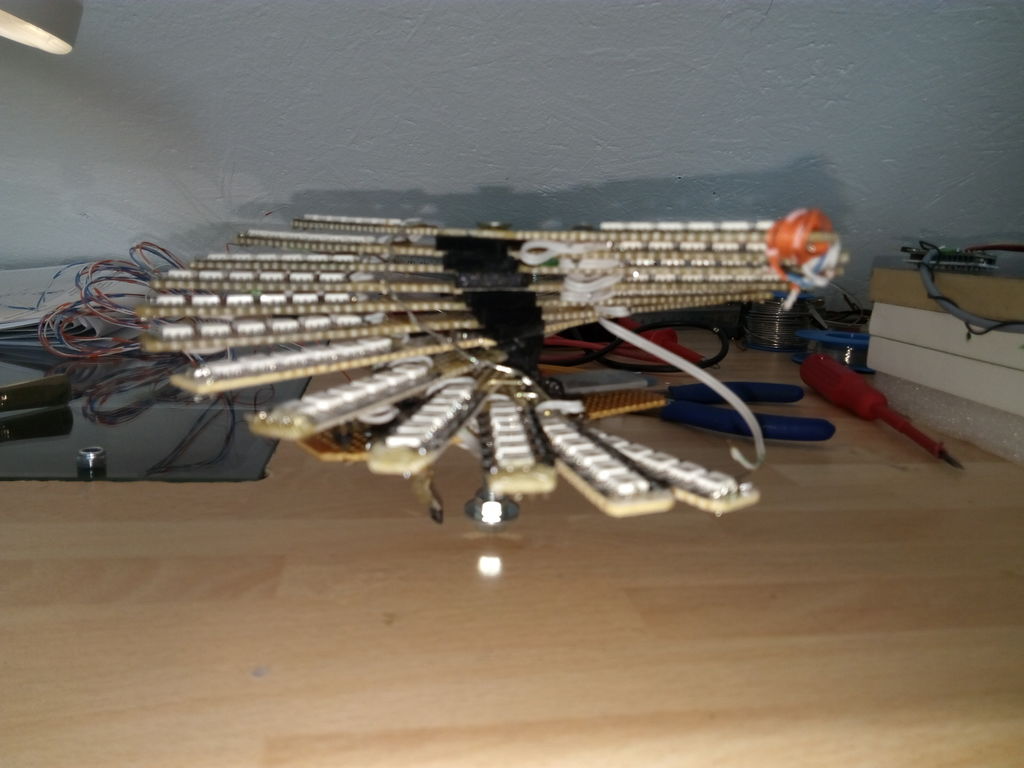
When faced with the need to cut thousands of parts from reels in order to make them into kits, “Der Zerhacker” decided to automate the process.

For his robotic machine, an Arduino Pro Mini pulls strips of tape into position with a stepper motor, coloring them along the way with a marker. An infrared sensor is used to align the correct number of parts with a pair of scissors, which are then cut via a second motor and tumble into a basket.

If you’d like to build your own, 3D print files and Arduino code can be found on Thingiverse. As the author doesn’t have a ton of spare time, wiring and other project details will need to be figured out, but you can get a few clues from the video below…

In order to make his model trains stand out, David G. Bodnar has been working on the best way to integrate 8×8 displays into the cars.

Through the process he’s come up with several great techniques, including a red filter to help them “pop,” as well as wiring things in such a way that sets of LEDs can be used on either side to show the same message.

An Arduino Pro Mini and Nano are used for control, while a Bluetooth module with an Android terminal program enables him to change the text remotely.

I have used LED matrix displays for a number of different projects over the last few years.  These 8×8 LED units have a controller that allows an Arduino to talk to them sending text or graphic information that can be displayed.  These small units can be daisy-chained together to create a long, scrolling display.

While the displays are visually appealing and easy to use they might not get the amount of attention that one would hope they would generate at a train show or other public train display. With this in mind I decided to build an on-board train display using three 8×32 LED boards. Each board is mounted on a car with the three connected together to crate one long scrolling message board. To make things even more interesting and compelling to visitors the display’s message can be changed remotely with a cell phone or computer.

Whether you’re interested in enhancing model trains, or simply want to hear more about integrating LED matrix displays into your next project, you can find more details on Instructables and on his website here.

While Arduino boards are useful for simple robotics and control applications, as outlined on William Osman’s blog, they can also be employed for data tracking to help engineers verify and modify a race car’s suspension design.

In this case, Osman decided to use a Pro Mini, a three-axis accelerometer, and an nRF24L01 module to implement a vehicular telemetry system for under $20. A second Arduino and 2.4GHz transceiver make up the base station, which is connected to his computer via USB.

While getting the raw data is interesting, he’s able to take the project to the next level using a free software package called COSMOS from Bell Aerospace. Although not initially user-friendly, it does allow those willing to conquer its learning curve to visualize data in real-time without spending thousands on software.

Be sure to check out his blog post, Hackaday’s recent write-up, or the video below for more information on the inexpensive telemetry system!

When you travel, you likely collect photographs and knick-knacks that can be displayed nicely for yourself and others. David Levin, however, took this one step further and used an MP3 recorder to capture the sounds of the places he and his wife have visited. But how does one show off sounds? Levin has a clever answer for that in the form of his Arduino-based Audio Memory Chest.

The project uses a recycled card catalog to hold items from each place traveled, and when one drawer is pulled out, a magnet and Hall effect sensor tells an Arduino Pro Mini which drawer has been opened. A serial MP3 player module then produces a random audio file recorded at that location, treating the user to both the sights and sounds of the region! 

My wife and I have been lucky enough to travel all over the world together during the past few years. Wherever we go, I collect little knick knacks, souvenirs, and ephemera. I also use a little MP3 recorder to capture sounds (marketplaces, street sound, music, etc). It’s always amazing to listen to these later—they immediately bring you back to a place, far better than a photograph alone could.

Want to read more, remember to take your vitamins, or even take out the trash? With the “Dory” Arduino-based tracking device from YouTuber YellowRobot.XYZ, now you can!

Dory–which comes in both a circular and smaller square version–uses an NFC reader to sense tags attached near the object that needs work. When you complete a positive action, you simply tap the nearby tag and the small gadget will light up its corresponding LEDs via an Arduino Pro Mini.

If you’d like to know where you are on your habit count, this is displayed with a button in the middle, and can be reset by holding it down. Beside from tracking habits, Dory is a great reminder of what can be done with NFC tags!

Instructables author Daniel Quintana loves mountain biking, but after having to interrupt a ride to continuously check the time, he did what any normal teenager would do in this situation: he created his own Google Glass-like headset from scratch.

His DIY AR device, called “Uware,” takes the form of a 3D-printed enclosure with a tiny 0.49″ OLED screen stuffed inside, along with an HC-06 Bluetooth module, an APDS-9960 gesture sensor, a 3.7V battery, and of course, a tiny Arduino Pro Mini for control.

In normal usage, the wearable displays the time and text messages transmitted from Quintana’s phone over Bluetooth via a custom app that he wrote. Swiping right in front of the gesture sensor puts it into camera mode, allowing him to capture the environment hands-free!

Want to see more? You can find Quintana’s write-up here, or check out Uware’s prototype electronics setup and custom magnetic charging rig in the videos below!

Chances are you’re likely familiar with POV displays. These devices move through the air at a high enough speed to trick your eyes into thinking that a sequence of flashing lights is actually a solid image. Though interesting enough in two dimensions, LED aficionado “Gelstronic” decided to add more depth to his display, stacking 12 LED-enabled circuit boards in a helical pattern. This meant his project, dubbed “PropHelix,” can create a light display in not two, but three dimensions.

PropHelix’s LED pattern is controlled by an also-spinning Propeller board, powered by a wireless charging setup normally seen used with mobile phones. An Arduino Pro Mini in the base of the assembly takes care of making things spin at the correct speed via a multicopter-style ESC and brushless motor, while an encoder handles feedback.

You can find more details on this build in its Instructables write-up here, or check out the beautiful images in the video below!

If you’re familiar with the Segway or other vehicles that balance in what is known as an “inverted pendulum” configuration, you may think that while interesting, creating something similar would be too complicated or out of your budget. Though perhaps still not simple, Joop Brokking takes you through his design for this type of bot in the video seen here, making it accessible if you’d like to build your own.

The robot, which will cost about $80 in parts, uses two stepper motors for greater movement precision than could be had with normal DC models, and employs an Arduino Pro Mini, along with an MPU-6050 accelerometer/gyroscope for control. It can be driven around by a Wii U-style nunchuck, which transmits to the robot via an Arduino Uno and wireless transceiver module.

You can find more info and product links for this project on Brokking.net.

You may have seen robots that wobble around, such as BOB, OTTO and ZOWI. Though their locomotion style of shifting the unit’s weight on huge feet is clever, they all share a rather similar look. French computer scientist Paul-Louis Ageneau decided to do something about this and created his own biped in the form of a dancing teapot a la Disney’s Beauty and the Beast.

To accomplish this, he attached four servos to the robot’s hips and ankles, which were connected to an Arduino Pro Mini and powered by a 9V alkaline battery. All the electronics are housed inside the 3D-printed teapot. It’s a neat build in itself, and in a separate post he goes over how to play music on an Arduino, which should make this little guy even more entertaining!

You can find Ageneau’s original blog here, as well as the Disney-like bot’s code on GitHub.


  • Newsletter

    Sign up for the PlanetArduino Newsletter, which delivers the most popular articles via e-mail to your inbox every week. Just fill in the information below and submit.

  • Like Us on Facebook