Posts | Comments

Planet Arduino

Archive for the ‘camera rig’ Category

If you’ve ever watched one of those high production value YouTube videos and wondered how they’re able to get those smooth shots where the camera seems to be spinning around an object, you were probably looking at the product of an motorized camera motion system. There’s no question these rigs can produce visually striking shots, but their high cost usually keeps them out of the hands of us lowly hackers.

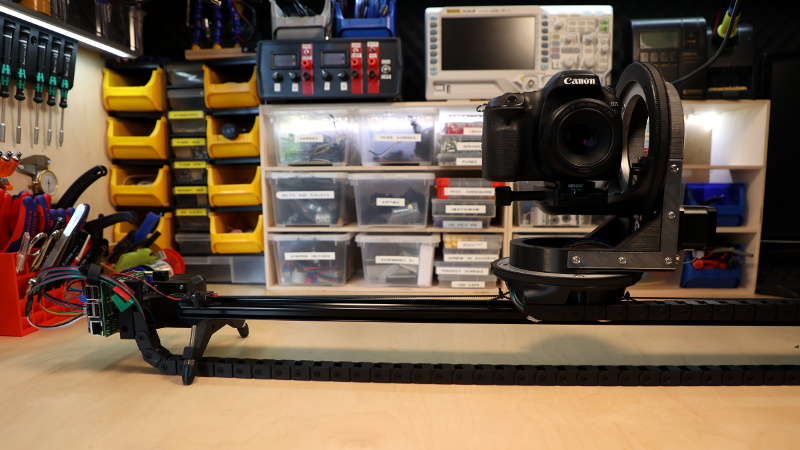
Unless of course you do like [Andy], and build your own. The latest version of this impressive rig features the ability to continuously rotate thanks to commercial 12-wire slip rings, with optical endstops so the machine can still be homed at the beginning of a move. An onboard Raspberry Pi and Arduino Uno are responsible for controlling the stepper motors, the configuration of which ends up being reminiscent of a standard 3D printer.

The MQTT remote can hold a phone for live video.

The software [Andy] has come up with lets him synchronize the camera rig with a small rotating platform he built, which allows for even more complex shots as demonstrated in the video below. It also supports a very slick MQTT-enabled remote controller that he built as a previous project, which makes taking direct control over the camera and monitoring its status much easier.

Want to add a little polish to your own project videos? [Andy] has released all of the files and information you’d need to build your own version of his motion control rig, though we wouldn’t blame you for feeling a bit intimidated by this one. It might not be the most elaborate camera motion control system we’ve seen, but it’s certainly up there. If you just want an overhead video and don’t need those fancy tracking shots, perhaps a modified VESA arm would fit the bill.

Many DSLR cameras can be operated with a simple infrared signal, making them perfect targets for Arduino control. Travis Antoniello took advantage of this with his brilliantly simple 3D scanning rig.

Electronics are handled by an Arduino Uno, which commands a stepper motor to rotate a scanning platform 10 degrees per photo. After rotation, it stops for a set amount of time to let scanned objects settle, and triggers the camera, a Nikon D3200, via an infrared LED. It then repeats this process over and over until a full set of photos is taken. 

Code for the build can be found on GitHub, and the device’s 3D-printed components are available on Thingiverse. The project video seen here gives a good overview of how it works, and the scanned object on display just after 2:30 looks absolutely brilliant.

rImg_6372Make an automatic camera rig for shooting high-resolution panoramas with a point-and-shoot camera.

Read more on MAKE

The post Build an Automatic Photo Rig for Perfect Panoramas appeared first on Make: DIY Projects, How-Tos, Electronics, Crafts and Ideas for Makers.

Aug
04

New Project: Built a Motion Control Rig for Time-Lapse Photography

arduino, camera, camera rig, Electronics, Photography, photography rig, stepper motors, time-lapse, video Comments Off on New Project: Built a Motion Control Rig for Time-Lapse Photography 

sunriseIn this project, you'll learn how to use an Arduino microcontroller and a stepper motor to precisely control the panning of a camera during a time lapse.

Read more on MAKE

The post Built a Motion Control Rig for Time-Lapse Photography appeared first on Make: DIY Projects, How-Tos, Electronics, Crafts and Ideas for Makers.


  • Newsletter

    Sign up for the PlanetArduino Newsletter, which delivers the most popular articles via e-mail to your inbox every week. Just fill in the information below and submit.

  • Like Us on Facebook