Posts | Comments

Planet Arduino

Archive for the ‘air quality’ Category

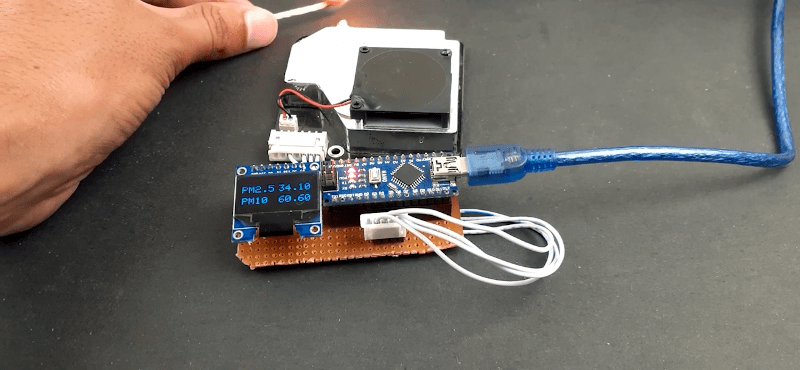
According to [Dr. Tom Lehrer’s] song Pollution, “Wear a gas mask and a veil. Then you can breathe, long as you don’t inhale!” While the air quality in most of the world hasn’t gotten that bad, there is a lot of concern about long-term exposure to particulates in the air causing health problems. [Ashish Choudhary] married an Arduino with a display and a pollution sensor to give readings of the PM2.5 and PM10 levels in the air.

The sensor uses a laser diode and a photodiode to detect and count particles, while a fan moves air through the system. If you aren’t up on pollution metrics, PM2.5 is a count of very fine particles (under 2.5 microns) and PM10 is a count of particles for 10 microns. You can find a datasheet for the device online.

One thing to note is that the sensor has a finite lifespan. The datasheet claims “up to” 8,000 hours. If you ran the sensor continuously that’s not quite a year, so you might want to be judicious about how often you light up the device.

This isn’t the first time we’ve seen this particular sensor. If you want to find the exact source of a pollutant, consider this build.

Handheld measuring devices make great DIY projects. One can learn a lot about a sensor or sensor technology by just strapping it onto a spare development board together with an LCD for displaying the sensor output. [Richard’s] DIY air quality meter and emissions tester is such a project, except with the custom laser-cut enclosure and the large graphic LCD, his meter appears already quite professional.

For his build, [Richard] used a Sharp GP2Y1010AU0F dust sensor. This $11 device has a little hole, through which airborne dust particles can pass. On the inside, an infrared LED and a photodiode are arranged in a way that allows no direct light, but only light reflected by the passing by dust particles, to reach the photodiode. An accurately trimmed amplifier within the sensor package translates the diode’s photocurrent into an analog output voltage proportional to the dust density. With a bit of software wizardry, it’s even possible to differentiate between house dust and smoke by analyzing the pulse pattern of the output voltage.

diy-pollutant-meterThe development board used in this project, a PDI-1 (which stands for Programmable Device Interface) is [Richard’s] own design. Manufactured in the UK, it isn’t the cheapest, but it’s the part that makes this build a breeze. It’s basically an Arduino Nano with a lot of onboard peripherals, including a large graphic LCD, some buttons, a speaker, plenty of H-bridges, and a few more.

After bodge-wiring the dust sensor to the board and taking the enclosure out of the laser cutter, the hardware side of this project was almost done. A little fan was added to ensure airflow through the sensor. Eventually [Richard] wrote a basic firmware to display a graph of sensor readings on the LCD. A first test in the exhaust stream of his car, cycling through idling and revving as shown in the title image, suggests that the meter works as intended. Of course, air quality and emission testing depend on more parameters than just dust density, but if you want to replicate and extend this build, [Richard] provides you with all the Arduino compatible source files.


Filed under: Arduino Hacks, misc hacks

pmgami01

“Under the Dome – PMgami” is an installation created by designer Jiayu  Lui using Arduino Nano. Inspired by paper origami techniques, the digitally fabricated flowers move and change color according to the quality of air measured locally. The main aim of the installation is to obtain a more intuitive way to communicate pollution data and  the relationship between technology and nature.

In the gallery you can explore some other pictures and the schematic. Check the video below to see the installation in action!

pmgamischeme pmgami03 pmgami02 pmgami04


  • Newsletter

    Sign up for the PlanetArduino Newsletter, which delivers the most popular articles via e-mail to your inbox every week. Just fill in the information below and submit.

  • Like Us on Facebook