
Oct
18
18
 A feature-rich microcontroller especially designed for Halloween and other multimedia projects.
The post Adafruit’s HalloWing, an MCU Optimized for Halloween Projects appeared first on Make: DIY Projects and Ideas for Makers.
A feature-rich microcontroller especially designed for Halloween and other multimedia projects.
The post Adafruit’s HalloWing, an MCU Optimized for Halloween Projects appeared first on Make: DIY Projects and Ideas for Makers.
It isn’t a unique idea, but we liked [Eric Wiemers’s] take on the classic animated skull for Halloween. In addition to showing you the code and the wiring, the video spends some time discussing what the audio looks like and what has to happen to get it into a format suitable for the Arduino. You can see the spooky video, below.
Of course, this is also a 3D printing project, although the skull is off-the-shelf. We wondered if he felt like a brain surgeon taking the Dremel to the poor skull. To fix the two parts of the device, he used brass threaded inserts that are heat set, something we’ve seen before, but are always surprised we don’t see more often.
Of course, the project uses a servo. We may have missed it but other than freezing the video, we didn’t see the Arduino source code online. It isn’t much code, though, so typing it from the video is an option. The schematic is a little easier to read when you realize the top part is the schematic and the bottom part is the “as built” layout.
We are glad this skull doesn’t taunt us with our time remaining like some we’ve seen. We’ve seen this done with fewer parts, by the way, and you can compare the videos to see how different the circuits respond.

Halloween is just around the corner, and to celebrate, fadecomic decided to set up a trio of singing animatronic pumpkins to belt out scary songs.
The project uses a Raspberry Pi for high level control and browser interface, and sends animation commands to an Arduino Uno via USB serial.

The Uno takes this data and translates it into actual pumpkin movements coordinated with music. The resulting trio of pumpkins each use their own servo to lift the top of the foam gourd up like a gigantic mouth, and also feature PWM-driven LED eyes. A light show controlled by SSRs completes the spooky musical effect.
Build info is available here and the Arduino code can be found on GitHub.

Using eight jack-o’-lanterns and an Arduino Mega, “CrankyCoder” built his own automated pumpkin patch.
CrankyCoder’s favorite holiday, as well as his family’s, is Halloween. After creating a skull that follows people around a few years ago, he decided to take things up a notch with his “Creepy Pumpkin Patch.” His patch includes eight pumpkins on the edges of a path with homemade pressure switches in between. As trick-or-treaters walk by, the patch is activated, making the pumpkins spin creepily.
Cleverly, CrankyCoder employs two pie pans with marbles in between for each rotating pumpkin, creating ball bearings to support the weight. Also, instead of a candle or other complicated electronics, he’s using flickering LEDs from the dollar store to produce a creepy lighting effect.
With Halloween just days away, be sure to check out the project’s video seen here or its GitHub page to get started on your own Creepy Pumpkin Patch.
 "Why worry? Each of us is wearing an unlicensed nuclear accelerator on his back." That could be you with this DIY Ghostbusters Proton Pack!
The post Check Out This Amazing Ghostbusters Proton Pack appeared first on Make: DIY Projects and Ideas for Makers.
[Conor] wired up his 3D-printed coffin doorbell to an array of RGB LEDs, a screaming speaker, and a spinning skull on a cordless screw driver to make a “quick” Halloween scare. Along the way, he included half of the Adafruit module catalog, a relay circuit board, and ESP8266 WiFi module, a Banana Pi, and more Arduinos of varying shapes and sizes than you could shake a stick at.
Our head spins, not unlike [Conor]’s screaming skull, just reading through this Rube Goldbergy arrangement. (We’re sure that’s half the fun for the builder!) Smoke ’em if ya got ’em!
Start with the RGB LEDs; rather than control them directly, [Conor] connected them to a WiFi-enabled strip controller. Great, now he can control the strip over the airwaves. But the control protocol was closed, so he spent a week learning Wireshark to sniff the network data, and then wrote a Bash script to send the relevant UDP packets to turn on the lights. But that was not fancy-schmancy enough, so [Conor] re-wrote the script in Go.
Yes, that’s right — a Go routine on a Banana Pi sends out custom UDP packets over WiFi to a WiFi-to-LED-driver bridge. To make lights blink. Wait until you see the skull.
 The plastic skull has Neopixels in each ping-pong ball eye, controlled by an Arduino Nano and battery taped to the skull’s head. The skull is cemented to a driver bit that’s chucked in a cordless drill. A relay board and another Arduino make it trigger for 10 seconds at a time when the doorbell rings. Finally (wait for it!) an Arduino connected to the doorbell gives the signal, and sets a wire high that all the other Arduini and the Banana Pi are connected to.
Gentle Hackaday reader, now is not the time for “I could do that with a 555 and some chewing gum.” Now is the time to revel in the sheer hackery of it all. Because Halloween’s over, and we’re sure that [Conor] has unplugged all of the breadboards and Arduini and put them to use in his next project. And now he knows a thing or two about sniffing UDP packets.

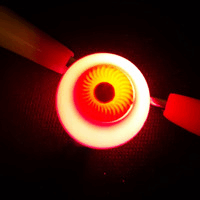
 LEDs are the perfect touch to add a creepy red glow to your Halloween props. Make them fade in and out with a simple Arduino sketch.
The post Arduino Basics: Add Pulsing LED Eyes to Halloween Props appeared first on Make: DIY Projects, How-Tos, Electronics, Crafts and Ideas for Makers.
 With some simple programming and a few basic parts, you can rig up a candy vending machine that slides sweets toward you at the push of a button.
The post Build an Arduino-Powered Candy Vending Machine appeared first on Make: DIY Projects, How-Tos, Electronics, Crafts and Ideas for Makers.
 Trick-or-treaters are bound to get a thrill when you make this choreographed music and light display that plays each time your gate is opened.
The post Choreograph a Music and Light Display for the Holiday appeared first on Make: DIY Projects, How-Tos, Electronics, Crafts and Ideas for Makers.
 In this project, I'll show you how to set up some simple infrared remote controls for effects that you can use in your haunted house this year.
The post Control Halloween Effects with DIY Infrared Remote Controls appeared first on Make: DIY Projects, How-Tos, Electronics, Crafts and Ideas for Makers.
Planet Arduino is, or at the moment is wishing to become, an aggregation of public weblogs from around the world written by people who develop, play, think on Arduino platform and his son. The opinions expressed in those weblogs and hence this aggregation are those of the original authors. Entries on this page are owned by their authors. We do not edit, endorse or vouch for the contents of individual posts. For more information about Arduino please visit www.arduino.cc
You are currently browsing the archives for the halloween category.
 Arduino Blog Make Magazine Blog Hackaday Electronics-Lab Noel Portugal CNX-Software Matthew Rollings Chris Debenham Techatronic Giasone John Boxall Arduino++ Adafruit Blog EngineeringException Mamaus's Blog Tinker Hobby Bits and Pieces Wayne and Layne NerdyTechy Liudr's Blog Steve Marple b7arduino Chipwired Embedded-Lab