We recently invited José Antonio Bagur to join us on EDUvision, to talk about his work on Quetzal-1; Guatemala’s first satellite. It was a hugely popular show with the Arduino and edutech communities, and we ran out of time before we could ask José all your space-based questions!
The range of questions you guys had around open-source, custom-built satellites were too good to go unanswered. So we brought him back for an EDUvision EXTRA. Melissa and Roxana teamed up to dig deeper into his amazing project.
José Antonio Bagur, and Quetzal-1
You can check out José’s first interview, which took place during the EDUvision livestream. But to quickly get you up to speed, let’s give José, and his pride and joy Quetzal-1, a quick introduction.
He’s a mechatronics engineer, university researcher and professor from Guatemala. He’s no stranger to the Arduino community either, as he regularly joins the Arduino team to host the Spanish-language Explore IoT webinars.
There are no formal aerospace science education programs in Guatemala, so José and his colleagues really had their work cut out designing and building the country’s first satellite! Over 100 people were involved in its development, which, of course, made plenty of use of Arduino.
In the EDUvision EXTRA video interview below, you can find out all about the incredible work they achieved. He talks about how they managed to get it into space, how it works, and what kind of challenges they faced throughout the project. Feel free to add any other questions you might have in the comments, over on the forum, or on social media.
Oh, and you’ll also find out where the name Quetzal-1 comes from!
Enjoy this extra slice of EDUvision goodness, and remember to join us on 20th May, 2021, for the next livestream. If you have a project you’d like to see featured live on EDUvision, let us know all about it. If it’s picked to be showcased, we’ll even send you some free Arduino swag.
User [mircemk] presents his “MiliOhm Meter” project which you can build with an Arduino, a handful of common parts from your lab, and a cigar box. It doesn’t get much simpler than this, folks. While this is something you won’t be getting calibrated with NIST traceability, it looks like a fun and quick project that’s more than suited for hobbyist measurements. It’s not only easy to build, the Arduino sketch is less than thirty lines of code. This is a great learning project, plus you get something useful for your lab when its finished.
It’s hard not to be impressed by the Arduboy. In just a few short years, [Kevin Bates] went from proof of concept to a successful commercial product without compromising on his original open source goals. Today, anyone can develop a game for the Arduboy and have it distributed to owners all over the world for free. If you’ve ever dreamt of being a game developer, the Arduboy community is for you.
Realizing the low-cost hardware and open source software of the Arduboy makes it an excellent way to learn programming, [Kevin] is now trying to turn his creation into a legitimate teaching tool. He’s kicking off this new chapter in the Arduboy’s life with a generous offer: giving out free hardware to educators all over the world. Anyone who wants to be considered for the program just needs to write-up a few paragraphs on how they’d plan on using the handheld game system to teach programming.
[Kevin] already knows the Arduboy has been used to teach programming, but those have all been one-off endeavours. They relied on a teacher that was passionate enough about the Arduboy to put in their own time and effort to create a lesson plan around it. So one of the main goals right now is getting an official curriculum put together so educators won’t have to start from scratch. The community has already developed 16 free lessons, but they’re looking for help in creating more and translating them into other languages.
While the details are still up in the air, [Kevin] also plans to travel to schools personally and help them get their Arduboy classes off the ground. He’s especially interested in developing countries and other areas that are disadvantaged educationally. Believing that the Arduboy is as much a way to teach effective leadership and teambuilding as it is programming, he thinks this program can truly make a difference.
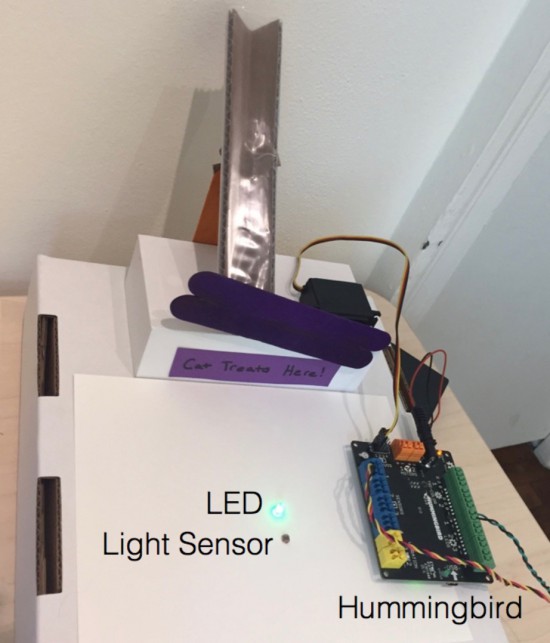
The Hummingbird by BirdBrain Technologies is an Arduino AtHeart microcontroller designed to enable beginners to create robots from craft materials. Hummingbird kits include LEDs, motors, and sensors that connect directly to the board. This eliminates the need for soldering or breadboarding and ensures that users have the parts they need to build their first robots. All of the components are reusable, so the same kit can be used to build many different robots.
In addition, the Hummingbird supports a variety of programming options, making it appropriate for beginning programmers as well as those who are more advanced. Some programming languages, such as Scratch and Snap!, can only be used when the board is connected to the computer. We will concentrate here on programming alternatives that enable users to upload a program onto the board’s Arduino.
Classrooms all over the world have used the Hummingbird from elementary to high school for projects ranging from Shakespeare dioramas to the physics of amusement park rides. In the following project, the BirdBrain Technologies team will show how they used the Hummingbird to build an automatic cat treat dispenser and demonstrate how the Hummingbird can be utilized to construct robots from everyday materials.
Building with the Hummingbird
Beginners can easily get started building Hummingbird robots with cardboard and craft materials. Motors, sensors, and LEDs can be connected directly to the Hummingbird board, and these elements can be added to the robot with hot glue. Hot glue peels off the components so that they can later be reused.
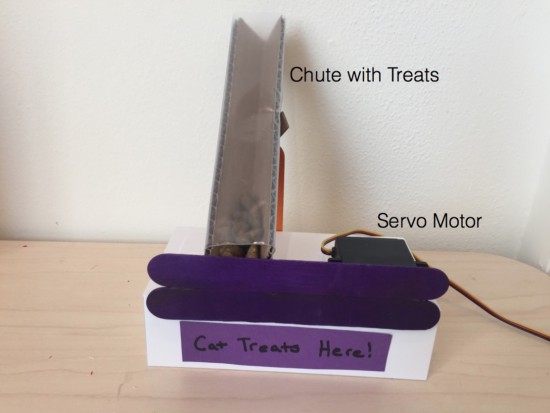
The example project uses one servo motor, one single color LED, and a light sensor. The dispenser consists of a servo motor attached to craft sticks that block the bottom of a chute containing cat treats. The position of the servo motor can be changed in software to release treats.
To receive a treat, the cat must cover a light sensor in front of the chute. When the cat covers the sensor, the servo motor briefly moves to open the chute and dispense a treat. The LED was included to show our test cat the location of the light sensor.
Programming with the Hummingbird
One unique feature of the Hummingbird is that it supports three different programming options for producing an Arduino program. These options provide steps of increasing difficulty to support learners as they transition from programming novices to Arduino experts.
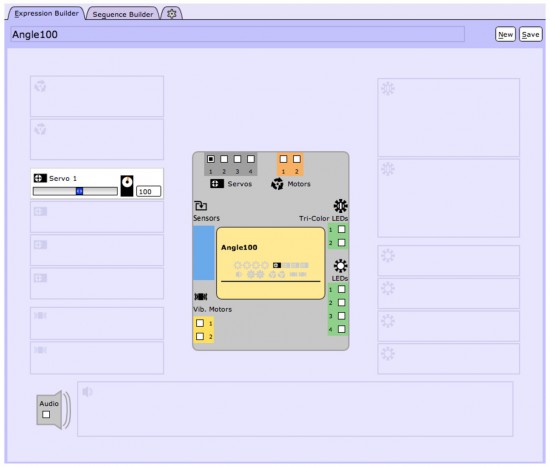
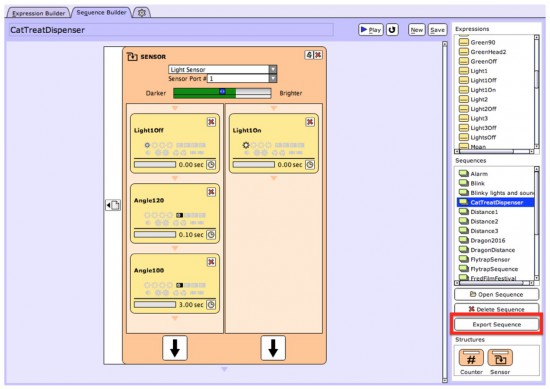
Beginners can start with the CREATE Lab Visual Programmer. This software option is based on storyboarding. Users can select the motors and LEDs that they are using on a schematic of the Hummingbird board. Then they can create expressions by using sliders to set the values of these outputs. The expression below sets a servo motor to 100°.
Expressions can be combined to create sequences. For example, the sequence below controls our automatic cat treat dispenser. This sequence is controlled by a sensor block. If the light level is low, the three expressions on the left are executed. If the light level is high, the three expressions on the right are executed. The user can then convert this sequence to an Arduino program by simply clicking the “Export Sequence” button (shown outlined in red). The Hummingbird can then be placed into Arduino mode and the program uploaded to the microcontroller.
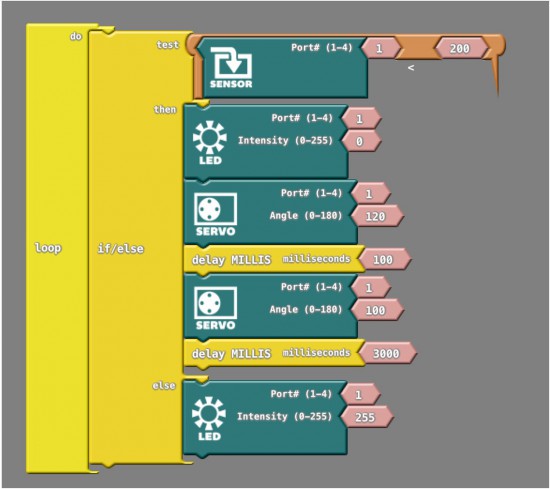
Another option for beginners is ArduBlock, which provides a visual introduction to the Arduino language. The Hummingbird extension for ArduBlock includes a block for each Hummingbird component. A program in ArduBlock to control the treat dispenser is shown below. This program is equivalent to the CREATE Lab Visual Programmer sequence shown above.
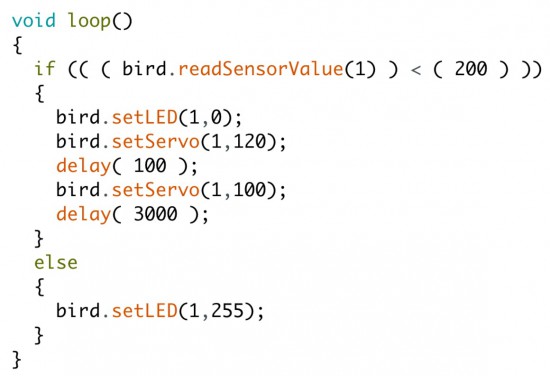
The Arduino code generated by this ArduBlock program is shown below. Individuals moving from the CREATE Lab Visual Programmer or ArduBlock to Arduino can start by modifying the generated code. For example, in the video we modified the commands inside the else to make the LED blink to attract the cat’s attention.
Once individuals are comfortable with the Arduino programming language, they can create more complex programs in Arduino. For instance, the video shows how we modified our robot and our code to incorporate three lights and three sensors. To get a treat, the cat must cover the sensor when the corresponding light is on.
The cat treat dispenser is only one example of a Hummingbird robot using the power of the Arduino at its core. The parts can be used and reused to construct an unlimited number of robots with low-cost materials such as cardboard, pipe cleaners, recycled materials, and even paper mache!
Arduino and Genuino Education is a worldwide-leading school initiative bringing technology into the hands of teachers and students to create a more inventive learning experience. It offers multiple platforms, including research-based projects like PELARS and in-class programs such as Creative Technologies in the Classroom (CTC), all of which are present at this year’s Maker Faire Bay Area.
With CTC, students are able to learn basic programming, electronics, and mechanics concepts in an approachable, playful way through a series of coding projects and easy-to-assemble experiments.
Arduino’s one-of-a-kind STEM program has been implemented in nearly 500 schools throughout the globe, resulting in an overwhelming satisfaction rate among both students and teachers alike. 95% of instructors continue to use the curriculum in their classrooms year after year, while more than 13,000 students have already participated.
CTC 101 — running on Arduino 101 — is divided into four distinct stages:
Teacher training (one week)
Themed modules (five modules, 10 weeks)
Student projects (nine weeks)
Technology fair (one day)
Each program comes with a CTC 101 Toolbox consisting of:
Sets of electronics components and pre-cut mechanical parts
“The color Visualizer” is an immersive installation to understand how color is used in nature to communicate between living organisms and to explore biodiversity through the lens of color:
By plucking an array of multi-colored strings, which are layered over the large array of high resolution screens, visitors can explore over 100 unique color stories as vibrant images and short videos appear before them. Strum a red cord, for example, and learn how a male cardinal bird colors his vibrant red feathers with pigments from food; strum a yellow cord and see how a yellow leopard’s spotted coat allows this predator to blend in with shadow and light while moving through tall grass.
The eye-catching cylindrical installation is part of the permanent exhibition “The color of Life” that opened in June 2015 and was created by Tellart in collaboration with the California Academy of Sciences. It was prototyped using Arduino Uno and it’s currently shortlisted for the Interaction Awards, representing excellence in interaction design.
In the video below the team working at the project explain the main features of the educational installation and show a bit of the making of:
About
Planet Arduino is, or at the moment is wishing to become, an aggregation of public weblogs from around the world written by people who develop, play, think on Arduino platform and his son. The opinions expressed in those weblogs and hence this aggregation are those of the original authors. Entries on this page are owned by their authors. We do not edit, endorse or vouch for the contents of individual posts. For more information about Arduino please visit www.arduino.cc
You are currently browsing the archives for the educational category.