Posts | Comments

Planet Arduino

Archive for the ‘blinkenlights’ Category

The Retro Shield, an Arduino Proto Shield for making many different circuits.

Is it an AM radio? Yes. It is a 555 LED flashing circuit? Yep. How about a hex counter with a 7 segment display? That too. Five different colored LED’s to satisfy your need for blinkenlights? Even that! What is this magical contraption? Is it one of those old school 30-in-1 or 50-in-1 “Science Fair” kits with the jumper wires and the springs? Almost!

When [grandalf]’s friend showed them a project where a 555 timer was installed on an Arduino shield, they realized two things: This whole “could have done that with a 555 timer” meme is a lot of fun, and “I’ve got an old 556 chip, I wonder if I can build one?” The answer is yes, and so much more.

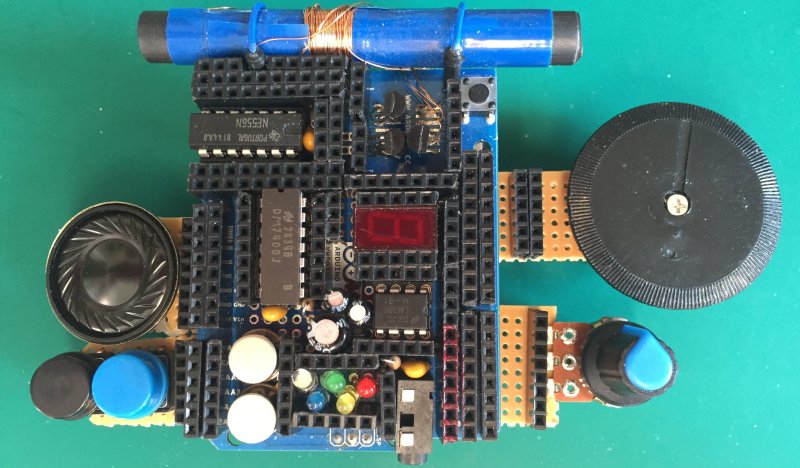
Starting with the 556 timer, and inspired by the old spring-and-jumper kits of the past, [grandalf]’s “556 on a Proto Shield” project evolved into a creation they call the Retro Shield. Snowballing like so many hacker projects, it now includes several built in circuits and components. Breadboard jumpers are used to connect components through strategically placed pin headers, of which there are quite a few!

To make it all fit, some parts were substituted with more compact pieces such as an LM386 instead of an LM380.  The AM radio portion is supplied by an all-in-one radio chip, the ZN414. With the scope creep picking up steam, [grandalf] eventually added so called sidecars- bits of board that contain controls and a speaker hanging off the side of the Proto Shield.

It is not mentioned if the Retro Shield integrates with the Arduino or not. All the same, the Retro Shield has been used to pick up local AM stations, blink LED’s and amplify audio with the LM386. Like [grandalf] we’re sure that the Retro Shield can be used for much more. We hope that [grandalf] expands on the concept and inspires future hackers to answer the question “I wonder what happens if I try this.” 

If you haven’t set eyes on one of the all-in-one kits, check out this 200-in-1 kit teardown and review. And of course, if you have your own hacked up projects to share, be sure to let us know through the Tip Line!


Just when we think we’ve seen all possible combinations of 3D printing, microcontrollers, and pretty blinkenlights coming together to form DIY clocks, [Mukesh_Sankhla] goes and builds this geometric beauty. It’s kaleidoscopic, it’s mosaic, and it sorta resembles stained glass, but is way cheaper and easier.

The crucial part of the print does two jobs — it combines a plate full of holes for a string of addressable RGB LEDs with the light-dividing walls that turn the LEDs into triangular pixels. [Mukesh] designed digits for a clock that each use ten triangles. You’d need an ESP8266 to run the clock code, or if you’d rather sit and admire the rainbow light show unabated by the passing of time, just use an Arduino Uno or something similar.

Most of the aesthetic magic here is in the printed pieces and the FastLED library. It has a bunch of really cool animations baked in that look great with this design. Check out the demo video after the break. The audio is really quiet until the very end of the video, so be warned. In our opinion, the audio isn’t necessary to follow along with the build.

The humble clock takes many lovely forms around here, including pop art.

People get into electronics for all kinds of reasons, but we would guess that the ability to blink the blinkenlights is probably pretty high on the survey results. [Kuchbert] has been going to Deichkind shows for the last decade and has wanted to build one of the German techno-rap band’s signature tetrahedral LED hats for about as long.

Up inside the hat is an Arduino Nano driving WS2812B LEDs and a portable battery to power everything. Thanks to an HC-05 Bluetooth module, the show can be controlled with an Android app. The many, many holes in the acrylic panels were milled out, but they could just as easily be laser-cut, or if you have infinite patience, drilled by hand. The code is coming once it has been cleaned up a bit. Everything else you’d need is already there waiting. This helmet even has its own lil’ music video, which we’ve carefully beat-matched in after the break.

Naturally, this makes us think of all the Daft Punk helms that have blinked by on this blog over the years. This hand-soldered one might be the most meticulously made.

From PDPs to Connection Machines, the Hackaday crowd are big fans of blinkenlights. While this project isn’t an old CPU, RAM, ROM, and an S-100 bus wrapped up in a fancy enclosure, it is a great recreation of the Altair 8800, the historic kit computer that supposedly launched the microcomputer revolution.

[Justin] says his project is just another Altair 8800 clone, but this one is cut down to the size of an Arduino shield. This is in stark contrast to other Altair recreations, whether they are modern PCs stuffed in an old case, modern replicas, or a board that has the same functionality using chunky toggle switches.

On board [Justin]’s pocket-sized Altair are a few LEDs, some DIP switches, and an octet of spring-loaded dual throw switches that wouldn’t look out of place in a 40-year old computer.

This shield targets the Arduino Due rather than the Mega, but only because the Due performs better running an Altair simulation. Everything is there, and a serial terminal is available ready to run BASIC or any other ancient OS.


Filed under: Arduino Hacks

Just when we thought we’d seen all the ways there are to tell time, along comes [mr_fid]’s Berlin clock build. It’s based on an actual clock commissioned by the Senate of Berlin in the mid-1970s and erected on the famous Kurfürstendamm avenue in 1975. Twenty years later it was decommissioned and moved to stand outside the historic Europa-center.

This clock tells the time using set theory and 24-hour time. From the top down: the blinking yellow circle of light at the top indicates the passing seconds; on for even seconds and off for odd. The two rows of red blocks are the hours—each block in the top row stands for five hours, and each block below that indicates a single hour. At 11:00, there will be two top blocks and one bottom block illuminated, for instance.

The bottom two rows show the minutes using the same system. Red segments indicate 15, 30, and 45 minutes past the hour, making it unnecessary to count more than a few of the 5-minute top segments. As with the hours, the bottom row indicates one minute per light.

Got that? Here’s a quiz. What time is it? Looking at the picture above, the top row has three segments lit. Five hours times three is 15:00, or 3:00PM. The next row adds two hours, so we’re at 5:00PM. All of the five-minute segments are lit, which adds 55 minutes. So the picture was taken at 5:55PM on some even-numbered second.

The original Berlin clock suffered from the short lives of incandescent bulbs. Depending on which bulb went out, the clock could be ‘off’ by as little as one minute or as much as five hours. [mr_fid] stayed true to the original in this beautiful build and used two lights for each hour segment. This replica uses LEDs driven by an Arduino Nano and a real-time clock. Since the RTC gives hours from 0-23 and minutes and seconds from 0-59, a couple of shift registers and some modulo calculations are necessary to convert to set theory time.

[mr_fid] built the enclosure out of plywood and white oak from designs made in QCAD. The rounded corners are made from oak, and the seconds ring is built from 3/8″ plywood strips bent around a spray can. A brief tour of the clock is waiting for you after the break. Time’s a-wastin’!


Filed under: Arduino Hacks, clock hacks


  • Newsletter

    Sign up for the PlanetArduino Newsletter, which delivers the most popular articles via e-mail to your inbox every week. Just fill in the information below and submit.

  • Like Us on Facebook