Posts | Comments

Planet Arduino

Archive for the ‘theremin’ Category

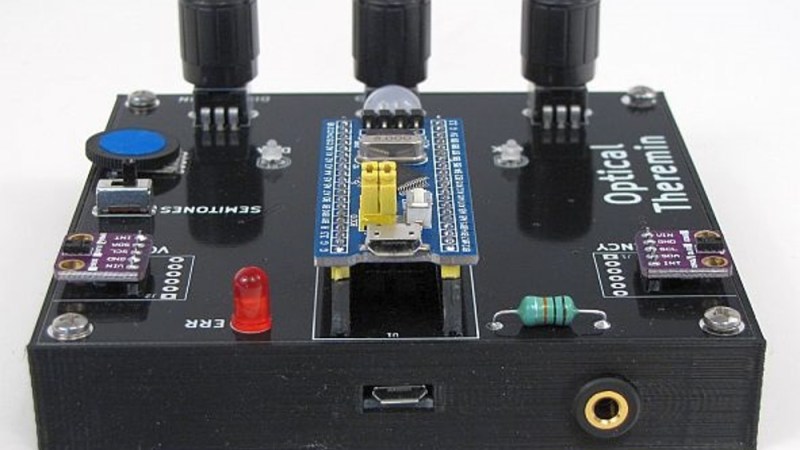
[Fearless Night]’s optical theremin project takes advantage of the kind of highly-integrated parts that are available to the modern hacker and hobbyist in all the right ways. The result is a compact instrument with software that can be modified using the Arduino IDE to take it places the original Theremin design could never go.

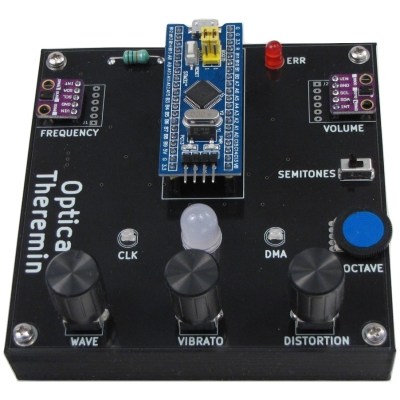
The design is based on a ‘Blue Pill’ STM32 MCU development board and two Avago APDS-9960 gesture sensor breakout boards, along with a few other supporting components. Where the original Theremin sensed hand proximity using two antenna-like capacitive sensors to control note frequency and volume, this design relies on two optical sensors to do the same job.

[Fearless Night] provides downloads for the schematic, code, parts list, and even 3D models for the enclosure. PCB files are also included for a convenient assembly, but since the component count is fairly low, a patient hacker should be able to get away with soldering it up by hand without much trouble.

This project creates the audio using the STM32’s Direct Digital Synthesis (DDS) capability and a simple low-pass filter, and has several ways to fine-tune the output. What’s DDS? Our own Elliot Williams explains it in terms of audio output for microcontrollers, and if you’d like a more comprehensive overview, Bil Herd will happily tell you all about it.

As the pandemic rages on, so does the desire to spend the idle hours tinkering. [knaylor1] spent the second UK lockdown making a sweet Theremin-inspired noise machine with a low parts count that looks like a ton of fun.

It works like this: either shine some light on the photocells, cover them up, or find some middle ground between the two. No matter what you do, you’re going to get cool sounds out of this thing.

The photocells behave like potentiometers that are set up in a voltage divider. An Arduino UNO takes readings in from the photocells, does some MIDI math, and sends the serial data to a program called Hairless MIDI, which in turn sends it to Ableton live.

[knaylor1] is using a plugin called TAL Noisemaker on top of that to produce the dulcet acid house tones that you can hear in the video after the break.

If you’ve never played with light-dependent resistors before, do yourself a favor and spend a little bit of that Christmas cash on a variety pack of these things. You don’t even need an Arduino to make noise, you can use them as the pots in an Atari Punk console or make farty square waves with a hex inverting oscillator chip like the CD40106. Our own [Elliot Williams] once devoted an entire column to making chiptunes.

We don’t think [bleepbit] will take offense when we say the “poor man’s theremin” looks cheesy — after all, it was built in a cheese container. Actually, it isn’t a bad case for a simple device, as you can see in the picture and the video below. Unlike a traditional theremin, the device uses ultrasonics to detect how far away your hand is and modifies the sound based on that.

There are also two buttons — one to turn the sound off and another to cycle through some effects. We liked how it looked like a retro cassette, though. The device uses a cheap Arduino clone, but even with a real Arduino, the price wouldn’t be too bad. However, the price tag quoted doesn’t include a few connectors or the speaker that appears in the schematic. There’s a note that the model built uses a jack instead of a speaker, but it would be nice to include both and use the kind of jack that disconnects the speaker when you plug speakers or headphones in.

The code is simple and there are four possible effects you can cycle through with one of the buttons. Unlike a real theremin, you can trigger this one with anything the ultrasonic sensor can see. The Arduino audio quality is not superb, of course, but it is still a fun rainy day project.

We couldn’t help but think that a 32-bit Arduino could have used one of the sophisticated audio libraries. However, there are other libraries that might improve things even with the 8-bit processor.

Granted, this isn’t a true theremin, but we’ve seen plenty of those, too. We’ve even used the same sensors to control a PC.

The traditional theremin is more or less an audio oscillator with two metal rods. Using proximity sensing, one rod controls the pitch of the oscillator and the other controls the volume. [Teodor Costachiou] apparently asked himself the excellent question: Why does the proximity sensor have to use capacitance? The result is an Arduino-based theremin that uses IR sensors to determine hand position.

[Teodor] used a particular type of Arduino–the Flip and Click–because he wanted to use Click boards for the IR sensors and also to generate sound via an MP3 board based around a VS1053. The trick is that the VS1053 has a realtime MIDI mode, and that’s how this Theremin makes it tones.

Of course, a real theremin is distinctly analog. A tiny change in hand position creates a small change in the output. With digital sensors and sound generation, the output is more in discrete steps, but according to [Teodor], the effect isn’t bad. We were hoping for a video (or, at least, an audio clip) but [Teodor] pleaded that he’s not a musician. He did include a video of a real theremin performance with his post, and you can see it below. But that’s a real analog theremin.

If you want to build something more traditional, have a look at Open Theremin. Or, if you want to get your exercise, how about trying a terpsitone. If you do, and can play the theme to The Day the Earth Stood Still, we’d love to see the video. Meanwhile, if you didn’t know the theremin had an espionage connection, you haven’t been staying current on Hackaday posts.


Filed under: Arduino Hacks, musical hacks

Ever wanted to own your own Theremin but couldn’t justify dropping hundreds of dollars on one? Now you can build your own, or buy it for a quintuplet of Hamiltons. The Open.Theremin.UNO project has built up antenna-based oscillator control around the ubiquitous Arduino Uno board.

So what’s the Arduino in there for? This is a digital Theremin, but check out the video below and you’ll agree that it sounds amazing and has excellent response. The aluminum antennas used for volume and pitch are attached to the top portion of the shield but it sounds like they’re not included in the kit. Don’t fret, you can use a variety of materials for this purpose. On the bottom you need to connect a speaker cable, and also a ground wire if that cable’s not grounded.

As the name implies, this is Open Hardware and we’re quite happy with the documentation on their site and the BOM (found on the GitHub repo). This design was shown off back in 2013 hiding in a pack of cigarettes. If you don’t want to build your own they’re selling kits on their site for 48 Euro delivered, or on Tindie for $55.

Okay, we’ve screwed this up so many times that we’re going to try to get it right here: the Theremin was not heard in the opening of Star Trek the original series, or in the opening of Doctor Who. It wasn’t featured in “Good Vibrations” either. As far as we can tell, it’s not used for anything in pop culture at all… but recognizing the sound and knowing what one is remains core geek knowledge.

If you want a Theremin to play using your entire body you need the Theremin Terpsitone.

[via Open Electronics]


Filed under: Arduino Hacks, musical hacks

openthereminuno_v2_web

Open.Theremin is an open source hardware and software project by Urs Gaudenz of  Gaudi Lab with the aim of building the next digital generation of the legendary music instrument developed in the ’20s by the Russian inventor professor Leon Theremin. The project is documented under a open license and uses Open.Theremin.UNO, an Arduino  or Genuino Uno shield featuring a digital mixer, combined 12 bit audio and CV out, audio jack on the bottom for more compact design, two completely separate antenna circuits:

The theremin is played with two antennas, one to control the pitch and one for volume. The electronic shield with two ports to connect those antennas comprises two heterodyne oscillators to measure the distance of the hand to the antenna when playing the instrument. The resulting signal is fed into the arduino. After linearization and filtering the arduino generates the instruments sound that is then played through a high quality digital analog audio converter on the board. The characteristics of the sound can be determined by a wave table on the arduino.

Most theremins on the market are either expensive or then not really playable. That’s how I decided to design a playable, open and affordable theremin. The first version was modular and difficult to program. Then I decided to redesign it as a shield to fit on the Arduino.UNO. This was a big success and many people could start using it, change the sounds and adapt it to their own application. The whole design is open source and documented on the website. I produced a small batch of the shield that can be bought through the small batch store on the website.

Watch the video below with Coralie Ehinger, a Swiss theremin player and organizer of the first Swiss theremin festival N / O / D / E, playing the instrument:


  • Newsletter

    Sign up for the PlanetArduino Newsletter, which delivers the most popular articles via e-mail to your inbox every week. Just fill in the information below and submit.

  • Like Us on Facebook