Posts | Comments

Planet Arduino

Archive for the ‘gps’ Category

A conventional compass points north (well, to magnetic north, anyway). [Videoschmideo]  wanted to make a compass that pointed somewhere specific. In particular, the compass — a wedding gift — was to point to a park where the newlywed couple got engaged. Like waking up in a fresh new Minecraft world, this is their spawn point and now they can always find their way back from the wilderness.

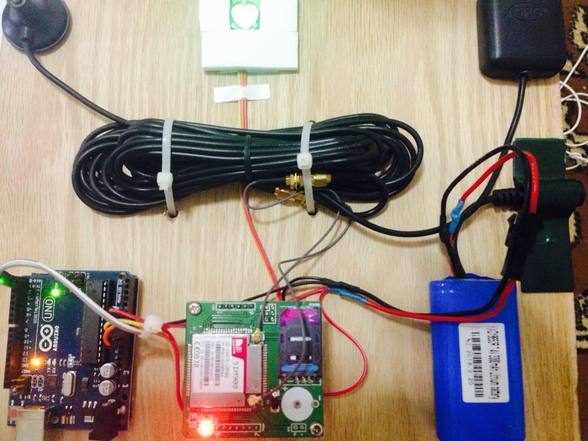
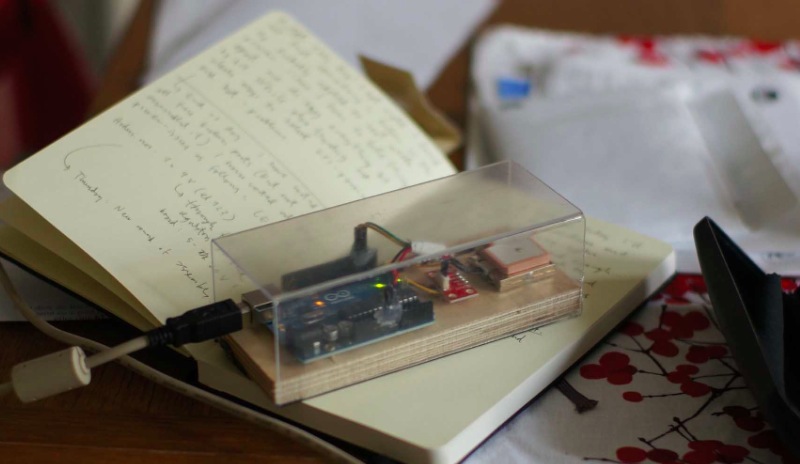
The device uses an Arduino, a GPS module, a compass, and a servo motor. Being a wedding gift, it also needs to meet certain aesthetic sensibilities. The device is in an attractive wooden box and uses stylish brass gears. The gears allow the servo motor to turn more than 360 degrees (and the software limits the rotation to 360 degrees). You can see a video of the device in operation, below.

The compass module may be hard to find, but you should be able to modify it to work with more readily available boards. Since you may not be able to find the exact gears used, your build will probably be a little different anyway.

The brass and wood are decidedly steampunk looking. It reminded us of this GPS project. If you have too much street cred to buy an off-the-shelf GPS, you could always roll your own.


Filed under: Arduino Hacks, gps hacks

3450168

Murad is a student of Mechatronics and Engineering at Tafila Technical University in the town of Tafila, in Jordan. He made a submission to our blog presenting his DIY project of a Heart Pulse Alarm based on Arduino Uno.

The HPA (Heart Pulse Alarm) is a portable device prototyped to measure the pulse rate and the body temperature of who’s wearing it. If the device receives an unusual heart pulse, it will send a sms message to paramedics to act quickly. He designed the device to help people who have cardiac problems and they lack  the resources for personal and professional assistants in his country.

Check the bill of materials and code on his blog.


[Joop Brokking] wanted to know where his quadcopter was and had been. He thought about Google Earth, but assumed it would be difficult to get the GPS data and integrate it with Google’s imagery. But he discovered it was easier than he thought. He wound up spending around $10, although if his ‘copter didn’t already have GPS, it would have been more.

Hardware-wise, [Joop] made a pretty straightforward data logger using a small Arduino (a Pro Mini) and an SD Card (along with an SD breakout board). With this setup, NEMA data from the GPS comes in the Arduino’s serial port and winds up on the SD Card.

gearthThe interesting part, though, is the visualization of the captured data. [Joop] uses u-Center from uBlox. This Windows software can read the NEMA data from the logger and provides several ways to view it, including a Google Earth view of the flight track played back at different speeds and in 2D or 3D views (see picture to the right).

We’ve seen uBlox hardware used in automotive applications. We’ve even seen the hardware flying and collecting WiFi information. But if your flying vehicle already has GPS, this is a pretty easy way to get some very cool post flight data interpretation. You can see [Joop’s] creation in action in the video below.


Filed under: Arduino Hacks, drone hacks, gps hacks

GPS is a global technology these days, with the Russian GLONASS system and the forthcoming European Galileo orbiting alongside the original US GPS satellites above our heads. [Florin Duroiu] decided to embrace globalism by forking the TinyGPS library for the Arduino platform to add support for these satellite constellations.

In addition to the GLONASS support, the new version of the venerable TinyGPS adds some neat new features by incorporating the NEMA 3.0 standard (warning: big-ass PDF link). Using this, you can extract interesting stuff such as the calculated position from each satellite constellation, the signal strength of each satellite and a lot more technical stuff about what the satellites are saying about you to your GPS receiver. [Florin] claims it is a drop-in replacement for TinyGPS that should require no rewriting. There is no support for Galileo just yet (as the satellites are still being launched: eight are in orbit now), but [Florin] is looking for help to add this, as well as the new Chinese BEIDOU system once it is operational.

(top image: artists’ view of a Galileo satellite in orbit, courtesy of ESA)


Filed under: Arduino Hacks
Jul
11

Punky GPS Gets The Steam Built Up For Geocaching

arduino, arduino hacks, geocache, geocaching, gps, gps hacks Comments Off on Punky GPS Gets The Steam Built Up For Geocaching 

While getting geared up for geocaching [Folkert van Heusden] decided he didn’t want to get one of those run of the mill GPS modules, and being inspired by steam punk set out and made his own.

Starting with an antique wooden box, and adding an Arduino, GPS module, and LiPo battery to make the brains. The user interface consists of good ‘ole toggle switches and a pair of quad seven segment displays to enter, and check longitude and latitude.

To top off the retro vibe of the machine two analog current meters were repurposed to indicate not only direction, but also distance, which we think is pretty spiffy. Everything was placed in a laser cut wooden control panel, which lend to the old-time feel of the entire project.

Quite a bit of wire and a few sticks of hot glue later and [Folkert] is off and ready for an adventure!


Filed under: Arduino Hacks, gps hacks
Jun
08

Pozyx shield gives position

arduino, bluetooth, gps, Position, shield, wifi Comments Off on Pozyx shield gives position 

20150604033001_PozyxShield

by elektormagazine.com:

Resolving the position of free roaming robots can be quite challenging. You can only expect to get accuracy of around 6 to 10 meters by using a standard low-cost GPS system and that can be further downgraded by poor signal strength inside buildings. Bluetooth and WiFi positioning can achieve 1 to 5 metres resolution but that’s often not enough. The Pozyx system has been developed to achieve a positional accuracy of 10 cm and works indoors or outdoors.

Four ‘Anchor’ transceiver units attach to walls or fences surrounding the space in which the Pozyx Shield operates. Communication between the shield and the four anchors allows the shield to determine its position and orientation within its operational area.

Pozyx shield gives position – [Link]

Jun
03

m45_Self_Balance_Bot-7Ready to level-up your robot skills? ArduRoller is a self-balancing, inverted pendulum robot that’s also capable of autonomous navigation indoors or out. I created it as an entry for the annual SparkFun Autonomous Vehicle Competition: The goal was to create a nontraditional vehicle capable of quickly navigating an obstacle course […]

Read more on MAKE

The post How to Build a Self-Balancing Autonomous Arduino Bot appeared first on Make:.

Apr
30

A Simple And Inexpensive GPS Navigation Device

arduino, arduino hacks, bitmap, BMP, display, geotiff, Github, gps, LCD, navigation, TFT, uno Comments Off on A Simple And Inexpensive GPS Navigation Device 

There are plenty of GPS navigation units on the market today, but it’s always fun to build something yourself. That’s what [middelbeek] did with his $25 GPS device. He managed to find a few good deals on electronics components online, including and Arduino Uno, a GPS module, and a TFT display.

In order to get the map images on the device, [middelbeek] has to go through a manual process. First he has to download a GEOTIFF of the area he wants mapped. A GEOTIFF is a metadata standard that allows georeferencing information to be embedded into a TIFF image file.  [middelbeek] then has to convert the GEOTIFF into an 8-bit BMP image file. The BMP images get stored on an SD card along with a .dat file that describes the boundaries of each BMP. The .dat file was also manually created.

The Arduino loads this data and displays the correct map onto the 320×240 TFT display. [middelbeek] explains on his github page that he is currently unable to display data from two map files at once, which can lead to problems when the position moves to the edge of the map. We suspect that with some more work and tuning this system could be improved and made easier to use, of course for under $25 you can’t expect too much.


Filed under: Arduino Hacks
Apr
02

Arduino based high-altitude balloon tracker

arduino, ATMeag328, gps, Tracker Comments Off on Arduino based high-altitude balloon tracker 

F2DZH47HN46GWPR-600x450

Ugifer wrote this instructable detailing the build of his Arduino based high-altitude balloon tracker:

The tracker is based upon the Atmel ATMeag328 Microcontroller which forms the heart of many of the popular “Arduino” boards. We are going to make an “Arduino Compatible” board which we can program using the Arduino IDE.
Because the GPS module and SD card both require 3.3v and we have plenty of computing power, we may as well make the whole tracker run on 3v3. That means that we can’t clock the ‘328 up to its full 16MHz but it will run happily at 8MHz on 3v3, and that’s plenty for our purposes.

Arduino based high-altitude balloon tracker - [Link]

Oct
09

GPS lamps and the (in)visible landscape of the networked city

arduino, arduino uno, Featured, gps, lamp, Lamp(s), oslo Comments Off on GPS lamps and the (in)visible landscape of the networked city 

gps-lamps2

Satellite Lamps is a project investigating one of the most important contemporary infrastructures, the Global Positioning System or GPS. It’s a project curated by Einar Sneve Martinussen, Jørn Knutsen and Timo Arnall as part of the Yourban research project at the Oslo School of Architecture and Design and continues their previous work on revealing the materials of technologies that started in 2009 with RFID and Immaterials: Light Painting Wifi. The project uses Arduino extensively, and is also thoroughly documented:

GPS is widely used yet it’s invisible and few of us really have any idea of how it works or how it inhabits our everyday environments. We created a series of Lamps that change brightness according to the accuracy of received GPS signals, and when we photograph them as timelapse films, we start to get a picture of how these signals behave in actual urban spaces.


They published a film that you can watch above, and published an article that details very thoroughly how it was made and why. If you are interested in the project, you can read more on how they explored GPS , how the visualisations were made, and about the cultural history of GPS.

gps-lamps

This is a GPS receiver connected to Arduino that sends data to a piece of software running on a laptop. It is a quickly designed tool, a transparent plastic box that that allows us to observe the performance of the electronics, and still mobile enough to carry in hand or a backpack.


  • Newsletter

    Sign up for the PlanetArduino Newsletter, which delivers the most popular articles via e-mail to your inbox every week. Just fill in the information below and submit.

  • Like Us on Facebook