Posts | Comments

Planet Arduino

Archive for the ‘math’ Category

Trigonometry is a struggle for some students. Perhaps one of the reasons for this is that instruction can be something of a one-way street, and concepts can be hard to grasp until more technical building blocks are learned. 

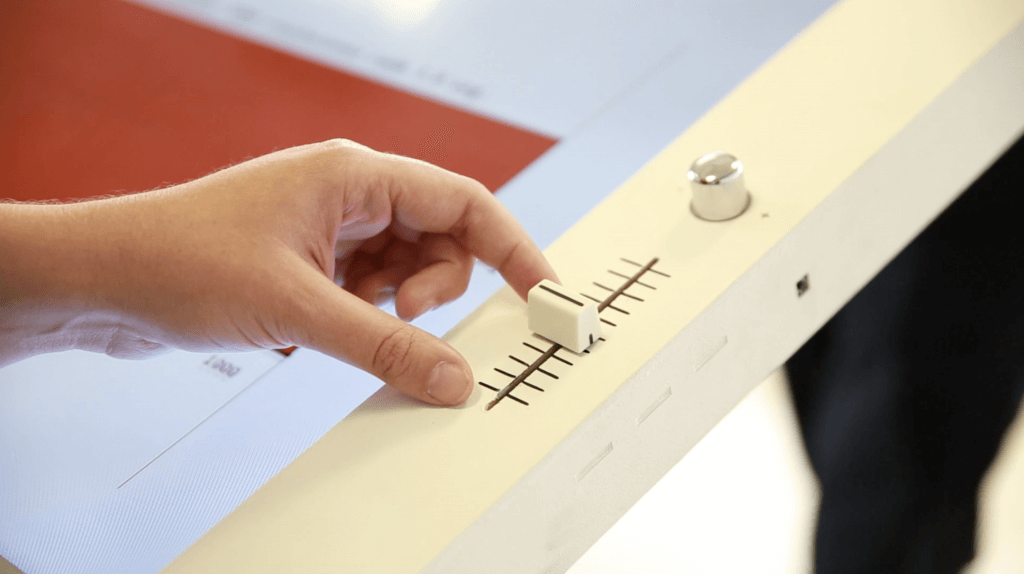
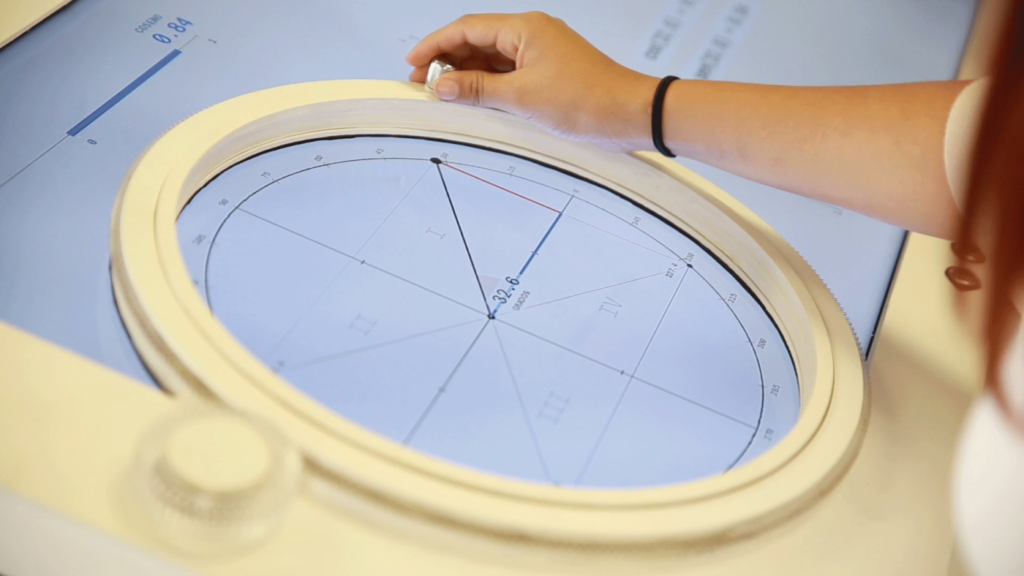
As seen here, researchers at the Universidad del Desarrollo in Chile aim to change that with an interactive trigonometry display called TAMI, or Tangible Mathematics Interface. This nearly horizontal screen shows mathematical relationships, while allowing students to engage with them using physical controls. 

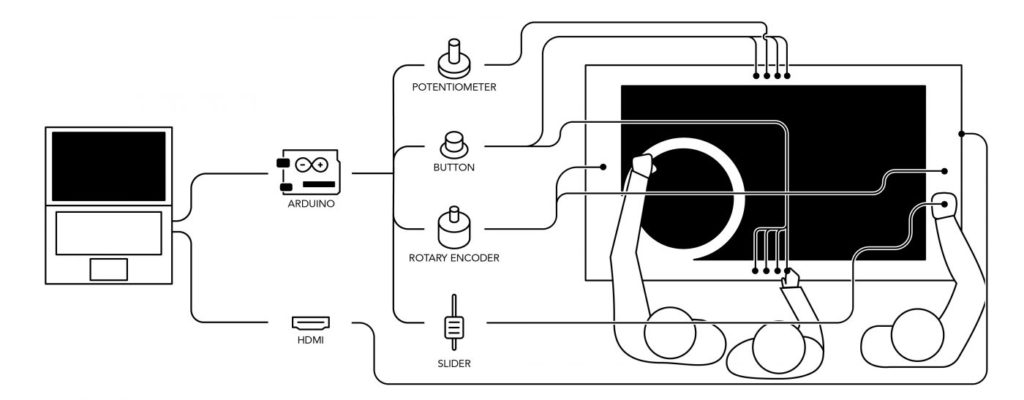
The most prominent controller here is a large rotary wheel. Students rotate this to modify the angle shown in the middle, and observe how concepts like sine and cosine react to this manipulation. An Arduino Leonardo takes input from this and other controls, and passes it along to a computer. This then handles on-screen info and even plays sounds as needed!

Small OLED displays are inexpensive these days–cheap enough that pairing them with an 8-bit micro is economically feasible. But what can you do with a tiny display and not-entirely-powerful processor? If you are [ttsiodras] you can do a real time 3D rendering. You can see the results in the video below. Not bad for an 8-bit, 8 MHz processor.

The code is a “points-only” renderer. The design drives the OLED over the SPI pins and also outputs frame per second information via the serial port.

As you might expect, 3D output takes a good bit of math, and the chip in question isn’t very good at handling real numbers. [Ttsiodras] handles this using an old technique: fixed point arithmetic. The idea is simple. Normally, we think of a 16-bit word as holding unsigned values of 0 – 65535. However, if you choose, you can also use it to represent numbers from 0-50.999, for example. Mentally, you scale everything by 1,000 and then reverse the operation when you want to output. Addition and subtraction are straightforward, but multiplication and division require some extra work.

If you want to read more about fixed point math, you are in the right place. We’ve also covered a great external tutorial, too. But if you think this is the first time we’ve covered a 3D graphics engine for the ATmega parts, you’re wrong.


Filed under: Arduino Hacks

Well all know cellular automata from Conway’s Game of Life which simulates cellular evolution using rules based on the state of all eight adjacent cells. [Gavin] has been having fun playing with elementary cellular automata in his spare time. Unlike Conway’s Game, elementary automata uses just the left and right neighbors of a cell to determine the next cell ahead in the row. Despite this comparative simplicity, some really complex patterns emerge, including a Turing-complete one.

[Gavin] started off doing the calculations by hand for fun. He made some nice worksheets for this. As we can easily imagine, doing the calculations by hand got boring fast. It wasn’t long before his thoughts turned to automating his cellular automata. So, he put together an automatic cellular automator. (We admit, we are having a bit of fun with this.)

This could have been a quick software project but half the fun is seeing the simulations on a purpose-built ecosystem. The files to build the device are hosted on Thingiverse. Like other cellular automata projects, it uses LED matrices to display the data. An Arduino acts as the brain and some really cool retro switches from the world’s most ridiculously organized electronics collection finish the look of the project.

To use, enter the starting condition with the switches at the bottom. The code on the Arduino then computes and displays the pattern on the matrix. Pretty cool and way faster than doing it by hand.


Filed under: Arduino Hacks, misc hacks

[gocivici] threatened us with a tutorial on positional astronomy when we started reading his tutorial on a Arduino Powered Star Pointer and he delivered. We’d pick him to help us take the One Ring to Mordor; we’d never get lost and his threat-delivery-rate makes him less likely to pull a Boromir.

As we mentioned he starts off with a really succinct and well written tutorial on celestial coordinates that antiquity would have killed to have. If we were writing a bit of code to do our own positional astronomy system, this is the tab we’d have open. Incidentally, that’s exactly what he encourages those who have followed the tutorial to do.

The star pointer itself is a high powered green laser pointer (battery powered), 3D printed parts, and an amalgam of fourteen dollars of Chinese tech cruft. The project uses two Arduino clones to process serial commands and manage two 28byj-48 stepper motors. The 2nd Arduino clone was purely to supplement the digital pins of the first; we paused a bit at that, but then we realized that import arduinos have gotten so cheap they probably are more affordable than an I2C breakout board or stepper driver these days. The body was designed with a mixture of Tinkercad and something we’d not heard of, OpenJsCAD.

Once it’s all assembled and tested the only thing left to do is go outside with your contraption. After making sure that you’ve followed all the local regulations for not pointing lasers at airplanes, point the laser at the north star. After that you can plug in any star coordinate and the laser will swing towards it and track its location in the sky. Pretty cool.


Filed under: Arduino Hacks, cnc hacks, news, solar hacks

If you want to sell a toy for the toddler crowd, it ought to be pretty close to indestructible. A lot of toys out there are just plain nonsense game-wise and therefore waste their beefy potential. [2dom]’s wife was close to throwing out such a toy—a Little Tikes Goofy Ball. The thing literally does nothing but let you push its big buttons in. After some time passes, it pops them back out again and giggles. Game over. [2dom] rescued it from the trash and turned it into a toy that plays math games.

[2dom] removed the existing board and replaced it with an Arduino Pro Mini and a Darlington array that drives the motor that pops the buttons back out, the speaker, and a Nokia 5110 screen. Upon startup, the user chooses between addition, subtraction, and multiplication questions using the appropriate button. Questions appear in the middle of the screen and multiple choice answers in the corners.

Choose the right answer and the ball cheers and shows one of a few faces. Choose the wrong answer and it makes a buzzing sound and shows an X. There is an adaptive level system for the questions that [2dom] doesn’t show in the demonstration video after the break. For every five correct answers, you level up. His 3- and 5-year-olds love it. For more advanced teachable moments, there’s this toy-turned-enigma-machine.


Filed under: Arduino Hacks


  • Newsletter

    Sign up for the PlanetArduino Newsletter, which delivers the most popular articles via e-mail to your inbox every week. Just fill in the information below and submit.

  • Like Us on Facebook