Italian artist, designer, and inventor Bruno Munari is often quoted as saying “If I listen, I forget; if I see, I remember; if I do, I understand.” We couldn’t agree more, and that is one of the reasons why we believe in the power of our Project Hub to help everyone truly learn, grow, and innovate. The tutorials our community shares are not only “recipes” you can replicate, but opportunities to go deeper and test different skills in real life. Don’t believe us? Check out this month’s top three picks!
Perplexed about the best way to safely multiplex a seven-digit LED display? Adrian Smith’s write-up offers a wonderful deep dive into electronics design best practices, suggesting shift registers as an alternative to directly connecting display segments and digit commons to microcontroller pins. The example, based on an Arduino UNO Rev3, will spur you to reflect on the interrelations between cost, complexity, and the crucial need to avoid overloads.
Your favorite Arduino module – Portenta H7 or H8, GIGA R1 WiFi, or Nano ESP32 will work great! – can inject a precious dose of flexibility into a field-programmable gate array (FPGA) to complete extreme tasks. Find out more about the general architecture and software drivers that can help you appropriately balance components’ performance, speed and costs: Dave Nardella’s Project Hub upload is not so much a step-by-step tutorial, but a springboard for infinite ideas!
Biking is an eco-friendly and healthy way of moving around the city! But traffic can be chaotic and safety should always be the priority: that’s why we love Luis Castillo’s idea to add direction indicators to the back of a bicycle. Activated via buttons installed directly on the handlebars, two LED arrows not only communicate clearly when you are ready to turn left or right, but also increase visibility and, of course, are a great excuse to try 3D printing, laser cutting, wiring, programming, and more!
These three Project Hub entries were selected for a $100, $300, and $500 gift card to spend on the Arduino Store, according to the terms and conditions of the Project Hub Competition we ran in 2023. Thank you all, for your contributions to open-source resources!
A will to create something new by subtracting and simplifying, rather than adding, seems to inspire the three projects uploaded to Project Hub in October that we are proud to highlight today. This “less, but better” attitude is often the key to great ideas and even better executions, creating magical interactions and efficient solutions. Sometimes, all you need is the openness to imagine a different way of doing things!
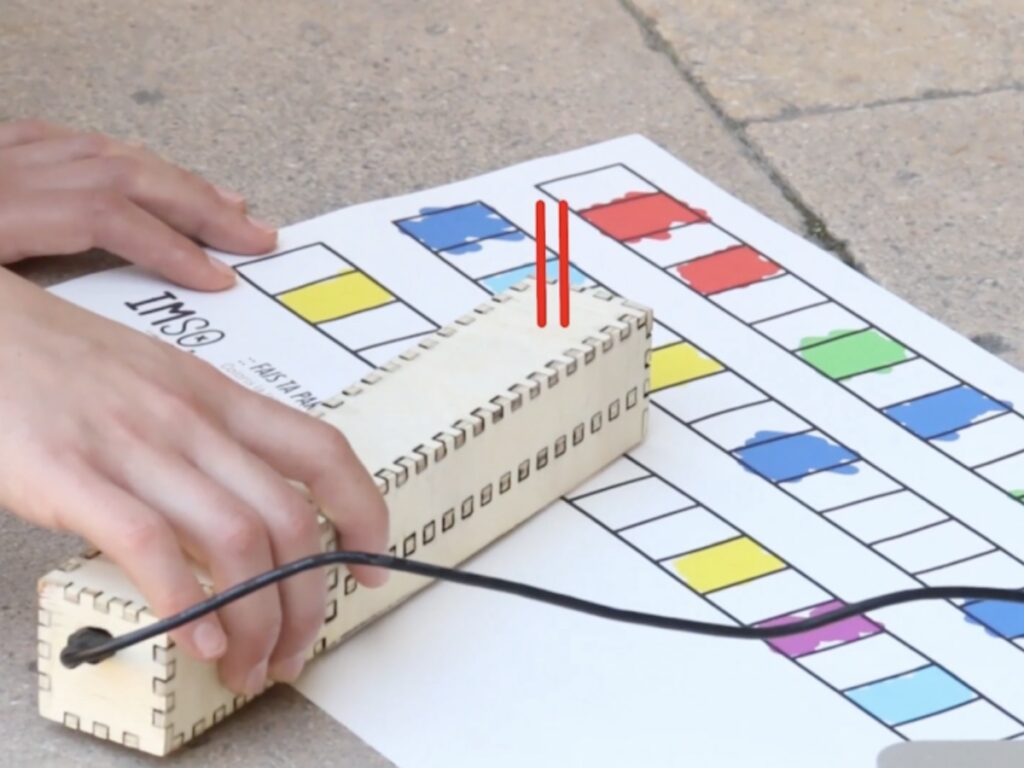
You may know that synesthesia allows some people to experience color when listening to music, but have you heard of a scanning tool that lets anyone translate color into sound? It’s the open-source, portable IMSO, Color on the Scale of Sound: a wooden “magic wand” powered by an Arduino Mini and a few lines of code, perfect to inspire kids, ages 7 and up, to explore the worlds of art, music and technology all at once.
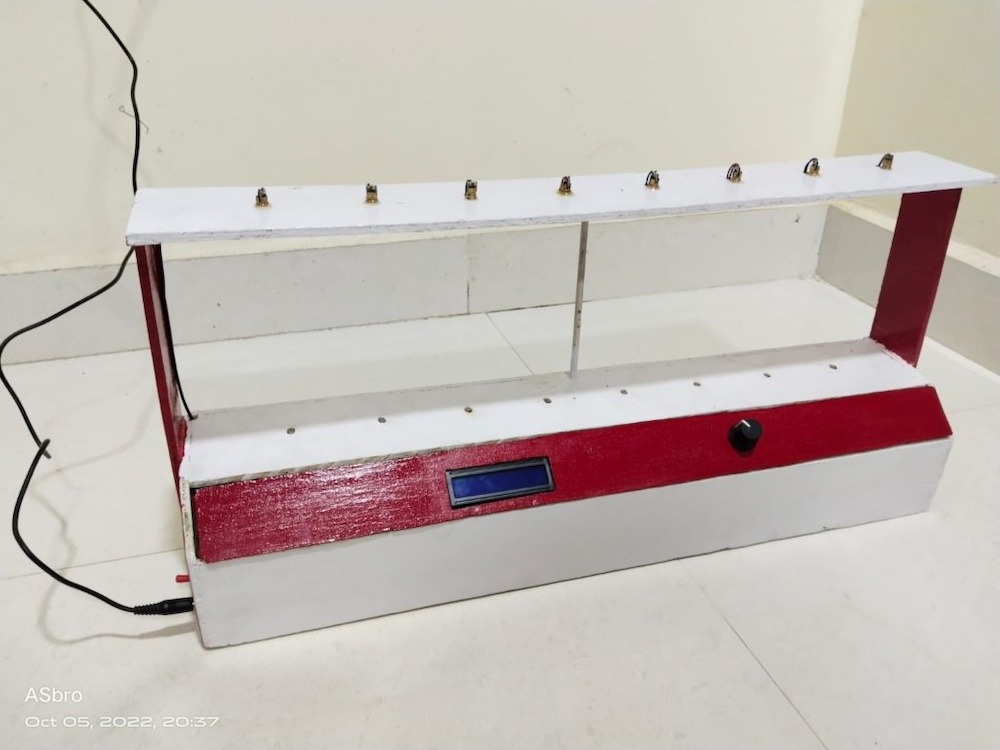
If you still believe instruments must have keys or strings or some surface to hit in order to produce sound, have a look at this project. Based on an Arduino UNO Rev3 and coded with the IDE 1.8, it enables you to play music by moving your hands in the air! Designed for musicians at any skill level, this one-of-a-kind instrument works by reproducing a different note depending on which of its 8 laser beams you are interrupting, and conveniently displays both the note and octave on an LCD display.
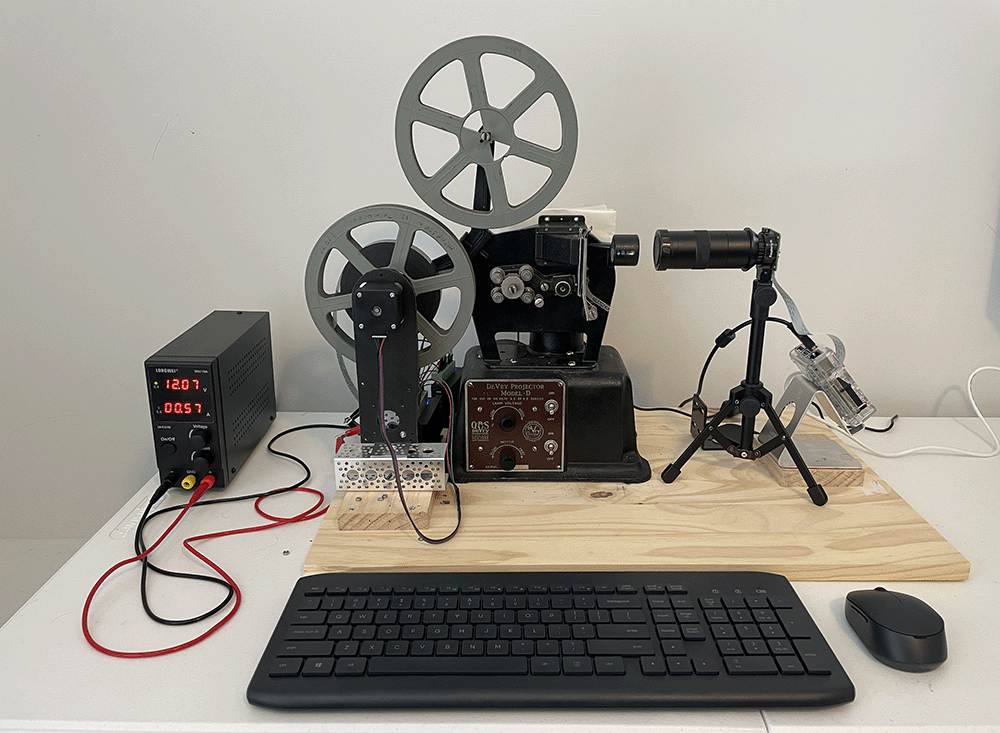
Faced with the staggering costs of digitizing his father’s high school 16-mm football films from the 1970s, dstein425 decided to leverage his professional software engineering skills to create a DIY solution based on the Arduino UNO Rev3, Raspberry Pi, an old projector, and only under 200 lines of code. His efforts led not only to great savings, but also to the huge satisfaction of creating a better-quality result that will preserve family memories through the years.
For your chance to be selected for a $100, $300 or even $500 gift card to spend on the Arduino Store, submit your best project on Project Hub! We will be awarding three new entries every month, as detailed in the complete terms and conditions. Good luck!
The Project Hub is where Arduino users share their achievements to inspire, help others, and maybe show off a little. With thousands of projects already uploaded, in categories that run the gamut from “flying things” to “smart lighting,” we are proud to celebrate this community-boosting initiative by selecting three highlights every month for a special mention and gift card to spend on our Store.
If you are new to the portal and think you’d never be picked, think again! All three top users from September stood out with the very first project they uploaded.
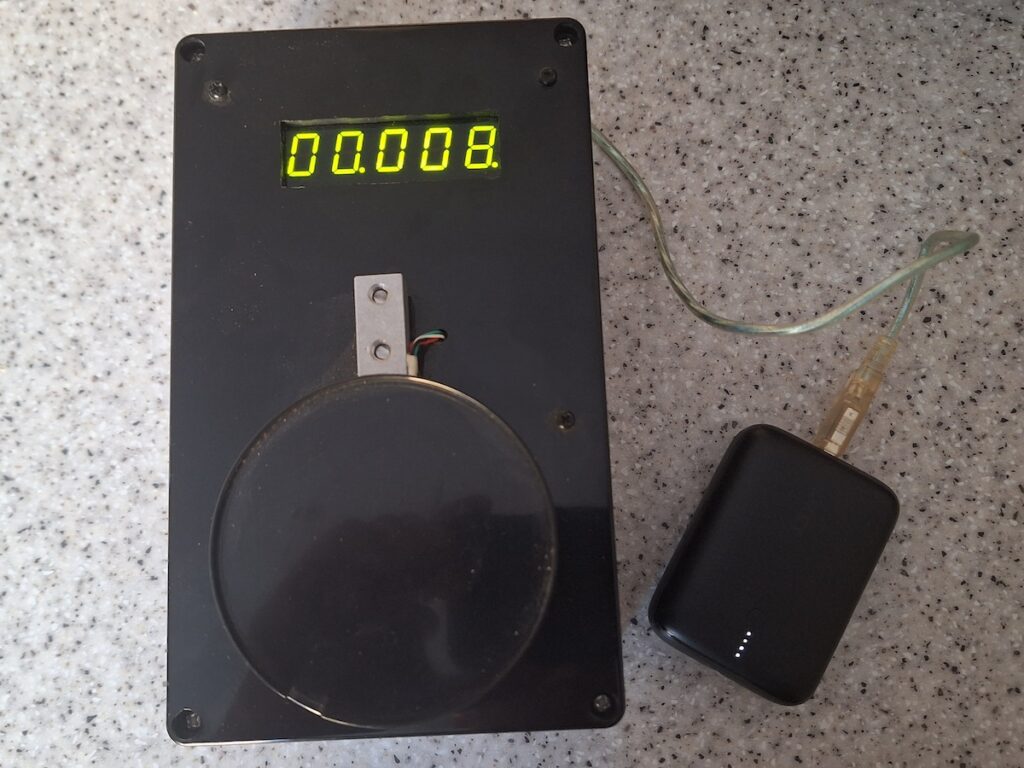
This advanced project allows you to successfully build an Arduino-based power meter system with internal PLC, able to accurately collect and calculate data to monitor energy consumption, improve efficiency, and add value to home automation solutions. Follow the instructions to display voltage, power factor, current, power and frequency instantly, with a handful of commonly available components and a compact Arduino Nano.
Syncing up different props – from different manufacturers and retailers – to create a cohesive overall installation is no easy feat! This project was specifically intended for Halloween, to get skeletal animatronics to play the same music together thanks to the UNO R3 and some ingenious wiring… but we think it would work great also with more festive characters, for a truly unforgettable holiday display.
A fan of Arduino since graduating with a dissertation on smart homes in 2022, kela910512 has successfully used an Arduino Micro to devise a secure tool to log in and out of Windows 10 using an RFID card. Instead of manually typing passwords, the solution leverages an Android application to send the user’s password to the Arduino via Bluetooth, with a range of additional security mechanisms. To find out more and perhaps try this yourself, head to Project Hub!
For your chance to be selected for a $100, $300 or even $500 gift card to spend on the Arduino Store, submit your best project on Project Hub! We will be awarding three new entries every month, as detailed in the complete terms and conditions. Good luck!
Everything old is new again! Arduino users always amaze us with how they put a fresh spin on the most common objects around us: a clock, a board game, a computer… anything can inspire the exciting new entries they share on Project Hub. These are the three builds we selected from August’s uploads to highlight our community’s advanced skills, resourcefulness, and creativity.
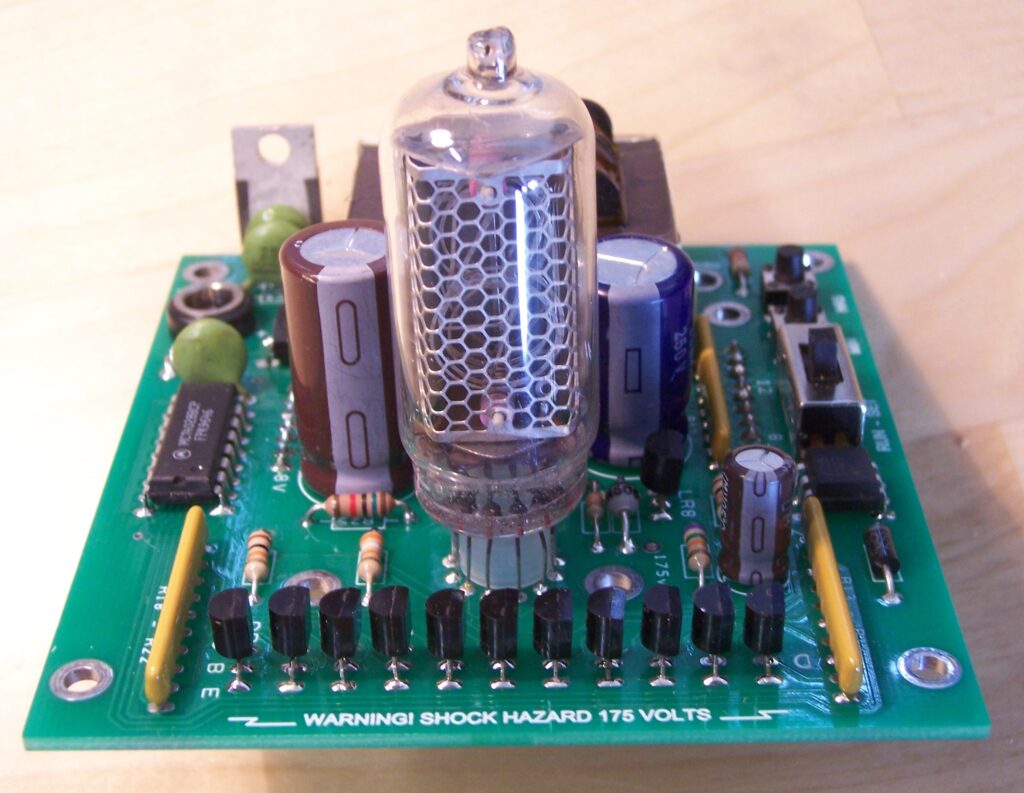
As the saying goes, “With great power comes great responsibility.” if you have the electronics knowledge to work in total safety, assembling this fun retro clock is a great opportunity to show off your skills and ingenuity at the same time. Using an Arduino UNO and a Nixie tube – which, unlike an LED, operates at high voltage and therefore must be handled with care – you can read the time off a unique display, even from across the room. Combine multiple tubes to showcase different information!
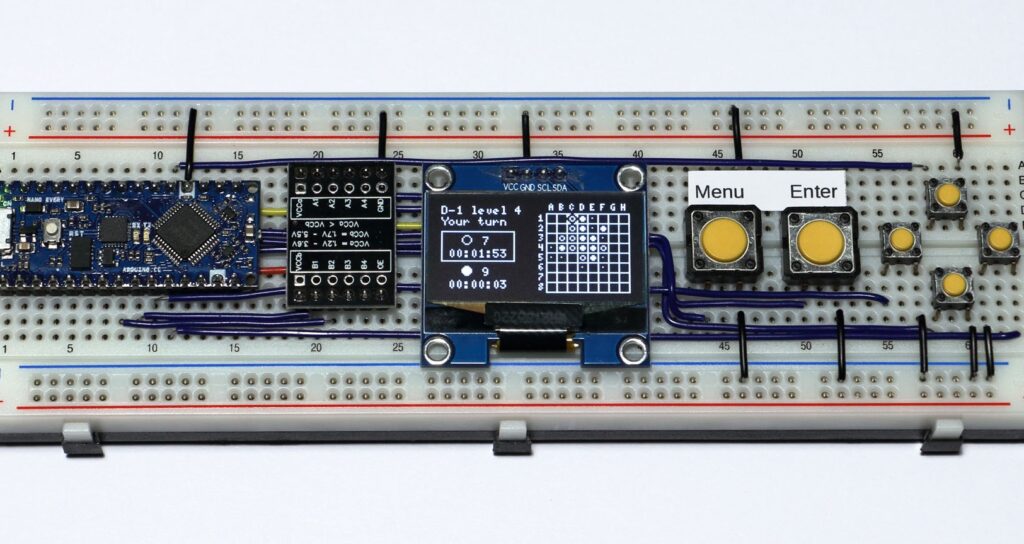
To make or not to make was never the question! We have no doubt you can follow this tutorial to create your own digital version of the traditional Othello game: learn to play, practice, and win – even with minimal hardware. In fact, you can get away with only the Arduino Nano Every board, the Arduino IDE, and a cable to connect the two.
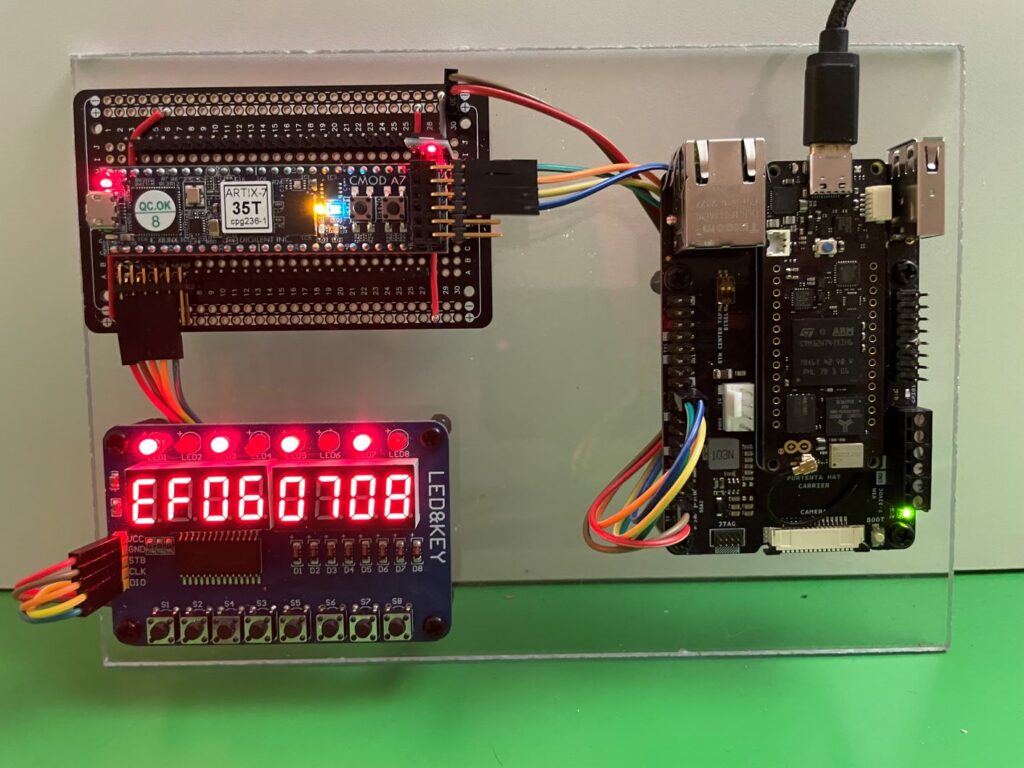
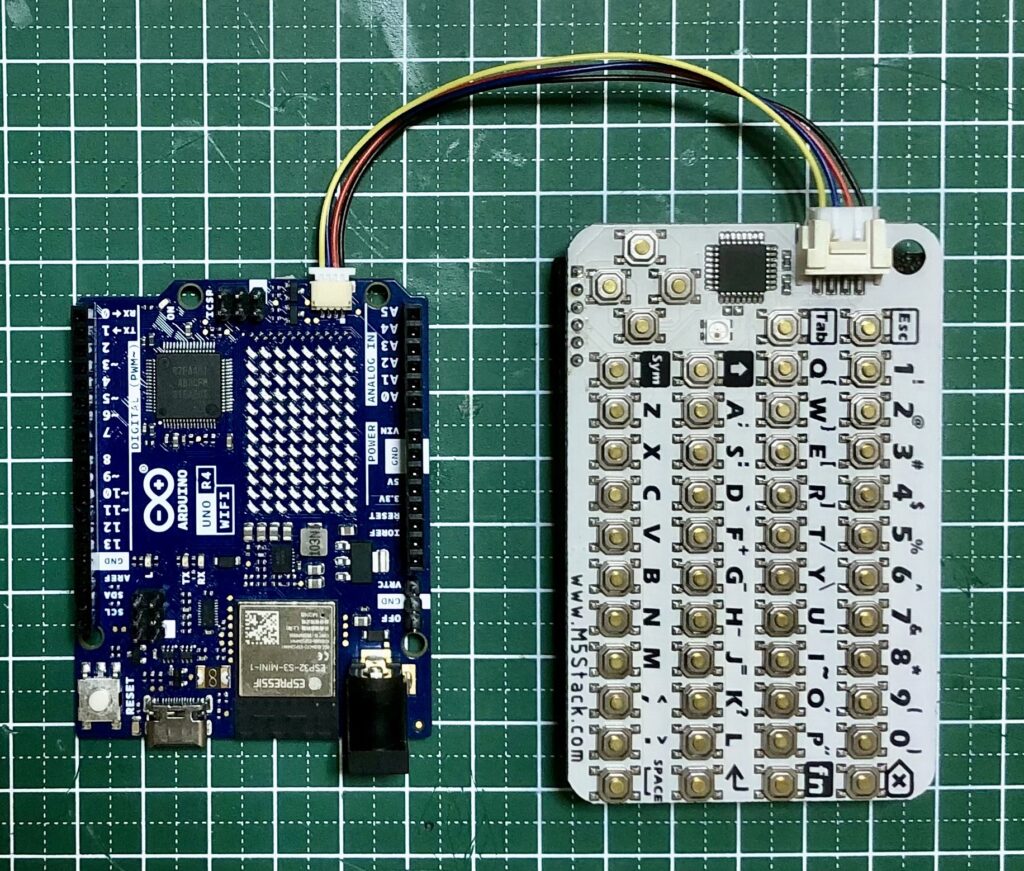
It’s the stuff of vintage spy movies, but blends into today’s reality – where custom technology can truly be at your fingertips at all times thanks to new, accessible components. Based on two 2023 releases from Arduino – the Nano ESP32 and UNO R4 – yokonav’s debut contribution to Project Hub demonstrates how to stack hardware to form a small, functional computer that runs on Linux.
For your chance to be selected for a $100, $300 or even $500 gift card to spend on the Arduino Store, submit your best project on Project Hub! We will be awarding three new entries every month, as detailed in the complete terms and conditions. Good luck!
Makers always find a good reason to make: to learn or to enjoy, to share or to find a solution, they can play around all day, and work around anything. Proud of our community’s resourcefulness, this month we celebrate three projects uploaded to Project Hub in July that embed IoT, robotics, and home automation into approachable and fun tutorials. It just takes equal parts passion, creativity, and willingness to try something new…
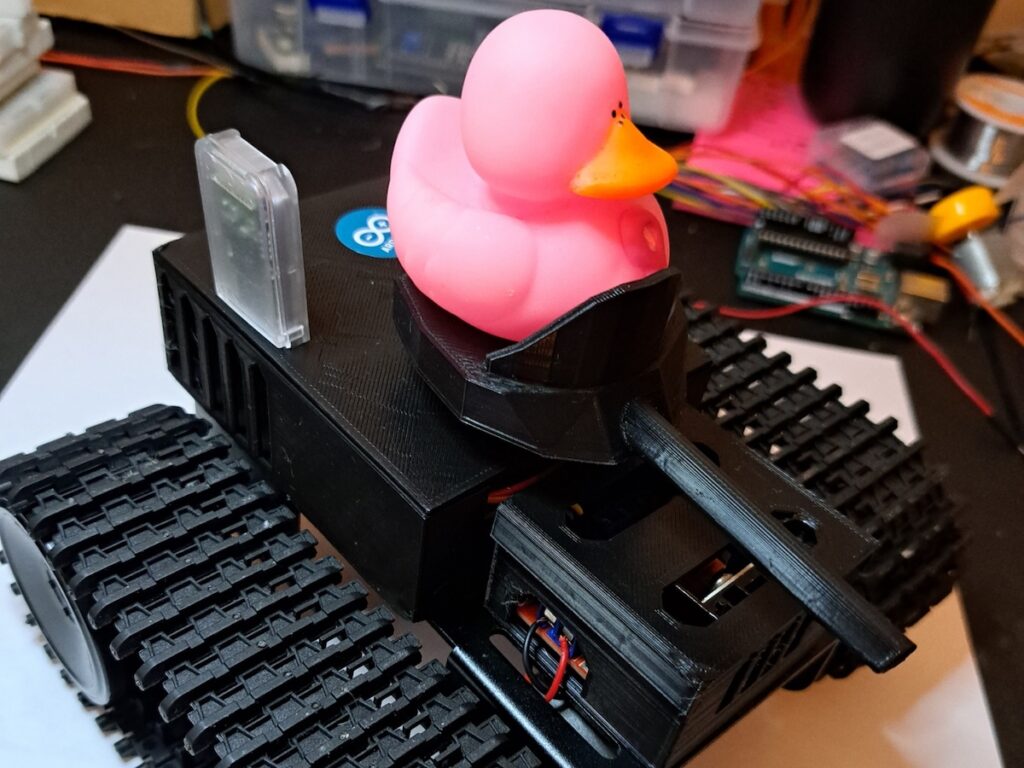
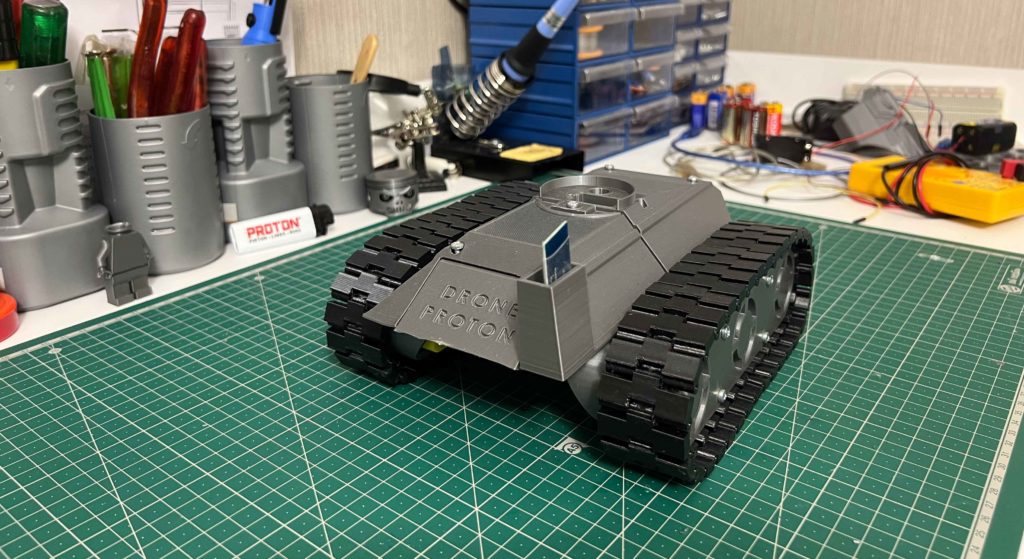
Adding custom enclosures can make your project look neater, protect its inner workings, and allow you to hone your designs for functionality and fun! It’s the finishing touch that makes any project really stand out – including this one, for an Arduino Nano Every tank that can be controlled remotely via Bluetooth®. You can find all the instructions you need in its Project Hub write-up: add a handful of components, and go call that friend who has a 3D printer!
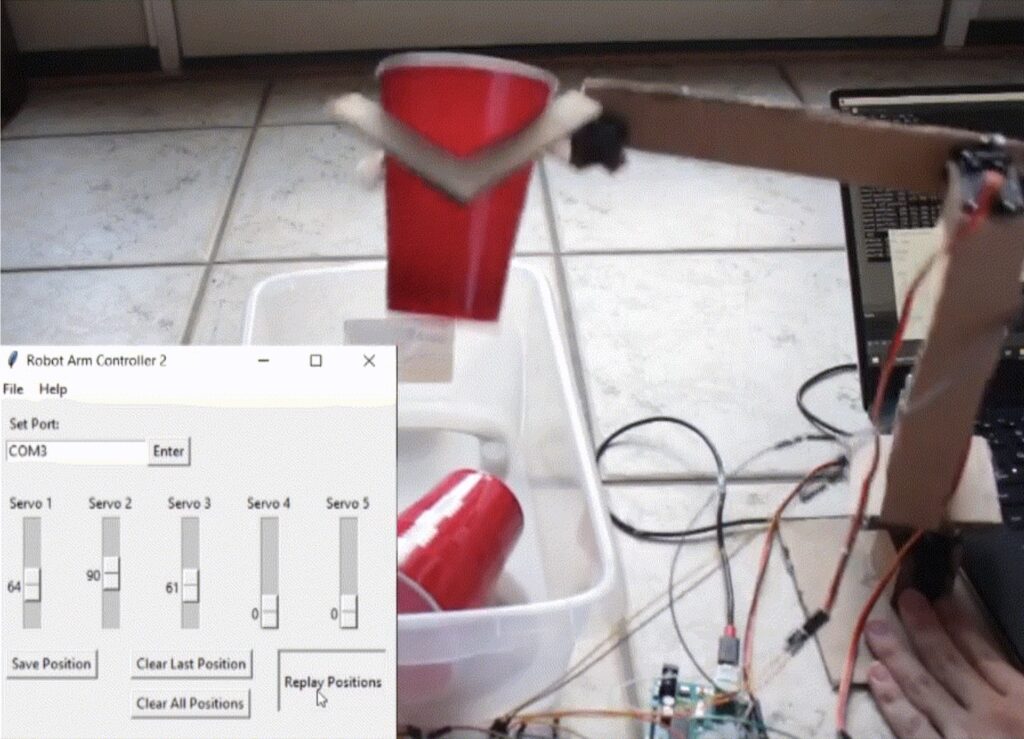
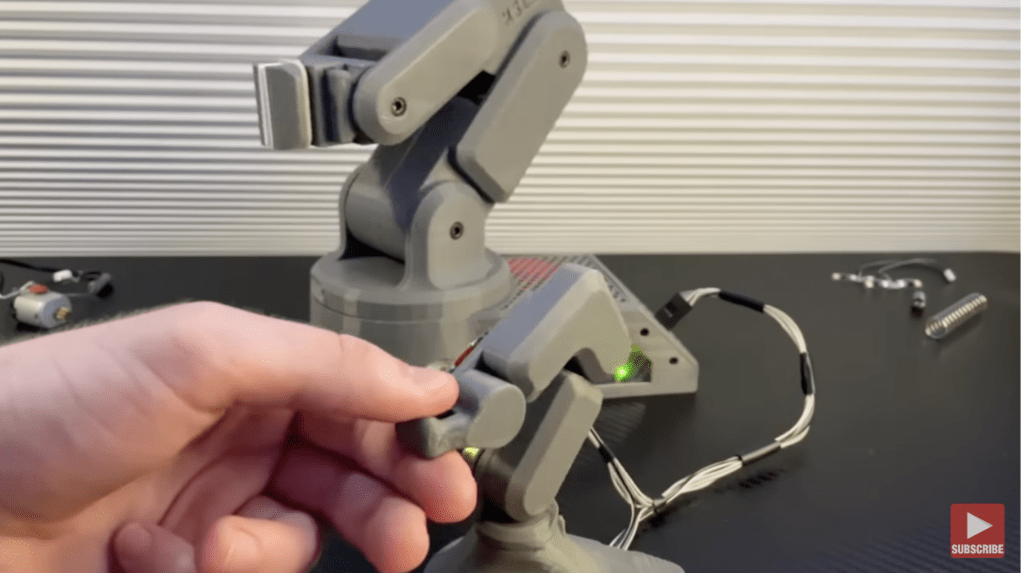
This Arduino UNO Rev3 project gives anyone approaching robotics a leg up – in building their first robotic arm! Using ready available and inexpensive materials like cardboard, you can follow the tutorial and replicate the simple Arduino and Python code to program the arm: it will record and replay positions, which you can easily control from a graphical interface.
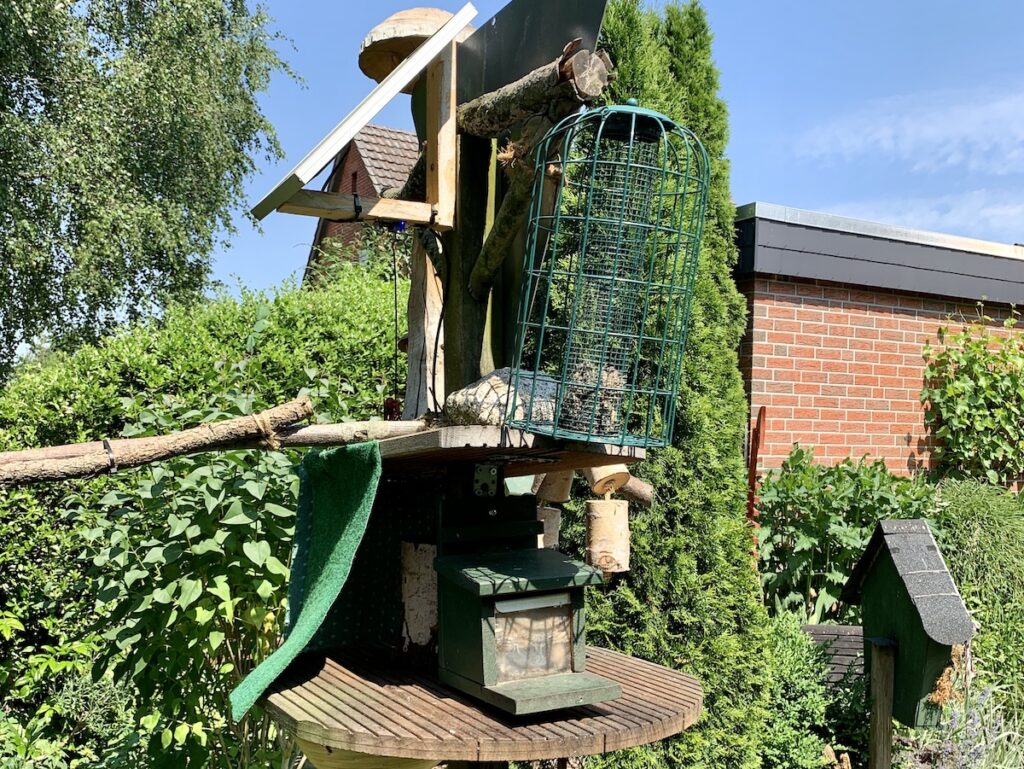
Why just casually feed the little creatures, when you can construct a system that also automatically reports back on their activity? Peter Stuhr’s first tutorial on Project Hub combines a solar-powered MKR WiFi 1010 with Google Sheets, using the simple IFTTT web hook: every time the feeder is opened, the board wakes up for 10 minutes and fills out a few rows in the spreadsheet. His solution could be adapted to monitor many other events in the garden, but we love that he has invested his skills and resourcefulness to ensure hungry squirrels always have enough food.
For your chance to be selected for a $100, $300 or even $500 gift card to spend on the Arduino Store, submit your best project on the Project Hub! We will be awarding three new entries every month, as detailed in thecomplete terms and conditions. Good luck!
It’s back to school! Whether you are a student or not, Arduino’s Project Hub is a great place to never stop learning, thanks to the wealth of knowledge, experiments, and plain cool ideas our community so generously shares. The three highlights we’ve selected among the projects uploaded in June indeed all have something to teach us… with one valuable lesson in common: the past has a lot to offer, if we take the time to recharge, rediscover or revamp it just a little!
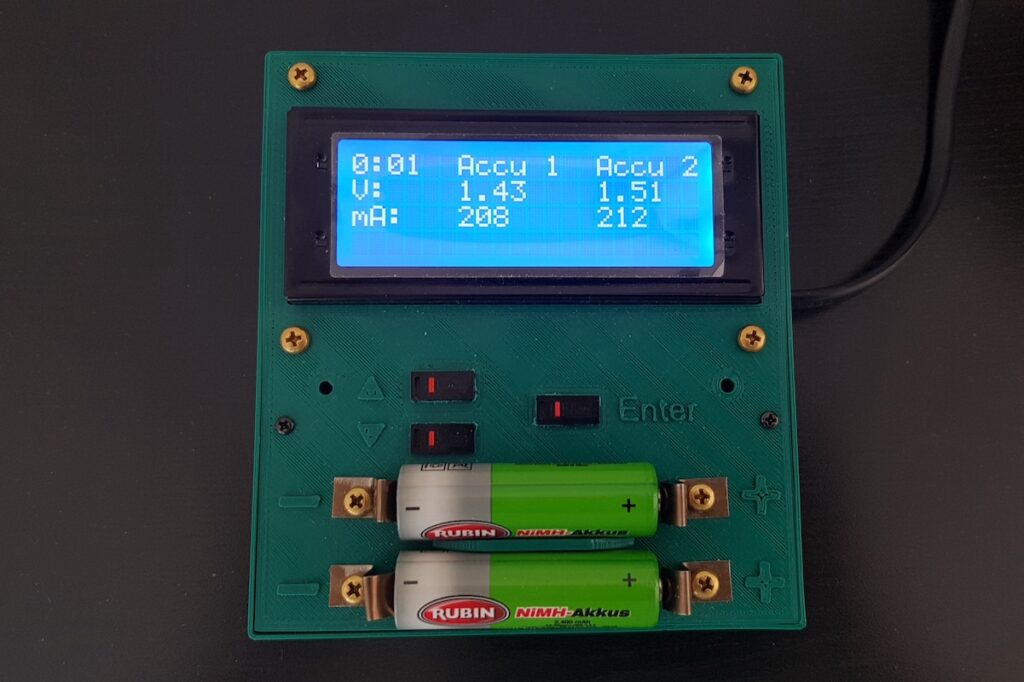
This tutorial is so clear it can make anyone feel capable of building their own charger – with additional functionalities such as determining battery wear. Batteries always have to be handled with care, but if you have the skills to customize code and solder a circuit according to the schematic provided, more power to you! All you need are an Arduino Nano and a few other common components.
This is not just a project, but a wonderful deep-dive on wireless communication where you’ll learn about the ISM band, ASK modulation, and synchronous and asynchronous demodulation. More importantly, you might rediscover the “simpler and older radio frequency devices and schemes” that are perfect to save resources on smaller projects. In this case, they will be all you need to implement wireless communication interfacing a Nano with a 433 MHz RF module.
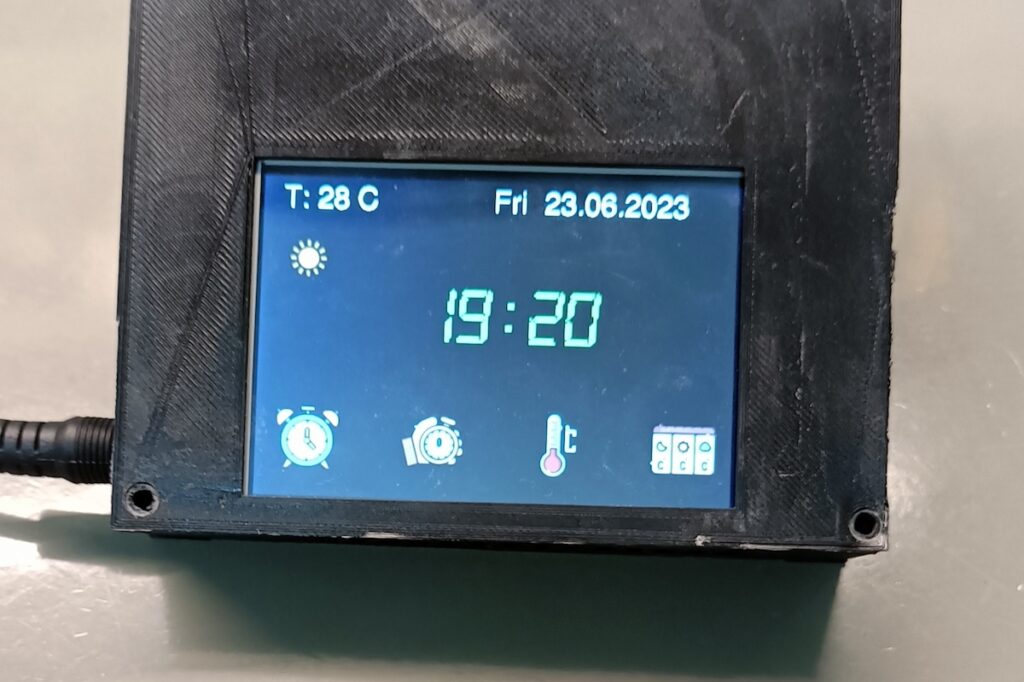
Time and date, timer and alarm, but also detailed temperature data and even the weather forecast: you can have it all in one clock! With this project, Project Hub user dzh121 improved upon a previous version of theirs by adding a touchscreen and displaying more information. An impressive device that makes great use of Arduino IoT Cloud-based dashboards.
For your chance to be selected for a $100, $300 or even $500 gift card to spend on the Arduino Store, submit your best project on the Project Hub! We will be awarding three new entries every month, as detailed in the complete terms and conditions. Good luck!
The three great projects selected in April for our Arduino Project of the Month competition are a reminder that making allows anyone to work (or play!) with technology – regardless of their goal, skill level, budget or inspiration. Be sure to browse the Project Hub regularly as you never know whether you’ll find a solution to support industrial automation in your company, or a fun experiment that’s just meant to make you smile.
Building a robotic arm may seem like a challenging goal – but it’s easy (and probably not as expensive as you think!) with this super-clear video tutorial. Designed to be small, streamlined and easy to control, this project required custom 3D-printed parts, straightforward coding through the Arduino IDE, and of course, an Arduino Leonardo.
Pipelines are an essential component in many types of machines and equipment – and keeping them healthy is crucial to extend the life of entire industrial systems. For a budget-friendly and compact solution to detect and diagnose defects, Kutluhan Aktar’s advanced project leverages an mmWave sensor and machine learning, thanks to Arduino products’ wide compatibility and modularity. Check out the tutorial to see how an Arduino Nano can be paired with a Nicla Vision to run a tinyML model, capture images of any deformed pipes, and inform users of the results.
No matter the deadline, a countdown always makes it seem more pressing. Now, you can also make it a lot more fun with a four-digit, Predator-style counter based on the Arduino Nano 33 IoT! In this tutorial, user rogermiranda1000 even developed a custom numeric system and tweaked the delays for a more dynamic final effect. Perhaps not the most functional counter out there… but definitely a winner for any Predator movie fan!
For your chance to be selected for a $100, $300 or even $500 gift card to spend on the Arduino Store, submit your best project on Project Hub! We will be awarding three new entries every month, as detailed in the complete terms and conditions. Good luck!
This is the third time that we’ve selected three outstanding projects in the Arduino Project of the Month competition, highlighting the wide range of our users’ contributions to our growing Project Hub. For April we go from tanks to tunes – because why not? Anything is possible with just a few components, a lot of curiosity, and an amazing community like ours.
If you’re on a mission to build a remote-controlled tank, this is the project for you! Complete with downloadable code, electronics diagram and 3D models, it even provides easy instructions in video format. Use an Arduino Nano, four DC motors, a motor driver, and Bluetooth® module to fight the good fight of making!
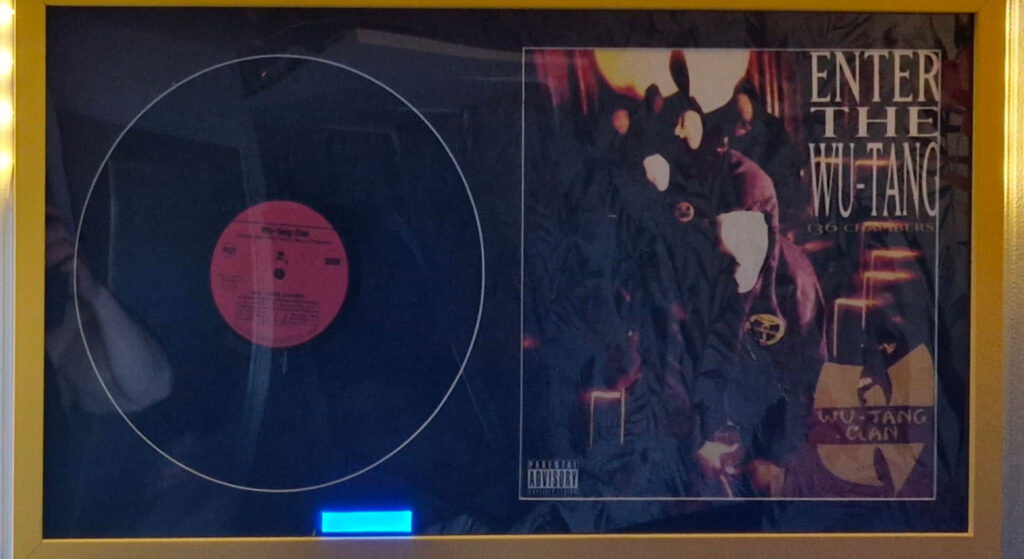
Thanks to this project, you can display your favorite record and listen to it too! Add small hidden speakers and a touch-sensitive button to your vinyl frame, and play MP3 tracks off a DFPlayer SD card. With an Arduino Nano, the Arduino IDE, and clear and simple instructions, you can recreate or customize this project without skipping a beat.
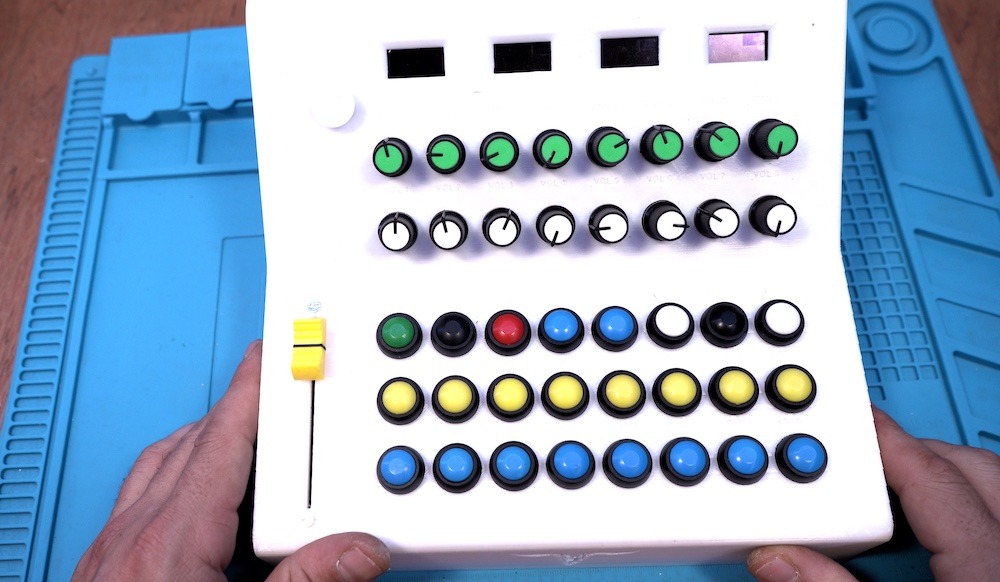
DIYing your own MIDI controller is cheaper than buying one off the shelf and, of course, is hugely satisfying for any music-oriented maker. With this Arduino Due project, it might even be easier than you think! Check out this entry’s in-depth tutorial to make a USB MIDI controller for all the basic parameters of a digital audio workstation (DAW) — volume, pan, mute, solo, rec, play, stop and more — without assigning anything manually.
For your chance to be selected for a $100, $300 or even $500 gift card to spend on the Arduino Store, submit your best project on the Project Hub! We will be awarding three new entries every month, as detailed in the complete terms and conditions. Good luck!
Who said robots had to be all work and no play? For many years, people have been designing and building robots not just to help with chores, but to help us win games. Possibly the most famous examples of this are the robots that play chess.
In this article, we’ll take a look at the history of chess-playing robots, how they’ve evolved over time, and share three famous examples.
And do not forget that with the right inspiration, Arduino, and the Arduino Cloud, creating a robot is not a dream anymore!
The history of robots in chess — Three famous robotic chess prodigies
Chess is an old game. Humans have been playing it for 1,400 years, and for the vast majority of that time, their only opponents were other humans.
As time went on and technology became more advanced, people started to turn their thoughts to ways of using tech to win at chess. One of the first (somewhat clumsy) attempts came in the 18th century.
The Turk
The Mechanical Turk, developed in 1770 by Wolfgang von Kempelen, stunned audiences by repeatedly holding its own against human opponents. The world had changed forever — were machines finally beginning to outsmart their makers!?
Well… not exactly. The Turk actually turned out to be a case of fraud — and featured a human chess player hiding inside the machine and controlling its movements. False alarm.
The Mechanical Turk was destroyed by fire in 1854, after a perplexingly long career.
Boris Handroid
Throughout the 20th century, people worked furiously to build machines that could beat humans at chess. Progress slowly chugged along, and in 1980 the first commercially available chess robot came into being.
It was based on a chess computer called Boris and was extremely rare and limited, to the point where many people doubted it even existed. Due to its incredibly exclusive nature, it’s no surprise that the Handroid never became a household name.
The Milton Bradley Computers
Although the Handroid was not exactly a success story, it did show the world that there was at least an appetite for chess-playing robots, if they could be made effectively and at scale.
In the early 1980s, American board game giant Milton Bradley decided to take on the challenge. Working with computer scientists, they began to develop a robotic chess game that would move the pieces reliably enough to be sold at a mass scale.
The result was actually three different models: the Grandmaster that hit the US market, the Milton which was sold in Germany, France, and the Netherlands, and the Phantom which was built for the British market — although all three devices were extremely similar.
The Milton Bradley chessboard was able to detect where pieces were and used magnets attached to motor-driven belts to pull the pieces around the board. Unlike most of its predecessors, the Milton Bradley chess robot was a success and sold many copies in the US and Europe.
For chess aficionados, an important moment had arrived — you could now play chess at home without the need for a human opponent.
Deep Blue
Although it’s more of a computer program than a robot per se, no article about chess-playing robots would be complete without a mention of Deep Blue. Built on an IBM supercomputer, Deep Blue was the culmination of many years of grueling research and programming — a computer that could finally challenge a human chess champion.
In a series of games over the course of 1996 and 1997 — 10 years after development began on the project at Carnegie Mellon University — Deep Blue beat chess grandmaster Garry Kasparov.
It was a groundbreaking moment not just for chess, but for humanity as a whole — a reminder that, as advanced and intelligent as we are, the machines might just be catching us up.
Build your own chess robots
Today, you don’t need to rely on astronomically expensive novelty gadgets to experience the wonders of chess-playing robots — you can easily make your own at home. With tools like Arduino, amateur tech enthusiasts can assemble chess-playing machines for relatively low cost and without the need for a highly specialized skillset.
The Arduino Project Hub is home to a ton of chess-related projects, including some robots. YouTuber RobotAvatar built this machine that uses 64 reed switches to direct an Arduino Uno where each chess piece is.
Meanwhile, a computer running a Python program takes care of the “thinking” and sends signals to the device to move pieces. It’s a pretty straightforward device that literally adds an extra dimension to the game of computerized chess — allowing you to play games against machines in a much more tangible way.
Another amazing project, created by Greg06 on Instructables, is the automated chessboard that can not only tell where specific pieces are moved but also play against an actual opponent while moving its own pieces.
Chess isn’t the only thing Arduino is capable of. Check out our homepage to learn more about how it all works, the kinds of projects you can build, and how you can get started.
Humans have domesticated animals since the dawn of time. Dogs (our oldest furry friends) were owned by humans as far back as 30,000 years ago, and since then we’ve formed bonds with all kinds of different creatures.
It was only in the last century, though, that we started to actually build our own pets. The history of robot pets is a short but fascinating one, going from barely recognisable gadgets to incredibly sophisticated devices in just a few decades.
In this article, we’ll look at some of the biggest milestones in the evolution of robotic pets, and show you a few neat examples from the Arduino Project Hub.
A history of robot pets
The Phony Pony
Built in 1968 at the University of Southern California, the Phony Pony marked the beginning of a new era. As the first ever autonomous quadrupedal robot, it is the common ancestor to which all of today’s robot dogs and cats can be traced back (despite being named after a different species).
By today’s standards, the Pony wasn’t all that sophisticated. It featured four legs, each with its own hip and knee joint, attached to a frame. But, it worked — the Pony was able to walk around at various slow speeds. It wasn’t wireless but, come on, it was the ‘60s.
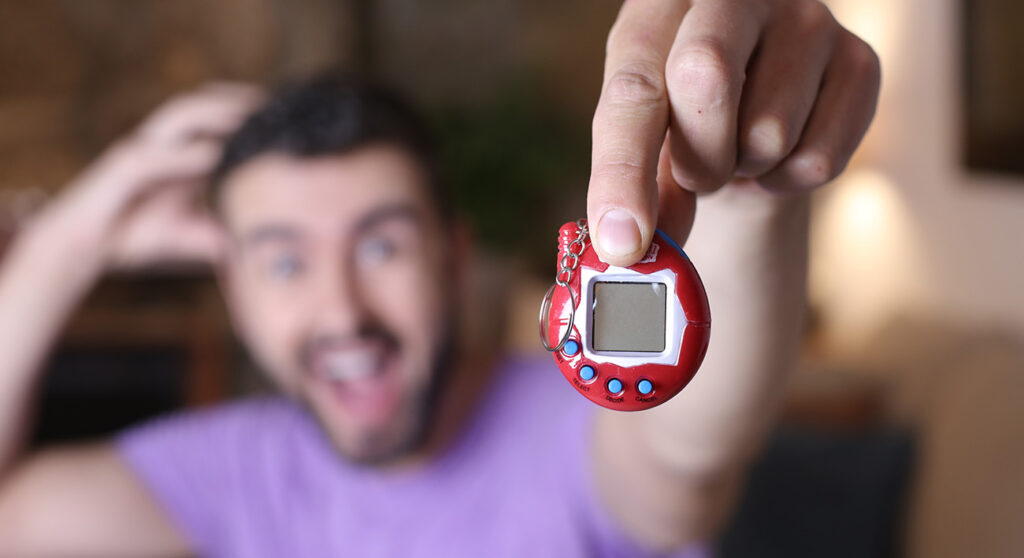
The Tamagotchi
Here’s one for the ‘90s kids. The Tamagotchi, released in 1996 in Japan by Bandai, soon made its way to the rest of the world. This simple, handheld device containing an animated pet which needed to be fed, watered, and cared for like any living animal soon became a smash hit — selling over 80 million units to date.
Anyone who has been through the traumatizing experience of losing their Tamagotchi will testify that these bundles of pixels can inspire surprising amounts of love and devotion from their owners.
The Furby
Another ‘90s classic here — the robotic, furry Furbies were popular throughout the world and sold more than 40 million units. While they weren’t the pinnacle of sophistication in terms of what they could actually do, it’s clear that people enjoyed the novelty of a robotic pet that was, in some small way, kind of alive.
BigDog
Released in 2005, the BigDog was the debut project of the now-famous robotics company Boston Dynamics. The BigDog was designed to be used in the military, and is equipped to do tasks like move easily over challenging terrain and carry up to 154 kg of weight.
Unfortunately, in spite of its physical prowess, the BigDog never quite made the cut, as its engine was deemed to be too noisy to be effectively used in combat situations. However, since then Boston Dynamics have been refining and optimizing their robot war dogs, and the latest iterations look very fearsome indeed.
Pleo the Dinosaur
UGOBE, based in California, set out to build a robotic creature that was also imbued with its own operating system, giving it an uncanny resemblance to a living thing. The result was Pleo — a pet dinosaur that uses cutting-edge research in fields like robotics, sociology, and even philosophy to appear very life-like indeed.
ANYmal Robotic Dog
Developed by Swiss robotics company ANYbotics, the ANYmal Robotic Dog was designed to safely inspect unsafe industrial environments. It comes equipped with an arsenal of tools like laser inspection sensors and the ability to autonomously navigate through different environments, collecting and sharing an impressive amount of data.
Make your own
Inspired by the idea of building your very own robotic pet? The Arduino Project Hub has a number of examples from people who have tried their hands at just that. Let’s take a look at a few.
The Nerd
Built in the same mold as the Tamagotchi, The Nerd is an electronic pet that lives in your pocket (or wherever you put it down) and survives by eating WiFi SSIDs (it also needs rest and sunlight).
To properly care for your Nerd, you need to make sure it has just the right balance of offline and online mode, along with sufficient levels of light and darkness. If it’s disconnected from that tasty WiFi for too long, The Nerd will emit a desperate plea in Morse code,
You can build your own Nerd using the Arduino MKR IoT Bundle, a few other components like an RGB LED, phototransistor, and buzzer, and some code. Just make sure it doesn’t go too hungry — The Nerd makes a lot of noise when it dies. And you can now create your own Nerd with just one click with the ready-to-use The Nerd Arduino Cloud template. Read the full tutorial to learn more about how to use it.
Roger Bot
Arduino user hannu_hell built the Roger Bot in their very own home using an Arduino and a few other components. The Roger Bot features a robotic arm and the ability to move around on flat surfaces. It also contains built-in sensors that collect sensory data and display them on an LCD screen.
While it isn’t well-equipped to handle uneven or challenging terrain just now, this is something hannu_hell is working on for the future.
Build your own with Arduino
With an Arduino, a few simple components, and a free subscription to the Arduino Cloud, you too can create your very own robotic pet. Add to the ranks of historical robotic companions and gain a faithful and useful friend. And who knows… with the way AI is developing, maybe a truly autonomous robot pet is only just around the corner.
Planet Arduino is, or at the moment is wishing to become, an aggregation of public weblogs from around the world written by people who develop, play, think on Arduino platform and his son. The opinions expressed in those weblogs and hence this aggregation are those of the original authors. Entries on this page are owned by their authors. We do not edit, endorse or vouch for the contents of individual posts. For more information about Arduino please visit www.arduino.cc
You are currently browsing the archives for the ProjectHub category.