We’ve just released Arduino IDE 2.3, and along with the usual list of bug-fixes and improvements, this new version marks the end of the experimental phase for the debug feature – which is now stable and fully incorporated into the IDE!
True to our belief in open standards and interoperability, the debug feature is now based on a standard framework documented in the new specifications and guidelines. As a result, maintainers of Arduino cores can now add debugging for any board and leverage the UI and debugging engine provided by the Arduino IDE.
What’s more, thanks to this new open framework, wealreadyenabled the debug feature for all the Arduino boards based on the Mbed core, which include GIGA R1 WiFi, Portenta H7, Opta, Nano BLE and Nano RP2040 Connect, while the Renesas-based boards (UNO R4, Portenta C33) will follow in the next hours.
We’ve worked on implementing debug in IDE 2 for a long time, in collaboration with the open-source community and, more recently, in close contact with Espressif to make sure that ESP32 devices would be fully supported. So keep an eye on the upcoming release of the Arduino-ESP32 core, which will support the new debug framework!
Want to be able to debug your favorite board using IDE 2.3?
Get in touch with the platform developer or, even better, help them by submitting a pull request to implement the new specifications.
We look forward to receiving your feedback on the new debugging features in the Arduino forum or, if you’re a developer and want to report a bug, directly in the GitHub repository.
Still curious about those bug-fixes? Arduino IDE 2.3 fixes security issue CVE-2023-4863 (see details in this commit).
Enjoy the new Arduino IDE, and help us make our development environment better than ever!
Welcome to the next chapter in our ‘Better, with You’ journey! In recent blog posts, we’ve explored the refreshed look of Arduino Cloud and introduced the latest features of the renewed Arduino IoT Remote app. Today, we’re thrilled to unveil another game-changer, the new Arduino Cloud Editor, which brings the classic Arduino IDE experience to your browser.
The new Cloud Editor
Imagine that you can start your project without having to deal with any annoying setups or maintenance headaches. Imagine that you’re free to work from wherever you want. Well, that’s the vibe of our new Cloud Editor. We’ve made the whole development experience way smoother, so you can forget about the boring techy stuff and just focus on bringing your ideas to life. Let’s dive in!
A unified and more powerful editor
Traditionally, Arduino Cloud had two separate editors: an embedded simple one and the full editor. Users have long awaited a unified editor that gets the best of each one. The new Cloud Editor achieves just that, completely revamping its implementation and setting the stage for exciting new upcoming features.
Tip: To facilitate a smooth transition, the new Cloud Editor will coexist with the current one over the next 2 months. During this period, you can choose to opt-in for the new editor or keep the existing version. It’s your call! Scroll down to the “Try it now” section to find out how to activate the new Cloud Editor on your account.
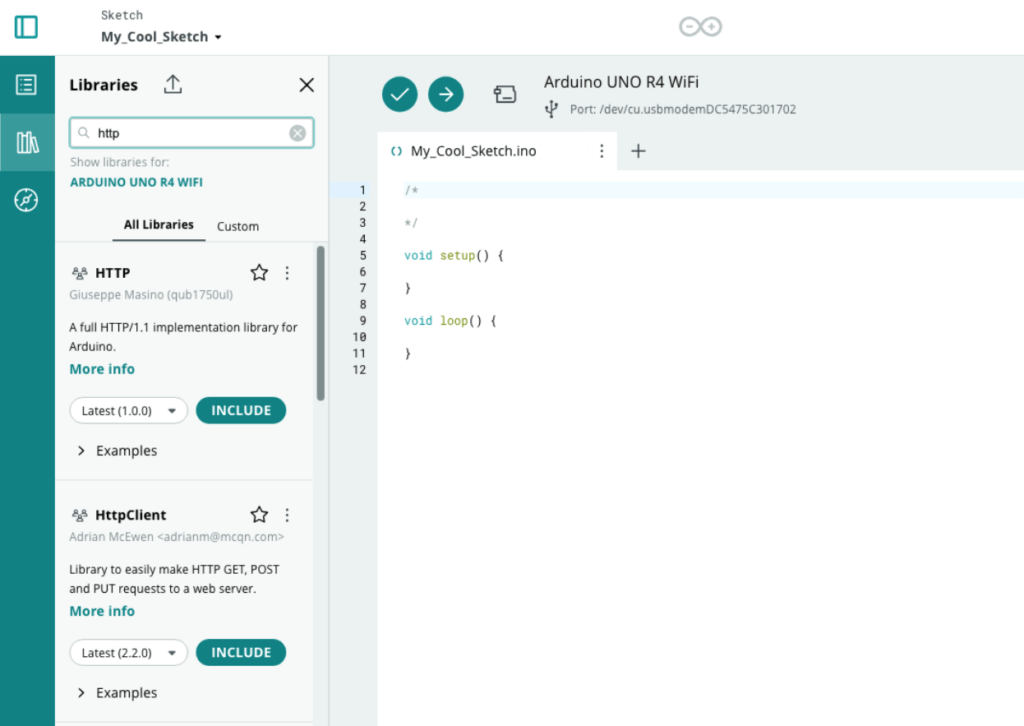
Better library and example management
The new Cloud Editor provides a library manager that helps you explore and organize libraries as well as easily use their examples.
Screenshot of the revamped library manager in the new Arduino Cloud Editor
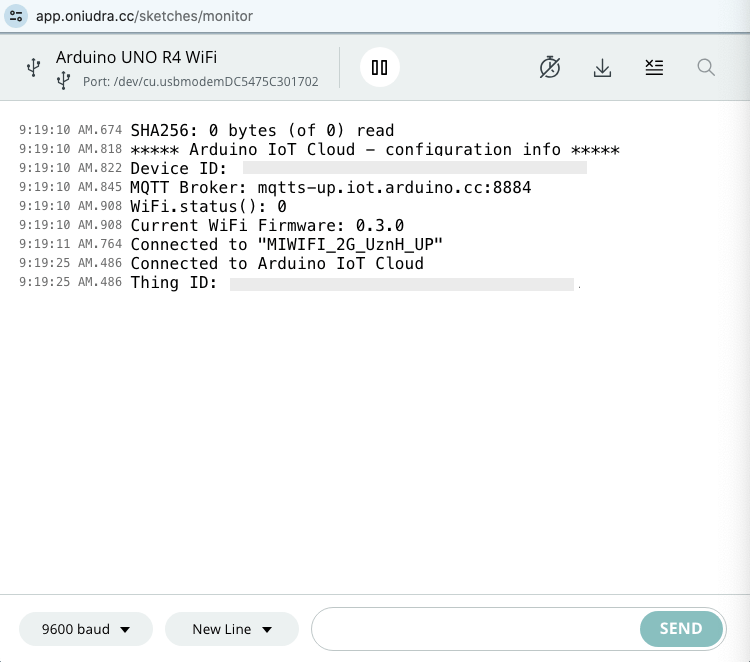
Improved serial monitor
The serial monitor has been improved with the ability to download logs and the inclusion of timestamps per line. This is a long-time requested feature by users to improve debugging.
Screenshot of the improved serial monitor with timestamps in the new Arduino Cloud Editor
Support for any Arduino IDE-compatible device
The Arduino Cloud Editor supports any device compatible with the Arduino IDE, thus extending your Arduino development experience to your browser.
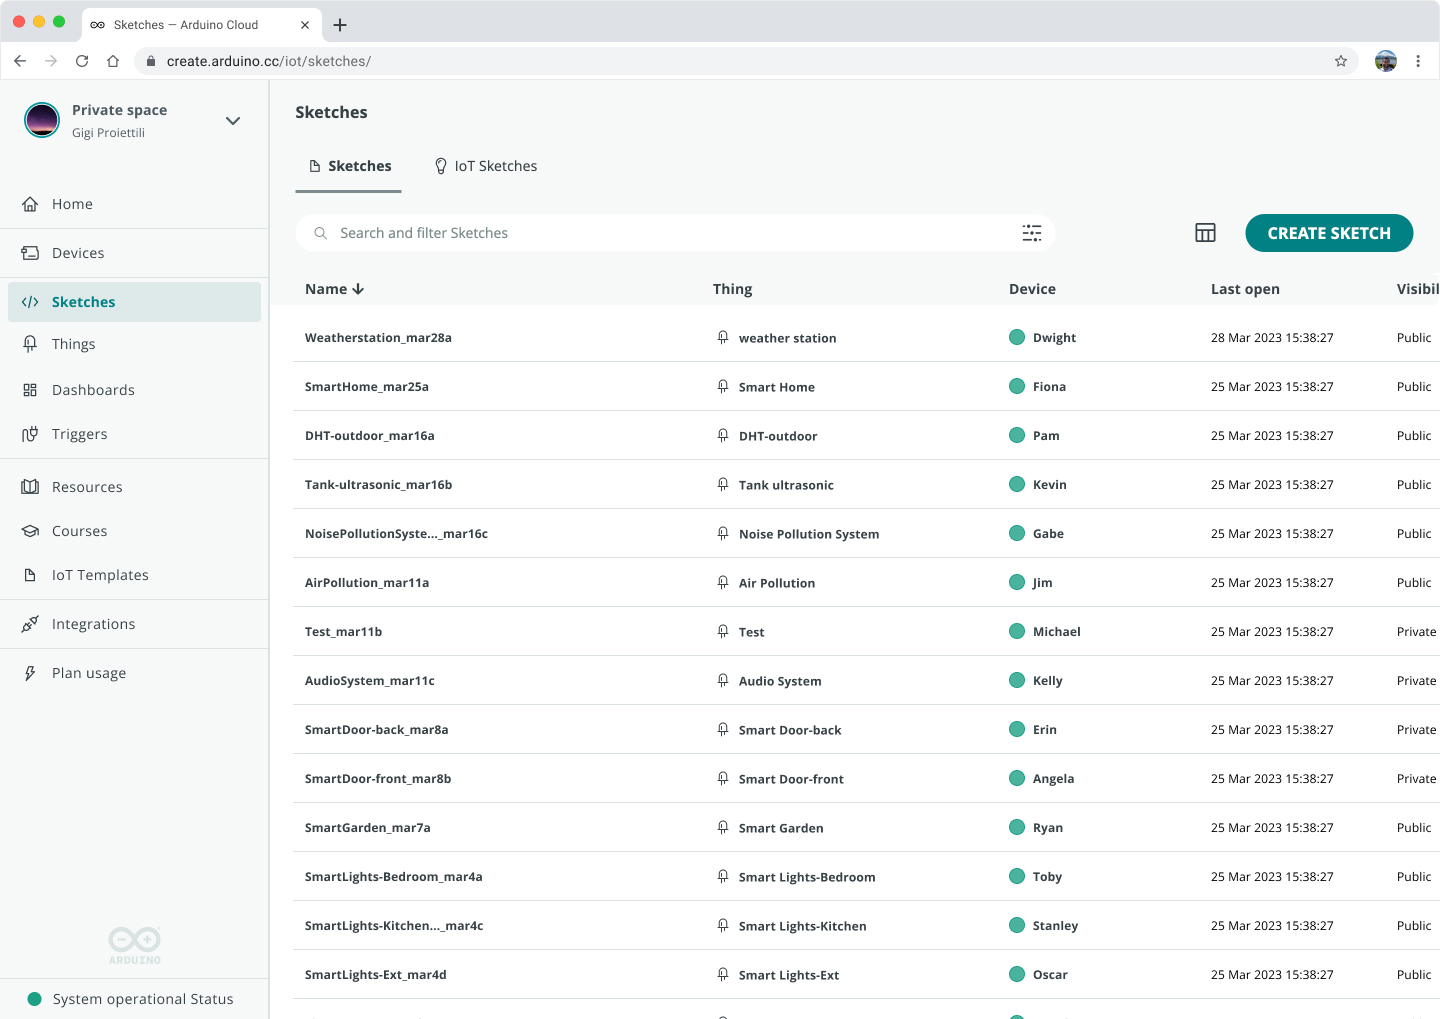
A single sketch repository
Whether you’re programming IoT sketches or traditional ones, the new Arduino Cloud provides a unified place to store and organize your sketches with a single editor for all of them.
Screenshot of the new Arduino Cloud sketchbook with the Sketches and IoT Sketches tabs
Keep your sketches organized
The sketchbook allows you to create folders so that you can keep your sketches organized in a more efficient way.
How to use the Cloud Editor
In the new Arduino Cloud, sketches are organized as “Sketches” and “IoT Sketches”, where “IoT Sketches” are the ones that have been created to connect the application with Arduino Cloud so that it can be monitored and controlled using the dashboards.
Your standalone sketch development starts from the “Sketch” section of your sketchbook. Just click on “CREATE SKETCH” or select the sketch you want to edit.
IoT Sketches are automatically created when you create an Arduino Cloud Thing. Once they are created, you can access the sketch either from the Thing or the “IoT Sketch” section of your sketchbook.
Try it now
Click on “TRY NOW” as shown in the screenshot below to start using the new Cloud Editor. If you need a bit more time before moving to the new version, you can still use the existing version until March 31st by clicking on “MAYBE LATER.”
You can now have the option to try the new Cloud Editor from the notification at the bottom right hand corner of your screen.
Please note that Chromebook support will not be available initially. Stay tuned for updates as we will announce Chromebook support as soon as it is ready.
The new editor is part of the new Arduino Cloud
If you’re just getting into the Arduino Cloud, don’t worry, we’ve got the lowdown for you right here. Arduino Cloud is the next exciting step in the Arduino journey for IoT enthusiasts. Here is a quick intro video that will give you a summary in 2 minutes.
Basically, if you’ve got an IoT project idea, you can easily turn it into a real project using this all-in-one, easy Cloud platform. It helps you create applications that can be monitored and controlled from custom dashboards accessible from your browser or your mobile phone. It not only supports Arduino and ESP-based devices, but also any device programmed using Python, MicroPython, Javascript or Node-RED. Which is why the Arduino community is talking a lot about it at the moment! Forget about dealing with complicated stuff – the Arduino Cloud lets anyone, no matter their skill level, create stuff from wherever.
Want a sneak peek? Here’s Karl giving you a tour of Arduino Cloud with the latest new UI.
Get started with the Arduino Cloud
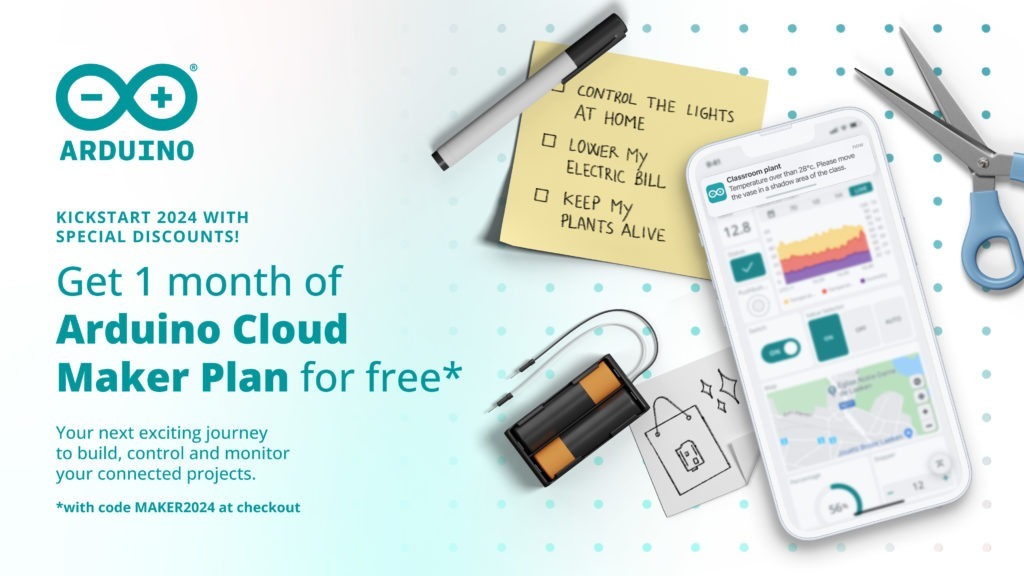
Are you ready to dive in? Learn more about the new Cloud Editor through our detailed documentation. And to sweeten the deal, don’t forget to grab your first month free on the Maker plan with the code ‘MAKER2024 at checkout. But hurry, this offer is only valid until January 31st (You can cancel anytime). Join us in unlocking the full potential of your creative projects!
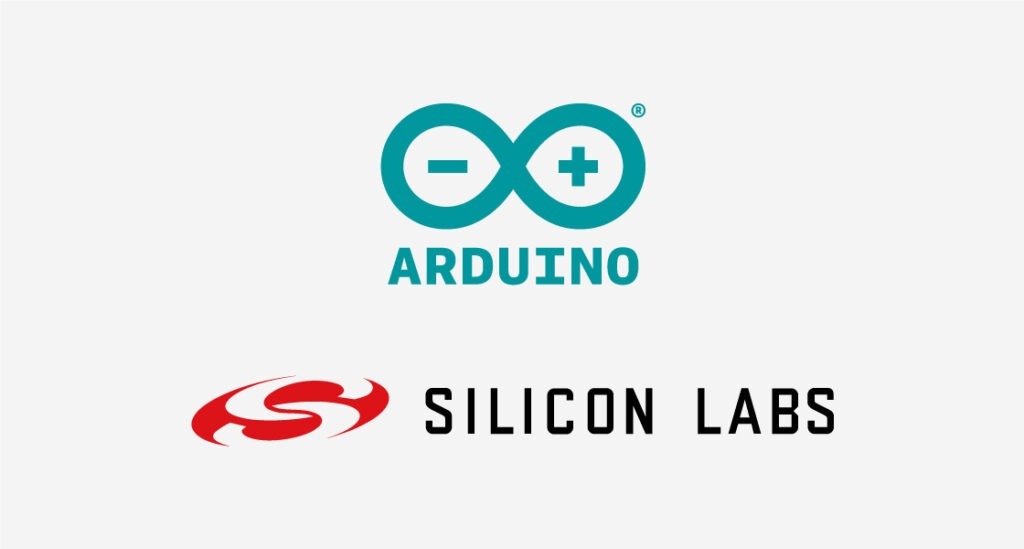
The world of IoT just got more exciting: Arduino and SiLabs unveil plans for Matter protocol integration.
In a groundbreaking development for IoT enthusiasts and professionals alike, Arduino and Silicon Labs (SiLabs) have announced a collaboration that promises to revolutionize access to the Matter protocol. This initiative is set to unfold in two major phases, ushering in a new era of connectivity and innovation.
Phase one: The dawn of a new era in IoT development begins at CES 2024
At CES 2024, Arduino and SiLabs have revealed the first phase of their ambitious project. This phase marks the release of an extremely user-friendly Arduino library tailored for the Matter protocol, alongside the Arduino core for SiLabs microcontrollers. This integration into the Arduino IDE is a significant leap forward, making advanced IoT development more accessible than ever.
“Our partnership with Arduino brings simplicity and ease of use to wireless development for Silicon Labs developers as well as Arduino’s 40M users to take their project from concept to production,” said Rob Shane, VP of Global Mass Markets for Silicon Labs. “By integrating Matter with Arduino’s ecosystem, we’re opening a universe of possibilities for developers.”
This announcement is not just about new tools; it’s a statement of intent to make IoT technology more accessible to a wider range of users, from hobbyists to professionals.
Get started now: Use existing Matter boards
In anticipation of the second phase, the Arduino community can begin experimenting with Matter protocol through existing boards. Our friends at SparkFun have provided an excellent platform for this purpose, allowing users to get a head start in exploring the potential of Matter with Arduino.
“We are thrilled with the continued adoption of Matter to support IoT applications. The Matter implementation in Arduino has been a massive undertaking and it will make Matter even more accessible for engineers, creators, and innovators across the globe. This is another major step forward in interoperability and improving our daily interactions with the devices we have come to reply upon.” – Glenn Samala, CEO at SparkFun
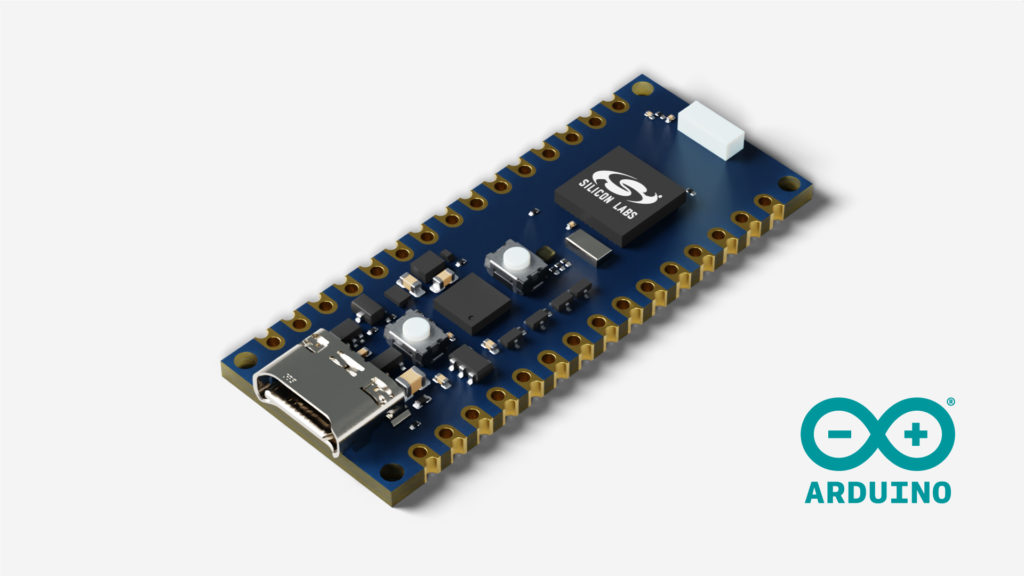
Phase two: The launch of a revolutionary board ads to Arduino Day celebrations
The second phase is set to culminate on Arduino Day, in March 2024, with the release of an innovative addition to the über-popular Nano family, with a board based on the SiLabs MGM240SD22VNA. This board is expected to be a game-changer in the field of IoT, offering unparalleled ease of use and capabilities.
The collaboration between Arduino and SiLabs, leading up to these releases, represents a major stride in making advanced IoT technologies more accessible. The combination of Arduino’s user-friendly interface with the robust capabilities of SiLabs’ technology and the universality of the Matter protocol is a recipe for innovation.
For educators, students, hobbyists, and professionals, this means an unprecedented opportunity to dive into IoT projects with greater ease and more powerful tools. The implications for smart home applications, industrial IoT, and educational projects are immense.
Looking ahead
Here is a sneak peek of the new board being developed – stay tuned for the launch in March 2024!
As we eagerly await these releases, the excitement within the Arduino community is palpable. This collaboration is not just about new products; it’s about empowering a whole generation of creators and innovators, breaking down barriers, and opening up new horizons in the world of IoT.
Stay tuned for more updates as we approach these landmark dates, and get ready to embark on a journey of discovery and innovation with Arduino and SiLabs.
Are you in Las Vegas? Come meet the Arduino team at CES 2024 – Venetian Tower — Suite 29-228.
We’re happy to share that version 2.1 of the Arduino IDE is out! Among the many updates and fixes, this latest release includes two main highlights:
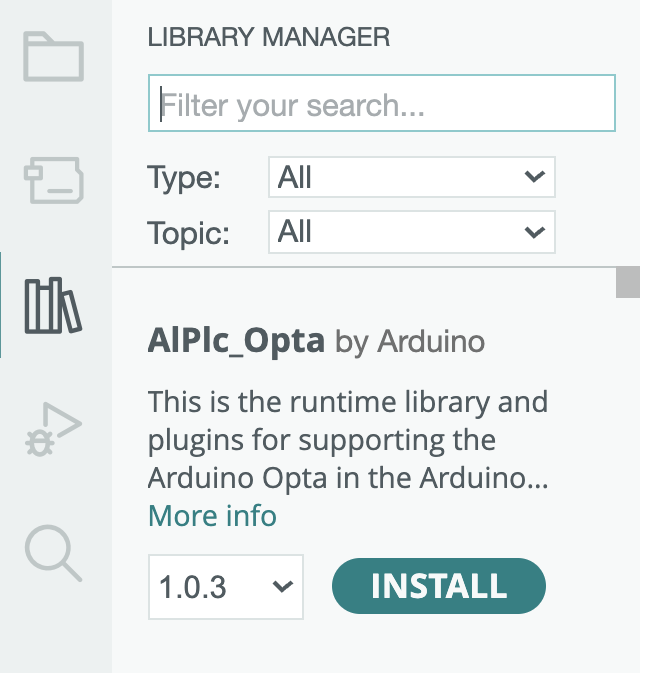
A full redesign of the Library Manager panel, which is now more usable and clear, along with an improved search engine.
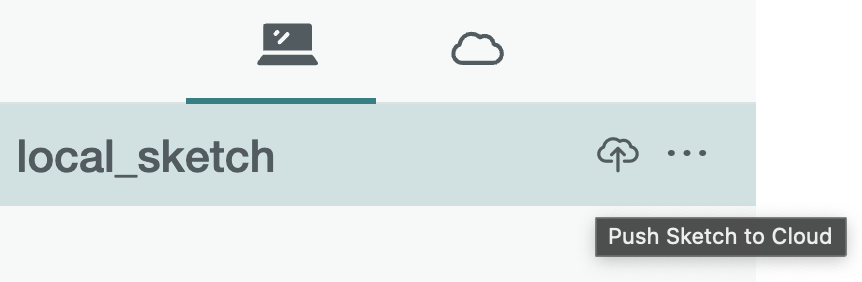
A full redesign of the integration with Arduino Cloud that lets you backup your sketches via a single click and access them on multiple computers (as well as the browser).
The development of the Arduino IDE is made possible thanks to a passionate open source community, and to everyone supporting us with donations, purchases of original Arduino hardware, or Arduino Cloud subscriptions.
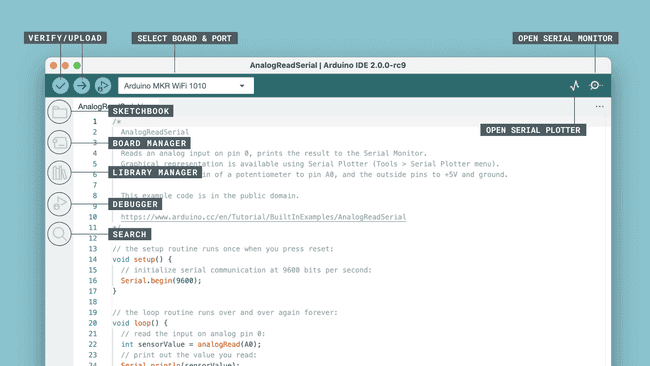
Arduino have released the latest version of their Integrated Development Environment (IDE), Version 2.0 and it is a big step up from the previous release, boasting plenty of new features to help you to develop your code more easily.
As the de-facto way for beginners to get into programming hardware, more experienced users have sometimes complained about what they see as the over-simplistic IDE — even lacking relatively basic features such as autocomplete. The new version provides this, and much more besides.
The press-release from Arduino offers a few clues to the main features, but the real detail is tucked away in a range of new tutorials, designed to get you up to speed with the new look.
The main screen is organised differently, to show off the new capabilities and to make development faster and easier. The new “Remote Sketchbook” has been integrated closely with the Arduino Cloud, to allow for easy switching between computers during development. V2.0 will pick up any Cloud sketches automatically, while computers using the previous versions of the IDE can still access the sketches via the Web Editor as before.
The Serial Plotter can now be used at the same time as the text Serial Monitor, rather than having to choose one or the other. In addition, there is a host of new Debug functionality for those devices that support it. This works with the usual In-Circuit Emulators (such as the Atmel ICE), but also natively with newer Arduino boards like the Arduino Zero without any additional hardware. The debugger gives you access to powerful features like Breakpoints, Step-Into and Step-Over to really understand what your code is doing.
Installation is straightforward, and will automatically pull in any libraries and sketches that you created in previous versions of the Arduino software to ease the transition.
There’s a lot to like in the new IDE, but we expect it will take a little while to discover and use all the new features effectively. Some of them are carry-overs from the “Arduino Pro IDE” that we covered a few years ago, but it’s great to see the software evolve and improve over time.
Have you tried new new IDE yet? What are your thoughts on how it compares to the older version, or other development environments? Let us know in the comments.
To say it’s been another challenging year would be an understatement, but it’s reassuring to see that the top 10 Arduino blog posts of 2021 show us that makers have persevered, undaunted.
As we sprint headlong into 2022 with hope for a return to normality (whatever that might actually look like!) we wanted to cast an eye back over the Arduino blog. These are the top posts from 2021, which prove that you can’t keep good maker down.
The Arduino community has been creating some of the best projects we’ve ever seen. It’s also exciting to note that it’s been another year when newcomers have taken up the electronics hobby. The presence of Arduino software posts in our top 10 Arduino blog posts of ‘21 suggests lots of people have been getting into the Arduino scene.
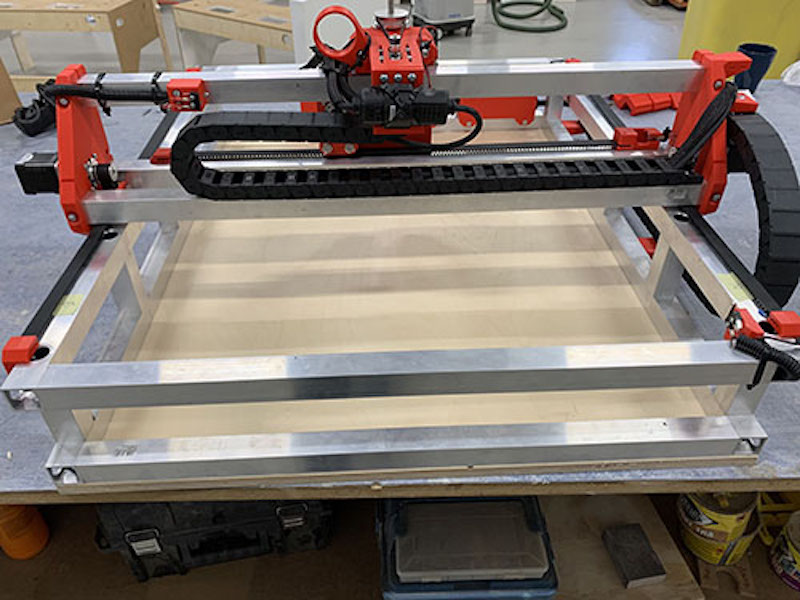
Learn how to build your own massive 3D-printed CNC router
If you want an affordable option, this guide shows you how to build Ivan Miranda’s 3D-printed CNC machine design.
Cascading LED stair lights prevent late night tumbles
Stephen Gidge and his roommate could have installed a new hall light, but they were both experienced with Arduino and so they created these cascading LED star lights instead.
Support for ESP32 devices (on top of existing support for ESP8266) became available on the Arduino IoT Cloud in May, 2021. A huge step forward in bringing IoT devices of all kinds together.
We’re looking for you to help with the Arduino IDE 2.0 Release Candidate (RC), which is available right now. Whether you’re an Arduino power user or new to microcontroller coding, there are a variety of ways that you can contribute to this exciting new release.
Arduino IDE 2.0 Comes Out of Beta
It seems like only two minutes since the beta of Arduino IDE 2.0 was released. In fact, it was back at the very beginning of March. Now it’s ready to exit its beta phase, and you can update to the latest release candidate version right now.
And this is a really important step, not just because of some great new features that are bundled in (see below). It’s where the Arduino community is brought into the equation. It’s where you lend your techno-muscle towards helping us refine the release candidate.
There’s support for localization, for one thing. Any and all help in crafting the best experience in different languages is great for everyone. After all, it’s an important part of truly user-centric software. So please put your multilingual skills to use by providing translation contributions through Transifex.
This crowd-focused process is the same for testing the functionality, as well as the localization. We’ve got a feedback form where we’d like you to make us aware of any and all changes you feel IDE 2.0 RC needs. Of course, the forum is also available. Join us there for bug reports or tweaks that warrant a quicker, more conversational report.
Finally, remember that the IDE is now built around web technologies like HTML and Typescript (rather than Java), so everyone’s welcome, and encouraged, to contribute to its development. Here’s the GitHub repository for you to dig into.
What’s new in IDE 2.0 RC?
So, onto the new features of the release candidate.
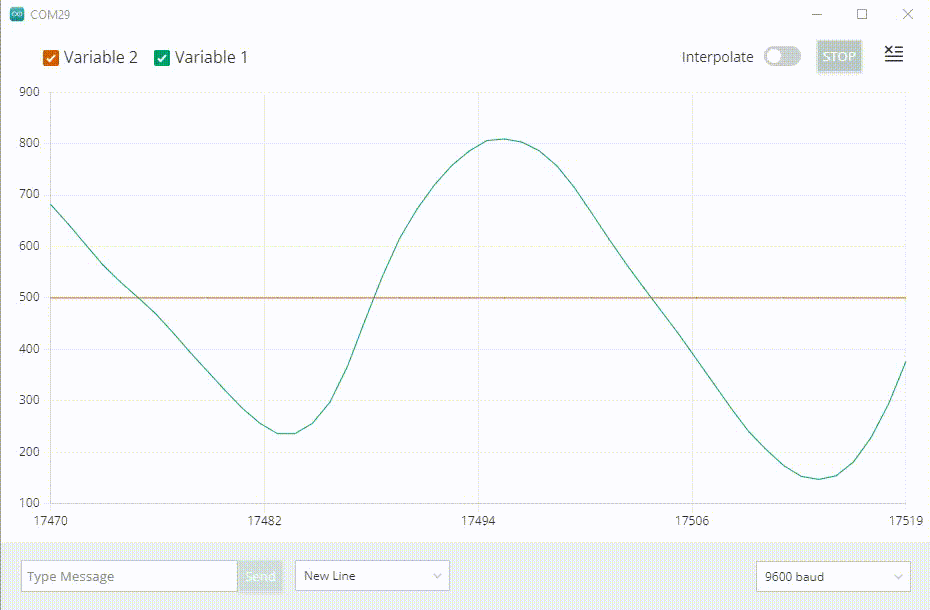
First up we have the serial plotter. Using this, you can pull in data from your boards and projects, and map it out as waveforms in a graph. You can even print multiple variables at once, to be visualized all on the same graph.
There’s a high performance serial monitor to help with your debugging efforts. It’s also handy for monitoring the status of your boards and/or projects, and it’s been re-engineered to work very efficiently for optimal usability.
And as we mentioned above, localization into languages other than English is also now supported. Remember you can help out in translating the Arduino IDE through Transifex.
So please update to Arduino IDE 2.0 RC now. Then you can get to work helping us craft the first, fully stable version of the second generation platform. Keep that feedback coming!
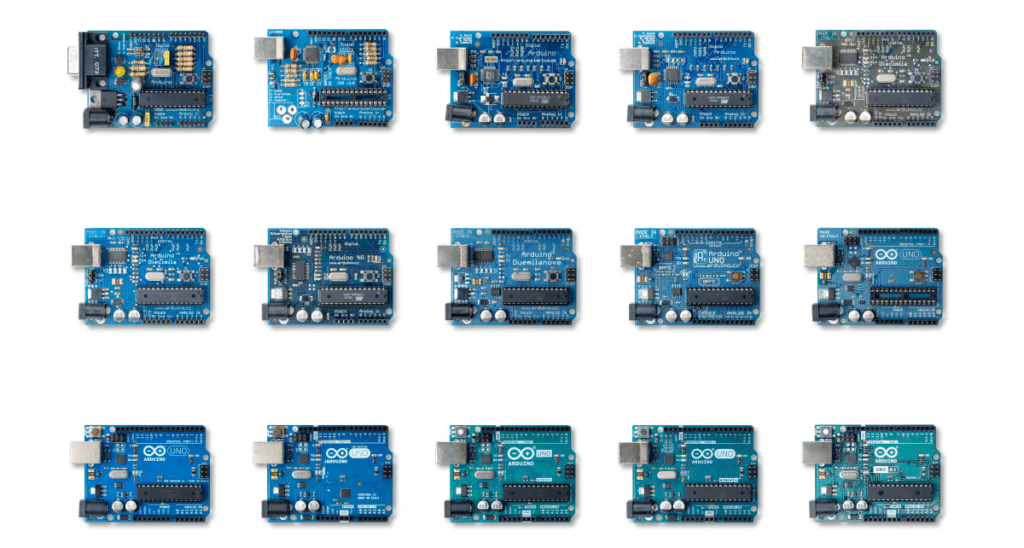
The Arduino IDE is the well-known software we all use to program our boards. Its development started in 2005 based on the graphical interface of the Processing project and has never stopped since. During these years, countless hours of development by the Arduino team with the help of a vibrant community made the Arduino IDE the de facto standard for electronics prototyping. Thanks to an extensible framework based on modular board support packages, the IDE supports more than 1,000 official and non-official boards; it’s translated in 66 languages, mentioned by more than 3,000 books, and is still growing: during the last year, it was downloaded more than 39 millions of times. More than ever.
First off, a big thank you to the Arduino community that makes development possible with donations and — even more important — by buying original Arduino boards: we use your money to pay the developers that work daily on the Arduino open source software for the benefit of everyone. Keep supporting our work!
The path from a simple IDE to an advanced IDE
While the Arduino IDE provides a simple and clear interface that is ideal for the novice users, the more advanced users often report that the editing capabilities are a bit limited compared to modern editors. This includes features like code indentation, block folding, auto-closing brackets, regular expression search and replace, comment toggling. In addition to this, many users have been asking for live debugging, i.e. the ability to run code on an attached board and stop it at a given line to check the contents of variables, memory and registers.
The IDE 1.x is developed in Java, and its monolithic codebase makes it difficult to implement such features. Java is also becoming an obsolete technology for desktop applications and is being phased out by newer operating systems and app stores, which forces us to spend time on working around compatibility issues.
In 2018 we started to refactor the toolchain by announcing a big game changer: arduino-cli, the Arduino command line tool written in Golang that exposes all the core functionalities of the IDE, providing advanced users with a flexible tool they can integrate into their professional IDE of choice. Since then, we maintain and improve arduino-cli on a daily basis (try it now if you haven’t!).
In 2019 we announced the alpha release of a new IDE built on top of arduino-cli and based on a modern software stack (Theia and Electron) under the code name of “Arduino Pro IDE” and we got a lot of positive feedback about it. 2020 has been a busy development year, and a dedicated team of developers has been working behind the scenes to bring the new IDE from a proof-of-concept to a fully functional tool.
The time has come: please welcome the Arduino IDE 2.0 (beta)
We’re pleased to announce that as of today the Arduino IDE 2.0 beta is available for download and its code repositories become open source. It carries a modern editor and provides a better overall user experience thanks to a responsive interface and faster compilation time. Don’t be afraid of trying it today: the upgrade will be frictionless as the interface will look very familiar. But let’s see some of the goodies you’ll find.
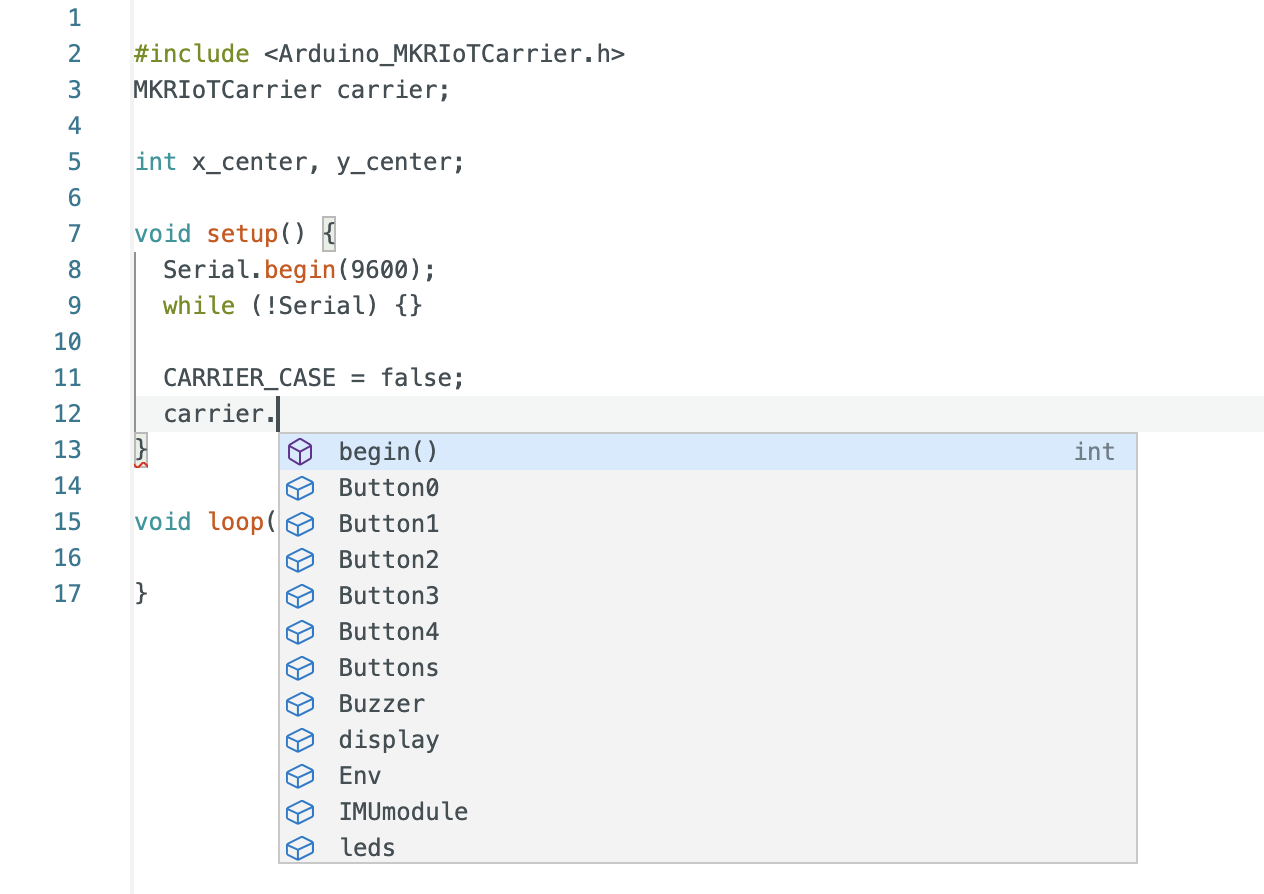
While typing, the editor suggests the autocompletion of variables and functions according to the libraries you included:
When right-clicking on a variable or a function, a contextual menu will provide navigation shortcuts to jump to the line (and file) where they are declared:
See this page to learn more about the new editing tools.
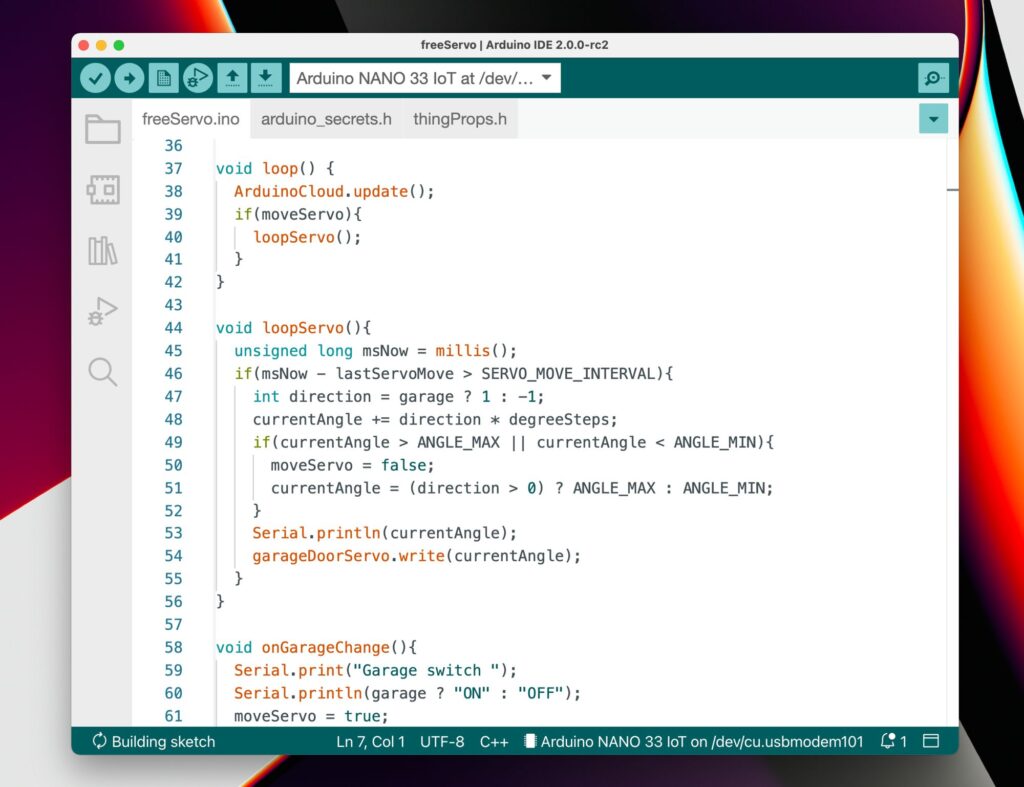
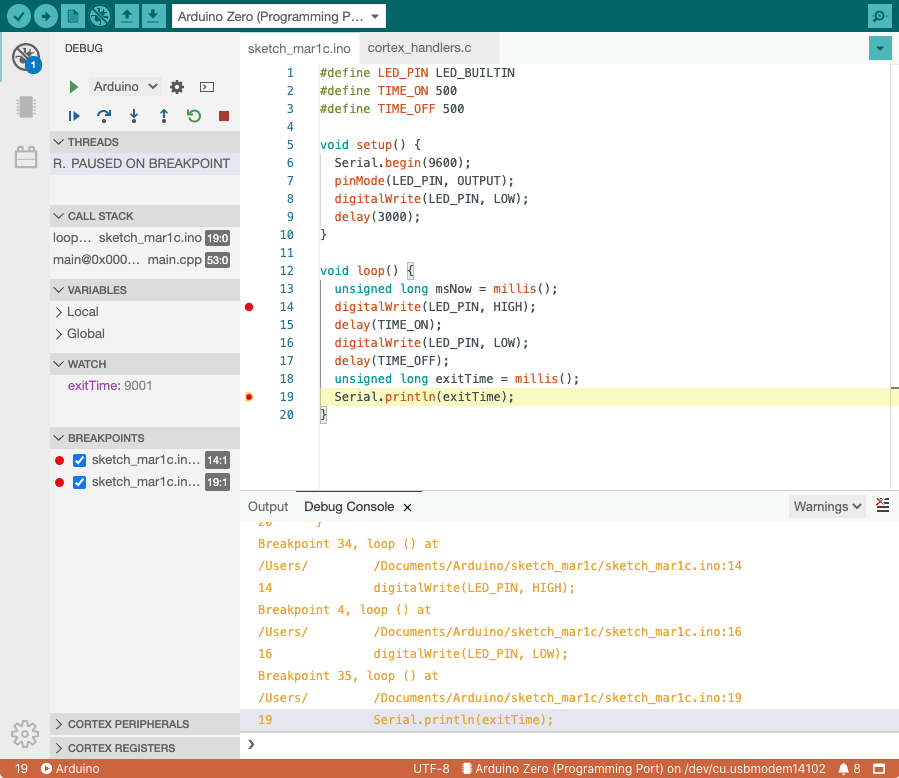
But there’s another big feature in the new IDE: a live debugger that allows you to run your code interactively on a board and inspect its execution without writing tens of “Serial.println()” statements. Just fire the debug panel, set breakpoints where you want to pause the execution and inspect the content of variables. Oh, you can even change the content of variables on the fly and resume execution!
As of today, the debugger supports all the Arduino boards based on the SAMD and Mbed platforms (MKR family, Nano 33 IoT, Nano 33 BLE, Portenta, Zero). Maintainers of Arduino cores for third-party boards can add support for debugging by adding the relevant configuration parameters; a technical guide for this is coming. You’ll need to connect a debugging probe such as the Segger J-link to the JTAG pins on the board and you’ll be ready to go.
The new IDE is based on the Eclipse Theia framework, which is an open source project based on the same architecture as VS Code (language server protocol, extensions, debugger). The front-end is written in TypeScript, while most of the backend is written in Golang.
In an age of streaming media it’s easy to forget the audio CD, but they still remain as a physical format from the days when the “Play” button was not yet the “Pay” button. A CD player may no longer be the prized possession it once was, but it’s still possible to dabble in the world of 120 mm polycarbonate discs if you have a fancy for it. It’s something [Daniel1111] has done with his Arduino CD player, which uses the little microcontroller board to control a CD-ROM drive via its IDE bus.
The project draws heavily from the work of previous experimenters, notably ATAPIDUINO, but it extends them by taking its audio from the drive’s S/PDIF output. A port expander drives the IDE interface, while a Cirrus Logic WM8805 S/PDIF transceiver handles the digital audio and converts it to an I2S stream. That in turn is fed to a Texas Instruments PCM5102 DAC, which provides a line-level audio output. All the code and schematic can be found in a GitHub repository.
Planet Arduino is, or at the moment is wishing to become, an aggregation of public weblogs from around the world written by people who develop, play, think on Arduino platform and his son. The opinions expressed in those weblogs and hence this aggregation are those of the original authors. Entries on this page are owned by their authors. We do not edit, endorse or vouch for the contents of individual posts. For more information about Arduino please visit www.arduino.cc
You are currently browsing the archives for the IDE category.

 core, which include GIGA R1 WiFi, Portenta H7, Opta, Nano BLE and Nano RP2040 Connect, while the Renesas-based boards (UNO R4, Portenta C33) will follow in the next hours.