Posts | Comments

Planet Arduino

Archive for the ‘interaction’ Category

Jul
03

The Funky Chicken

arduino, disabilities, interaction, Sonar Comments Off on The Funky Chicken 

Funky Chicken
The Funky Chicken was created during a series of workshops that were given as part of the larger project “Interactive Sensory Objects Designed for and by People with Learning Disabilities”:

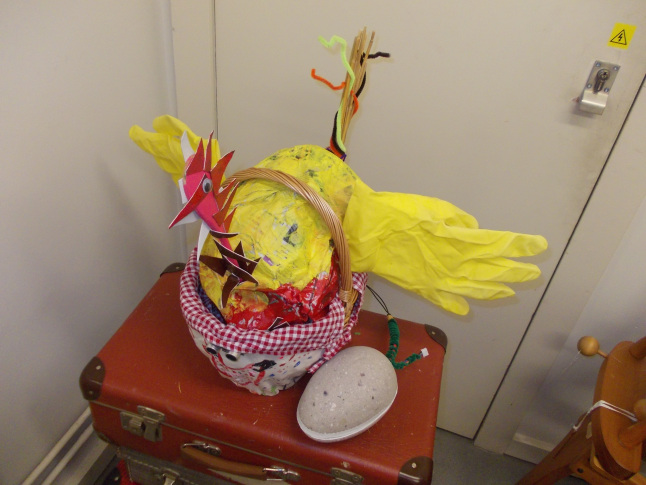
It was designed by Rumena, a student from the Reading College LLD/D course (people with learning disabilities) who attended the workshops on a regular basis. She made the papier mache chicken, painted it and added the frills and ornaments, and wanted it to sit inside a basket but flap it’s wings and cluck. We helped her to complete this artwork by adding the necessary electronics including an Arduino Uno, Adafruit Waveshield, speaker and a servo to make the wings flap.

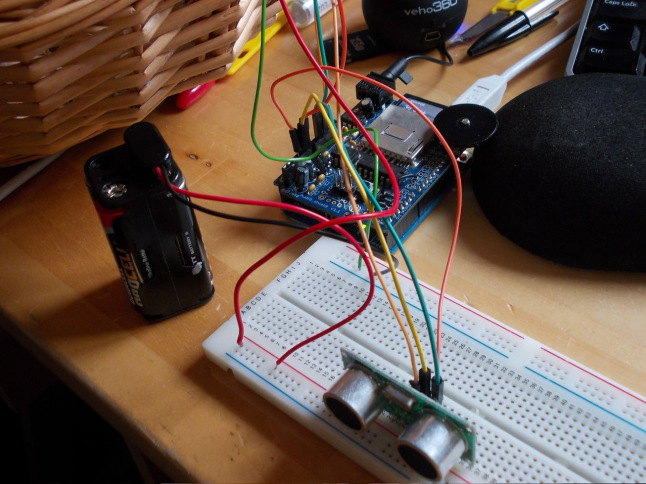
The whole flapping/clucking of the chicken is triggered using a sonar attached to Arduino Uno. Moving within 1m of the chicken will trigger it:

 In the image below the sonar is hooked up to the Arduino Uno, and the Arduino is connected to the servo controller (not shown). The sonar is a very inexpensive off-the-shelf HC-SR04, which has a range of about 3m.

Funky Chicken

Here’s the video with the chicken at work:


Mar
04

Turing and interaction at the Science Museum in London

arduino, arduino uno, Coding, events, inspiration, interaction, Interaction Design, museum, science Comments Off on Turing and interaction at the Science Museum in London 

Looping by Hirsch&Mann

Codebreaker is the exhibition started last year at  the Science Museum of London and celebrating  the centenary of the birth of computing pioneer Alan Turing.

Hirsch&Mann were commissioned to create a “series of exhibits which demonstrated and recognized the progress in computing while at the same time representing a spirit of engineering and innovation” .

They created three installations that demonstrated 3 programming principles:

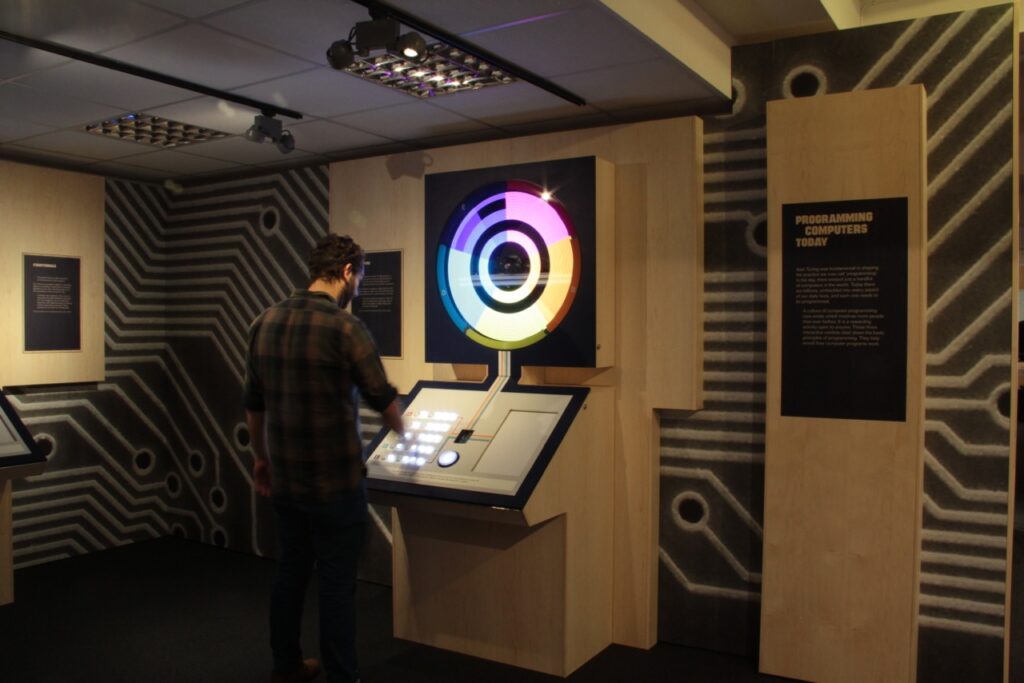
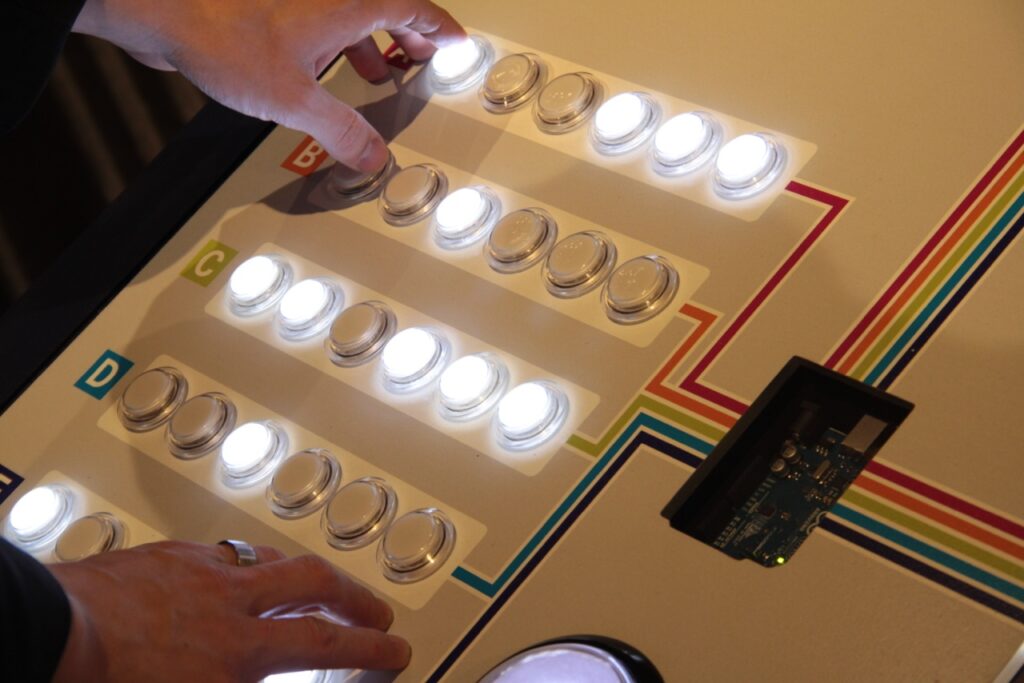
LOOPING: A spinning rotor with LEDs on it -> creating POV patterns all controlled by 30 arcade style illuminated switches.

CONDITIONALS: A version of Wolfram’s cellular automata – user was able to choose the result of the child node once the parent node conditions were met

VARIABLES: A mechanical tree – the branch angles were controlled by sliders on the console. Slider A controlled 1 angles at the base of the tree, slider 2 controlled the next 2 angles, slider 3, the next 4 angles and slider 4 the final 8 sliders.

Looping Console by Hirsch&Mann

Each installation has a light box which is revealed as soon as you press the BIG GLOWING button on the console. This turns on the lightbox – which has simplified pseudo code and essentially allows people to “step into” the code. Each line that is currently running is highlighted and then you see the result on the installation.

The whole point of these installations was to show where we have come since Turing’s time and stepping on his shoulders.

If you have the chance to visit the exhibition (it’s free!) or watch the video below you will see that at the center of each console there is an Arduino UNO.


Jun
27

Improving Arduino to PC Interactions with MegunoLink

arduino, capture, connection, data, interaction, logging, megunolink, serial, software review Comments Off on Improving Arduino to PC Interactions with MegunoLink 

Introduction

Through a colleague I was introduced to a new piece of software for the Windows environment which comprises of useful tools that interact with an Arduino-style board (or other MCU with serial data). The software is called MegunoLink, from BlueLeafSoftware in New Zealand. Megunolink has many useful features, and we’ll run through them briefly in this article. They include:

  • Serial port monitoring – that doesn’t reset the MCU
  • The ability to capture serial port data to a text file
  • A tool to graph formatted data sent from the Arduino in real time
  • “George” the serial monkey! (see below)
  • Enable building Arduino projects using ATMEL AVRstudio
  • And Megunolink can also act as a graphical interface for AVRdude to upload compiled code to an Arduino

Installation was simple and straightforward. The installation is only ~1.5 megabytes and not taxing at all. We only have a Windows 7 64-bit machine, so haven’t tested this in emulation under MacOS or Linux. Before moving ahead, note that the software is free. However the developers do ask for a US$10 donation, and if you use the software more than once this is a very fair amount to pay for such a featured piece of software. Now for a look at each of the features.

Serial Data monitoring

As with the Serial Monitor in the Arduino IDE, you can monitor the data from the Arduino, and also send it back through the serial line. Just click the ‘Monitor’ tab and you’re set, for example:

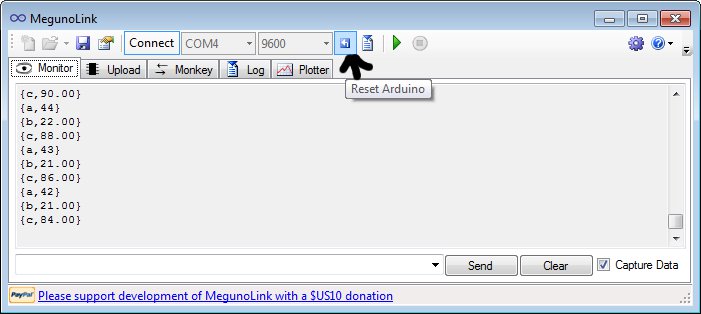
However unlike the Arduino IDE, opening the monitor does not reset the Arduino. But if you do need to perform a reset, a button on the toolbar is provided as shown below:

Capturing Serial Data to a file

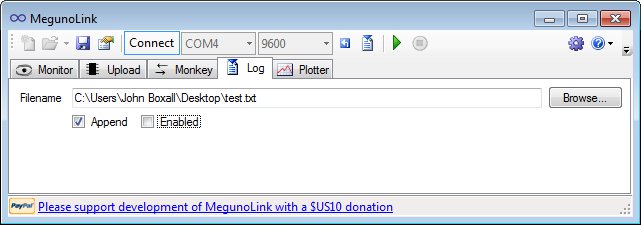
Very useful indeed, much quicker than dumping data to a microSD card and then bringing it back to the PC. Just click the ‘Log’ tab, specify a file location and name, then click ‘Enabled’, for example:

You can also append data to an existing text file. When creating the output format in your Arduino sketch, be mindful to have separators such as commas or colons – which make it much easier to delimit the data once imported into a spreadsheet or database application.

Plotting and Graphing Serial Data

Plotting data to a graph is very simple. You simply format the data you’d like to plot using Serial.write commands, and Megunolink takes care of the rest – just click the ‘Plotter’ tab and you’re off.  The data must be formatted as such:

{a, T, b}

Where ‘a’ is the name of the series. T tells MegunoLink to plot the actual real time, and b is the data as a number in string form. Here is a very simple example:

void setup()
{
 Serial.begin(9600);
}
int a=0;
float b,c;
void loop()
{
 for (int a=0; a<100; a++)
 {
 b=a/2;
 c=a*2;
 Serial.print("{a,T,"); 
 Serial.print(a);
 Serial.println("}");
 Serial.print("{b,T,");
 Serial.print(b);
 Serial.println("}"); 
 Serial.print("{c,T,");
 Serial.print(c);
 Serial.println("}"); 
 delay(100);
 }
 for (int a=100; a>0; --a)
 {
 b=a/2;
 c=a*2;
 Serial.print("{a,T,"); 
 Serial.print(a);
 Serial.println("}");
 Serial.print("{b,T,");
 Serial.print(b);
 Serial.println("}"); 
 Serial.print("{c,T,");
 Serial.print(c);
 Serial.println("}"); 
 delay(100);
 }
}

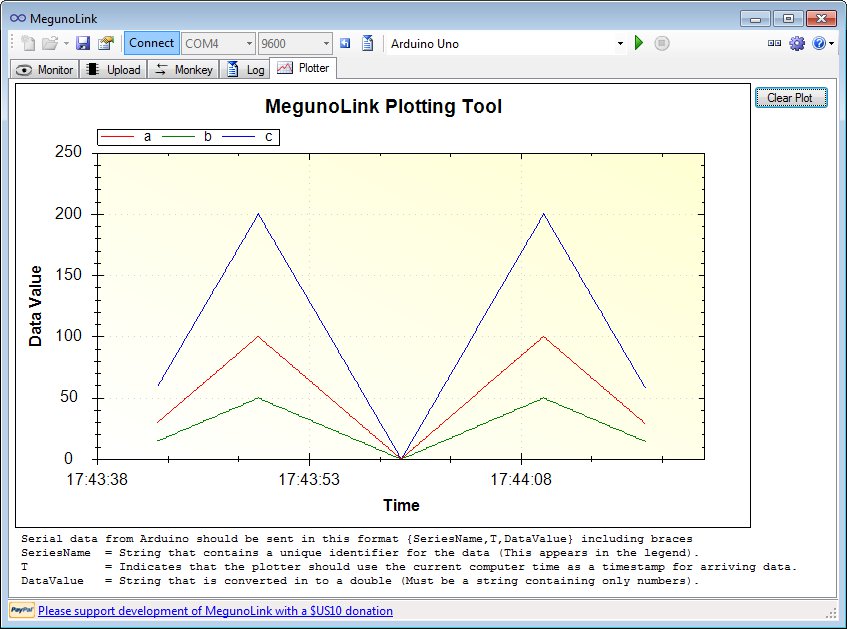
which resulted with:

Here is another example, it is the “SendSineCurve” sketch from the Arduino Graphing library:

You can always save the graph as an image in the usual formats as well as in .emf vector image file format.

“George” the Serial Monkey

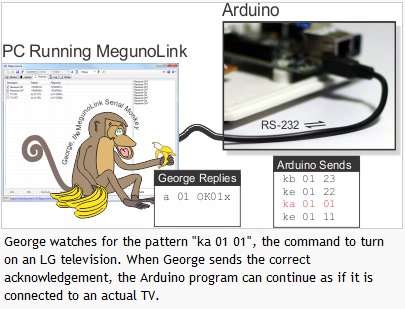
This is a serial protocol simulator tool which is useful for testing the control of serial-based devices. You can setup George so that it listens for a particular pattern in the serial output from an Arduino – and then sends back a response of your choice to the Arduino. For example:

For a more detail explanation and detail tutorial on how to control George, see the MegunoLink website.

Arduino Development with AVR Studio 

Using MegunoLink you can develop Arduino projects with Atmel AVRStudio software. As some people find the Arduino IDE somewhat limiting, this option gives you access to the more programmer-friendly Atmel IDE, for example:

Although there is a small amount of tasks to make this possible, it is straightforward to do so, and an easy to follow tutorial has been provided at the MegunoLink website.

Upload compiled .HEX files to Arduino

For those using avrdude to upload compiled .hex files to an Ardiuno, you can also do this using the GUI MegunoLink interface. This is also used for uploading the compiled files generated in AVRStudio, for example:

As with all the other MegunoLink features – there is a relevant tutorial available on the website.

Conclusion

MegunoLink works well, is easy to use, and the price is right. It has to be the simplest tool available for plotting data from a microcontroller, or capturing it to a file without any extra hardware. So download it and give it a try, it won’t cost you anything and I’m sure you will find a use for it in the near future. And remember – if you’re using MegunoLink, please consider making a donation towards the development of further versions. Thanks to Freetronics for the use of their top-notch Arduino-compatible hardware.

In the meanwhile have fun and keep checking into tronixstuff.com. Why not follow things on twitterGoogle+, subscribe  for email updates or RSS using the links on the right-hand column? And join our friendly Google Group – dedicated to the projects and related items on this website. Sign up – it’s free, helpful to each other –  and we can all learn something.


Jun
27

Introduction

Through a colleague I was introduced to a new piece of software for the Windows environment which comprises of useful tools that interact with an Arduino-style board (or other MCU with serial data). The software is called MegunoLink, from BlueLeafSoftware in New Zealand. Megunolink has many useful features, and we’ll run through them briefly in this article. They include:

  • Serial port monitoring – that doesn’t reset the MCU
  • The ability to capture serial port data to a text file
  • A tool to graph formatted data sent from the Arduino in real time
  • “George” the serial monkey! (see below)
  • Enable building Arduino projects using ATMEL AVRstudio
  • And Megunolink can also act as a graphical interface for AVRdude to upload compiled code to an Arduino

Installation was simple and straightforward. The installation is only ~1.5 megabytes and not taxing at all. We only have a Windows 7 64-bit machine, so haven’t tested this in emulation under MacOS or Linux. Before moving ahead, note that the software is free. However the developers do ask for a US$10 donation, and if you use the software more than once this is a very fair amount to pay for such a featured piece of software. Now for a look at each of the features.

Serial Data monitoring

As with the Serial Monitor in the Arduino IDE, you can monitor the data from the Arduino, and also send it back through the serial line. Just click the ‘Monitor’ tab and you’re set, for example:

However unlike the Arduino IDE, opening the monitor does not reset the Arduino. But if you do need to perform a reset, a button on the toolbar is provided as shown below:

Capturing Serial Data to a file

Very useful indeed, much quicker than dumping data to a microSD card and then bringing it back to the PC. Just click the ‘Log’ tab, specify a file location and name, then click ‘Enabled’, for example:

You can also append data to an existing text file. When creating the output format in your Arduino sketch, be mindful to have separators such as commas or colons – which make it much easier to delimit the data once imported into a spreadsheet or database application.

Plotting and Graphing Serial Data

Plotting data to a graph is very simple. You simply format the data you’d like to plot using Serial.write commands, and Megunolink takes care of the rest – just click the ‘Plotter’ tab and you’re off.  The data must be formatted as such:

Where ‘a’ is the name of the series. T tells MegunoLink to plot the actual real time, and b is the data as a number in string form. Here is a very simple example:

which resulted with:

Here is another example, it is the “SendSineCurve” sketch from the Arduino Graphing library:

You can always save the graph as an image in the usual formats as well as in .emf vector image file format.

“George” the Serial Monkey

This is a serial protocol simulator tool which is useful for testing the control of serial-based devices. You can setup George so that it listens for a particular pattern in the serial output from an Arduino – and then sends back a response of your choice to the Arduino. For example:

For a more detail explanation and detail tutorial on how to control George, see the MegunoLink website.

Arduino Development with AVR Studio 

Using MegunoLink you can develop Arduino projects with Atmel AVRStudio software. As some people find the Arduino IDE somewhat limiting, this option gives you access to the more programmer-friendly Atmel IDE, for example:

Although there is a small amount of tasks to make this possible, it is straightforward to do so, and an easy to follow tutorial has been provided at the MegunoLink website.

Upload compiled .HEX files to Arduino

For those using avrdude to upload compiled .hex files to an Ardiuno, you can also do this using the GUI MegunoLink interface. This is also used for uploading the compiled files generated in AVRStudio, for example:

As with all the other MegunoLink features – there is a relevant tutorial available on the website.

Conclusion

MegunoLink works well, is easy to use, and the price is right. It has to be the simplest tool available for plotting data from a microcontroller, or capturing it to a file without any extra hardware. So download it and give it a try, it won’t cost you anything and I’m sure you will find a use for it in the near future. And remember – if you’re using MegunoLink, please consider making a donation towards the development of further versions. Thanks to Freetronics for the use of their top-notch Arduino-compatible hardware.

In the meanwhile have fun and keep checking into tronixstuff.com. Why not follow things on twitterGoogle+, subscribe  for email updates or RSS using the links on the right-hand column? And join our friendly Google Group – dedicated to the projects and related items on this website. Sign up – it’s free, helpful to each other –  and we can all learn something.

The post Improving Arduino to PC Interactions with MegunoLink appeared first on tronixstuff.


  • Newsletter

    Sign up for the PlanetArduino Newsletter, which delivers the most popular articles via e-mail to your inbox every week. Just fill in the information below and submit.

  • Like Us on Facebook