Posts | Comments

Planet Arduino

Archive for the ‘logging’ Category

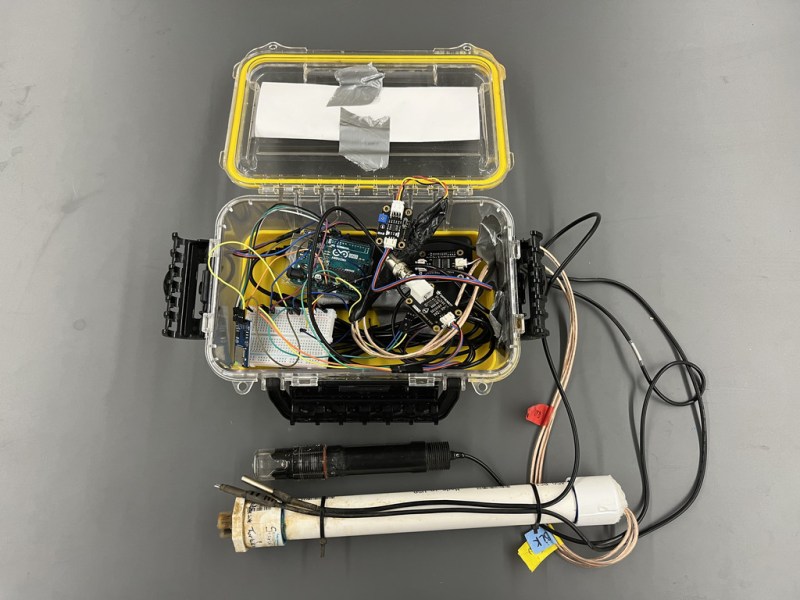
While it can be straightforward to distill water to high purity, this is rarely the best method for producing water for useful purposes. Even drinking water typically needs certain minerals in it, plants may need a certain pH, and wastewater systems have a whole host of other qualities that need to be measured. Measuring water quality is a surprisingly complex endeavor as a result and often involves a wide array of sensors, much like this water quality meter from [RowlesGroupResearch].

The water quality meters that they are putting to use are typically set up in remote locations, without power, and are targeting natural bodies of water and also wastewater treatment plants. Temperature and pH are simple enough to measure and grasp, but this device also includes sensors for total dissolved solids (TDS) and turbidity which are both methods for measuring various amounts and types of particles suspended in the water. The build is based around an Arduino so that it is easy for others to replicate, and is housed in a waterproof box with a large battery, and includes data logging to an SD card in order to make it easy to deploy in remote, outdoor settings and to gather the data at a later time.

The build log for this device also goes into detail about all of the steps needed to set this up from scratch, as well as a comprehensive bill of materials. This could be useful in plenty of professional settings such as community wastewater treatment facilities but also in situations where it’s believed that industrial activity may be impacting a natural body of water. For a water quality meter more focused on drinking water, though, we’d recommend this build that is trained on its own neural network.

We’ve all been there. When debugging a microcontroller project, we just want to put in a print statement to figure out what’s going on with the microcontroller in real time. However, advanced embedded programmers know that printf statements are verboten: they’re just too SLOW. While not fixing this plight entirely, [Atakan Sarioglu] has come up with a clever way to create readable debug messages with minimal runtime overhead.

[Atakan Sarioglu]’s innovation, called BigBug (Github), is a dynamically-generated codebook. The codebook translates abbreviated messages sent over serial (UART here) to longer-form human-readable messages. To generate the codebook, BigBug automatically parses your comments to create a lookup between an abbreviation and the long-form message. When you are running your program on the microcontroller, BigBug will translate the short codes to long messages in real-time as you send log/debug data over serial.

For example (not restricted to Arduino-only), if you write Serial.println("HW") //@BB[HW] Hello World!, BigBug will translate the received characters HW\n to Hello World!. In this simple example, the abbreviation uses 3 characters while the fully readable message uses 13 characters, for a savings of ~75% with no loss of clarity. More advanced usage lets you log data: Serial.println("DT 1 1") //@BB[DT] Today's Date is: {0}/{1} becomes Today's Date is 1/1. You can also use enumerated variables (last example could showToday's Date is Jan. 1 with the same print command).

In terms of real-world benefit, using a 115200 baud connection (with 8N1 encoding) this is 115200 bits per second /(8+1) bits per byte = 12800 bytes/sec = 1 byte every 80 microseconds. Sending 13 bytes of Hello World!\n (in a naive, blocking UART implementation) takes ~1 ms of CPU time. With the shortcode HW\n, it would take ~0.25 ms to send essentially the same message (then decoded by BigBug). Note that because this just operates on serial data, BigBug is language independent

If you’ve been constrained by serial throughput for debugging, this looks like a well-polished tool to solve your problems. If you are just using an Arduino and throughput is no issue, then try this tool to debug Arduino programs. Or you could always double-down and use a microcontroller to debug another microcontroller.

Jan
23

Data-logging made simple with Arduino

data logger, logger, logging, projects, prototyping, RTC, sd, shield, tutorial Comments Off on Data-logging made simple with Arduino 

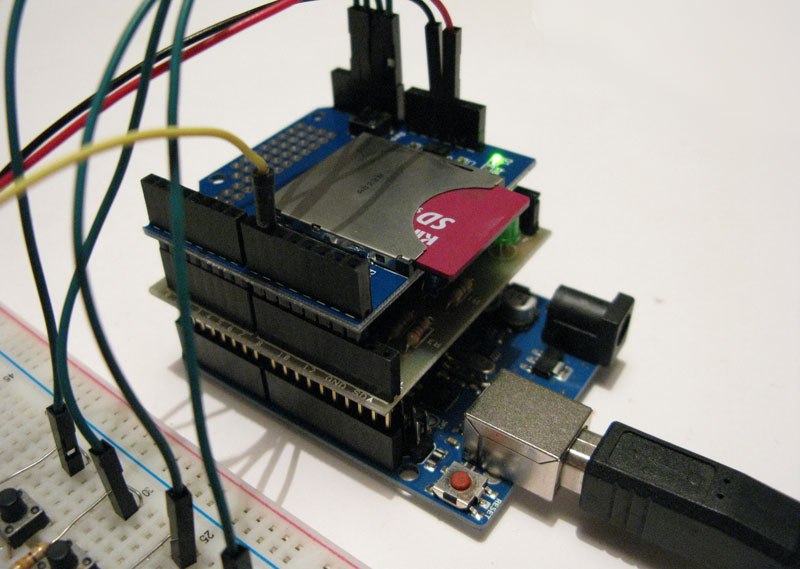
One of the best capabilities provided by Arduino regards its very high modularity, which helps users to quickly translate ideas into physical artifact, as practically demonstrated by Mauro, which shows on his blog how to build a simple data-logger by properly combining different shields. By using few additional components (mainly resistors and buttons) a fully-functional data logger can be easily implemented.

More information can be found here.

[Via: Mauro Alfieri's blog]

Jun
27

Improving Arduino to PC Interactions with MegunoLink

arduino, capture, connection, data, interaction, logging, megunolink, serial, software review Comments Off on Improving Arduino to PC Interactions with MegunoLink 

Introduction

Through a colleague I was introduced to a new piece of software for the Windows environment which comprises of useful tools that interact with an Arduino-style board (or other MCU with serial data). The software is called MegunoLink, from BlueLeafSoftware in New Zealand. Megunolink has many useful features, and we’ll run through them briefly in this article. They include:

  • Serial port monitoring – that doesn’t reset the MCU
  • The ability to capture serial port data to a text file
  • A tool to graph formatted data sent from the Arduino in real time
  • “George” the serial monkey! (see below)
  • Enable building Arduino projects using ATMEL AVRstudio
  • And Megunolink can also act as a graphical interface for AVRdude to upload compiled code to an Arduino

Installation was simple and straightforward. The installation is only ~1.5 megabytes and not taxing at all. We only have a Windows 7 64-bit machine, so haven’t tested this in emulation under MacOS or Linux. Before moving ahead, note that the software is free. However the developers do ask for a US$10 donation, and if you use the software more than once this is a very fair amount to pay for such a featured piece of software. Now for a look at each of the features.

Serial Data monitoring

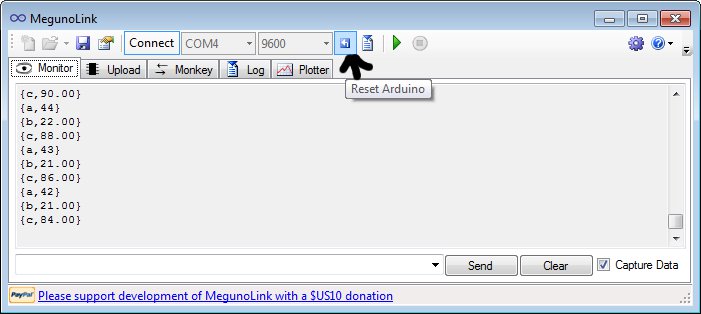
As with the Serial Monitor in the Arduino IDE, you can monitor the data from the Arduino, and also send it back through the serial line. Just click the ‘Monitor’ tab and you’re set, for example:

However unlike the Arduino IDE, opening the monitor does not reset the Arduino. But if you do need to perform a reset, a button on the toolbar is provided as shown below:

Capturing Serial Data to a file

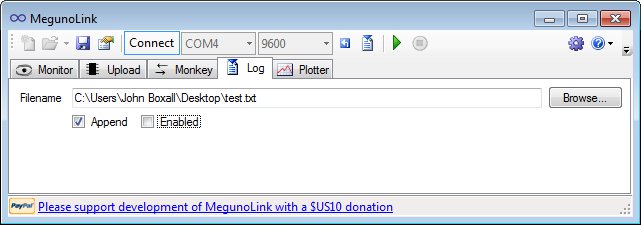
Very useful indeed, much quicker than dumping data to a microSD card and then bringing it back to the PC. Just click the ‘Log’ tab, specify a file location and name, then click ‘Enabled’, for example:

You can also append data to an existing text file. When creating the output format in your Arduino sketch, be mindful to have separators such as commas or colons – which make it much easier to delimit the data once imported into a spreadsheet or database application.

Plotting and Graphing Serial Data

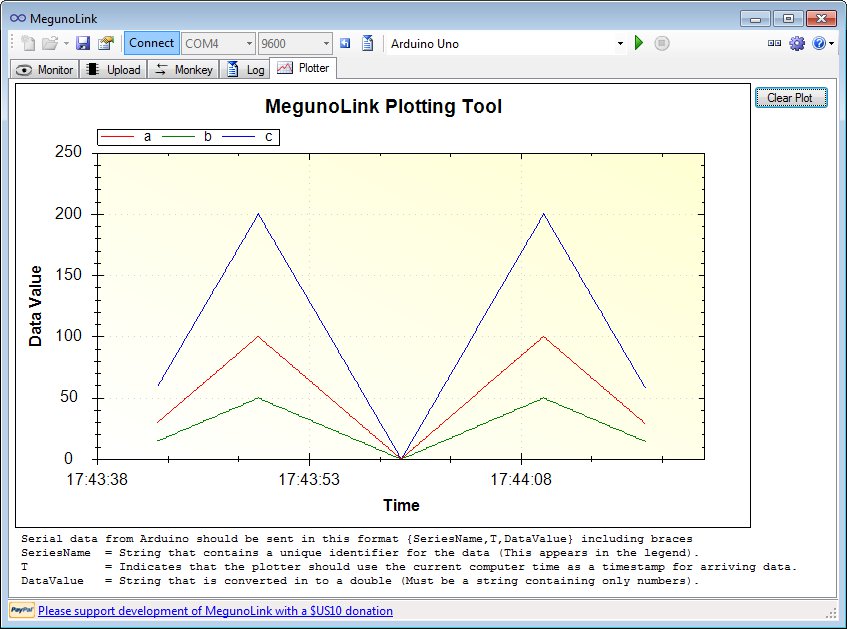
Plotting data to a graph is very simple. You simply format the data you’d like to plot using Serial.write commands, and Megunolink takes care of the rest – just click the ‘Plotter’ tab and you’re off.  The data must be formatted as such:

{a, T, b}

Where ‘a’ is the name of the series. T tells MegunoLink to plot the actual real time, and b is the data as a number in string form. Here is a very simple example:

void setup()
{
 Serial.begin(9600);
}
int a=0;
float b,c;
void loop()
{
 for (int a=0; a<100; a++)
 {
 b=a/2;
 c=a*2;
 Serial.print("{a,T,"); 
 Serial.print(a);
 Serial.println("}");
 Serial.print("{b,T,");
 Serial.print(b);
 Serial.println("}"); 
 Serial.print("{c,T,");
 Serial.print(c);
 Serial.println("}"); 
 delay(100);
 }
 for (int a=100; a>0; --a)
 {
 b=a/2;
 c=a*2;
 Serial.print("{a,T,"); 
 Serial.print(a);
 Serial.println("}");
 Serial.print("{b,T,");
 Serial.print(b);
 Serial.println("}"); 
 Serial.print("{c,T,");
 Serial.print(c);
 Serial.println("}"); 
 delay(100);
 }
}

which resulted with:

Here is another example, it is the “SendSineCurve” sketch from the Arduino Graphing library:

You can always save the graph as an image in the usual formats as well as in .emf vector image file format.

“George” the Serial Monkey

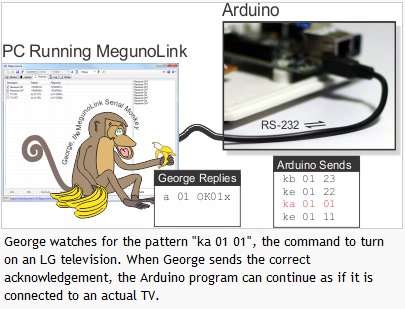
This is a serial protocol simulator tool which is useful for testing the control of serial-based devices. You can setup George so that it listens for a particular pattern in the serial output from an Arduino – and then sends back a response of your choice to the Arduino. For example:

For a more detail explanation and detail tutorial on how to control George, see the MegunoLink website.

Arduino Development with AVR Studio 

Using MegunoLink you can develop Arduino projects with Atmel AVRStudio software. As some people find the Arduino IDE somewhat limiting, this option gives you access to the more programmer-friendly Atmel IDE, for example:

Although there is a small amount of tasks to make this possible, it is straightforward to do so, and an easy to follow tutorial has been provided at the MegunoLink website.

Upload compiled .HEX files to Arduino

For those using avrdude to upload compiled .hex files to an Ardiuno, you can also do this using the GUI MegunoLink interface. This is also used for uploading the compiled files generated in AVRStudio, for example:

As with all the other MegunoLink features – there is a relevant tutorial available on the website.

Conclusion

MegunoLink works well, is easy to use, and the price is right. It has to be the simplest tool available for plotting data from a microcontroller, or capturing it to a file without any extra hardware. So download it and give it a try, it won’t cost you anything and I’m sure you will find a use for it in the near future. And remember – if you’re using MegunoLink, please consider making a donation towards the development of further versions. Thanks to Freetronics for the use of their top-notch Arduino-compatible hardware.

In the meanwhile have fun and keep checking into tronixstuff.com. Why not follow things on twitterGoogle+, subscribe  for email updates or RSS using the links on the right-hand column? And join our friendly Google Group – dedicated to the projects and related items on this website. Sign up – it’s free, helpful to each other –  and we can all learn something.


Jun
27

Introduction

Through a colleague I was introduced to a new piece of software for the Windows environment which comprises of useful tools that interact with an Arduino-style board (or other MCU with serial data). The software is called MegunoLink, from BlueLeafSoftware in New Zealand. Megunolink has many useful features, and we’ll run through them briefly in this article. They include:

  • Serial port monitoring – that doesn’t reset the MCU
  • The ability to capture serial port data to a text file
  • A tool to graph formatted data sent from the Arduino in real time
  • “George” the serial monkey! (see below)
  • Enable building Arduino projects using ATMEL AVRstudio
  • And Megunolink can also act as a graphical interface for AVRdude to upload compiled code to an Arduino

Installation was simple and straightforward. The installation is only ~1.5 megabytes and not taxing at all. We only have a Windows 7 64-bit machine, so haven’t tested this in emulation under MacOS or Linux. Before moving ahead, note that the software is free. However the developers do ask for a US$10 donation, and if you use the software more than once this is a very fair amount to pay for such a featured piece of software. Now for a look at each of the features.

Serial Data monitoring

As with the Serial Monitor in the Arduino IDE, you can monitor the data from the Arduino, and also send it back through the serial line. Just click the ‘Monitor’ tab and you’re set, for example:

However unlike the Arduino IDE, opening the monitor does not reset the Arduino. But if you do need to perform a reset, a button on the toolbar is provided as shown below:

Capturing Serial Data to a file

Very useful indeed, much quicker than dumping data to a microSD card and then bringing it back to the PC. Just click the ‘Log’ tab, specify a file location and name, then click ‘Enabled’, for example:

You can also append data to an existing text file. When creating the output format in your Arduino sketch, be mindful to have separators such as commas or colons – which make it much easier to delimit the data once imported into a spreadsheet or database application.

Plotting and Graphing Serial Data

Plotting data to a graph is very simple. You simply format the data you’d like to plot using Serial.write commands, and Megunolink takes care of the rest – just click the ‘Plotter’ tab and you’re off.  The data must be formatted as such:

Where ‘a’ is the name of the series. T tells MegunoLink to plot the actual real time, and b is the data as a number in string form. Here is a very simple example:

which resulted with:

Here is another example, it is the “SendSineCurve” sketch from the Arduino Graphing library:

You can always save the graph as an image in the usual formats as well as in .emf vector image file format.

“George” the Serial Monkey

This is a serial protocol simulator tool which is useful for testing the control of serial-based devices. You can setup George so that it listens for a particular pattern in the serial output from an Arduino – and then sends back a response of your choice to the Arduino. For example:

For a more detail explanation and detail tutorial on how to control George, see the MegunoLink website.

Arduino Development with AVR Studio 

Using MegunoLink you can develop Arduino projects with Atmel AVRStudio software. As some people find the Arduino IDE somewhat limiting, this option gives you access to the more programmer-friendly Atmel IDE, for example:

Although there is a small amount of tasks to make this possible, it is straightforward to do so, and an easy to follow tutorial has been provided at the MegunoLink website.

Upload compiled .HEX files to Arduino

For those using avrdude to upload compiled .hex files to an Ardiuno, you can also do this using the GUI MegunoLink interface. This is also used for uploading the compiled files generated in AVRStudio, for example:

As with all the other MegunoLink features – there is a relevant tutorial available on the website.

Conclusion

MegunoLink works well, is easy to use, and the price is right. It has to be the simplest tool available for plotting data from a microcontroller, or capturing it to a file without any extra hardware. So download it and give it a try, it won’t cost you anything and I’m sure you will find a use for it in the near future. And remember – if you’re using MegunoLink, please consider making a donation towards the development of further versions. Thanks to Freetronics for the use of their top-notch Arduino-compatible hardware.

In the meanwhile have fun and keep checking into tronixstuff.com. Why not follow things on twitterGoogle+, subscribe  for email updates or RSS using the links on the right-hand column? And join our friendly Google Group – dedicated to the projects and related items on this website. Sign up – it’s free, helpful to each other –  and we can all learn something.

The post Improving Arduino to PC Interactions with MegunoLink appeared first on tronixstuff.


  • Newsletter

    Sign up for the PlanetArduino Newsletter, which delivers the most popular articles via e-mail to your inbox every week. Just fill in the information below and submit.

  • Like Us on Facebook