
Take the first step discover love: join now Finding love may be difficult, but it is perhaps not impossible. that is why we are here to greatly help. we understand just how to compose content that engages and attracts visitors, therefore why don’t we help you find love. we realize that locating love could be … Seguir leyendo Take the first step discover love: join now
Archive for the ‘arduino’ Category
Apr
16
16
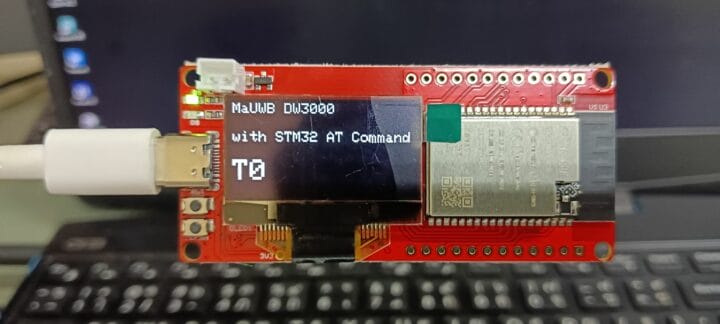
Hello, the device I am going to review is the MaUWB_DW3000 with STM32 AT Command. This is an Ultra-wideband (UWB) module from MakerFabs. The core UWB module on this board is the DW3000 UWB transceiver, and it is also equipped with an ESP32 microcontroller programmable with the Arduino IDE, as well as OLED display. The manufacturer claims that this UWB board resolves multiple anchors and tags mutual conflicts and supports up to 8 anchors and 64 tags. Additionally, the manufacturer has added an STM32 microcontroller to handle UWB multiplexing, allowing users to control the core UWB module by simply sending AT commands from an ESP32 microcontroller to the STM32 microcontroller. More information about this UWB board can be found on the manufacturer’s website. “MaUWB_DW3000 with STM32 AT Command” unboxing MakerFabs sent the package to me from China. Inside the package, there were 4 sets of the MaUWB_DW3000 with STM32 AT [...]
The post “MaUWB_DW3000 with STM32 AT Command” Review – Using Arduino to test UWB range, precision, indoor positioning appeared first on CNX Software - Embedded Systems News.
Apr
15
15
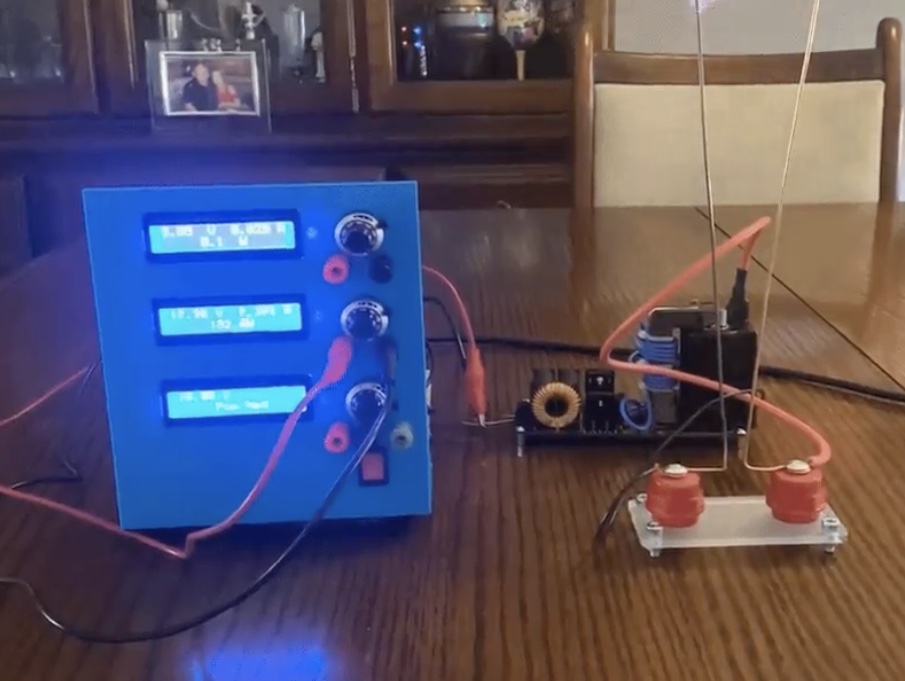
Every maker should have a bench power supply in their possession, ready to provide whatever voltage a project or particular component requires. But not all bench power supplies are created equal. Some only have a single output, some have a limited voltage range, and some can’t handle much current. In an attempt to eliminate such concerns forever, Doug Domke built “the Beast.”
This is a beefy bench power supply that can easily handle any project an electronics tinkerer is likely to tackle. It has three outputs that can all operate at the same time. Two of them can be set anywhere from 2V to 30V and can supply up to 10A each, at 30V. However, the supply transformer is only rated for 240 watts. If both are pulling the full current, then setting them above 24V would exceed the rating. But that isn’t a situation many people will find themselves in. The third output comes from a 20W supply that can provide 3V to 30V (positive or negative).
The user sets each output’s voltage with a simple potentiometer, but an Arduino Nano monitors the voltage and current of each using the analog input pins. The maximum 30V is far too high for the Arduino to work with directly, so it takes measurements through voltage dividers. With voltage and current readings, the Arduino can then calculate wattage. It displays the information for each output on a dedicated 16×2 character LCD screen, connected via I2C.

If you’re in need of a robust bench power supply, the Beast may just fit the bill.
The post This beastly DIY bench power supply will satisfy any requirement appeared first on Arduino Blog.
Apr
14
14
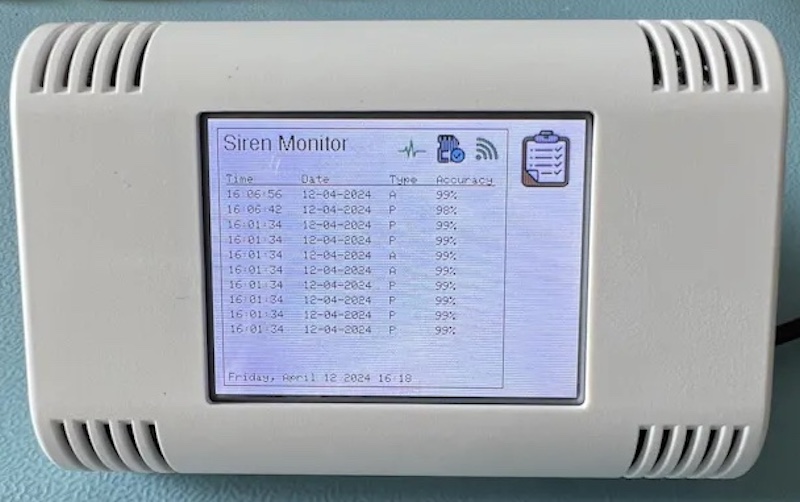
Soon after a police station opened near his house, Christopher Cooper noticed a substantial increase in the amount of emergency vehicle traffic and their associated noises even though local officials had promised that it would not be disruptive. But rather than write down every occurrence to track the volume of disturbances, he came up with a connected audio-classifying device that can automatically note the time and type of sound for later analysis.
Categorizing each sound was done by leveraging Edge Impulse and an Arduino Nano 33 BLE Sense. After training a model and deploying it within a sketch, the Nano will continually listen for new noises through its onboard microphone, run an inference, and then output the label and confidence over UART serial. Reading this stream of data is an ESP32 Dev Kit, which displays every entry in a list on a useful GUI. The screen allows users to select rows, view more detailed information, and even modify the category if needed.
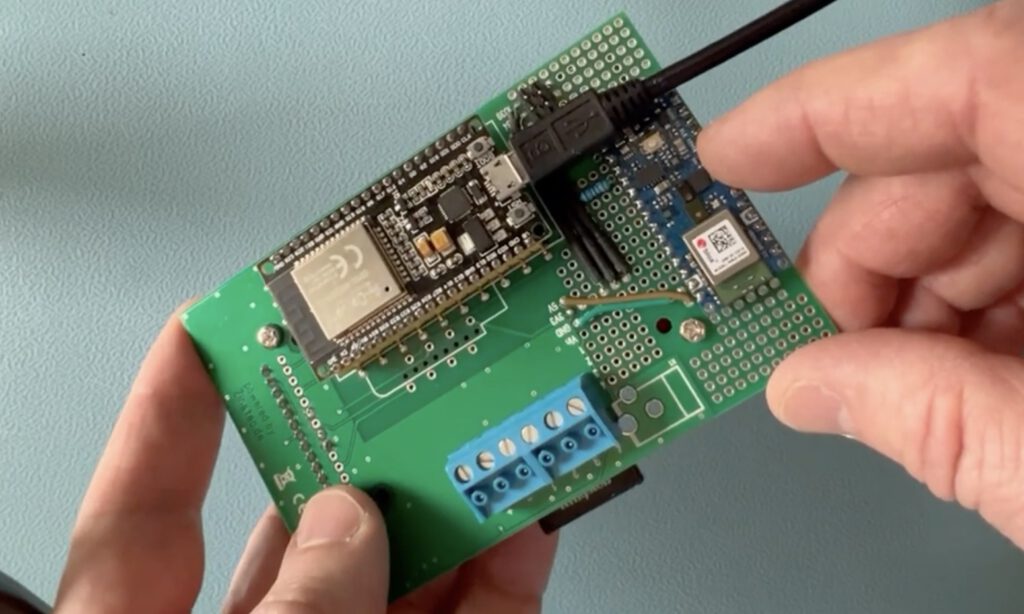
Going beyond the hardware aspect, Cooper’s project also includes a web server running on the ESP32 that can show the logs within a browser, and users can even connect an SD card to have automated file entries created. For more information about this project, you can read Cooper’s write-up here on Hackster.io.
The post Classify nearby annoyances with this sound monitoring device appeared first on Arduino Blog.
Apr
13
13

tebl on GitHub has built three projects to enhance radio-controlled cars using microcontrollers programmed in Arduino.
Module Description RC Light System A functional light system for RCs. It’s big, bulky and does mostly what I want it to do. RC Exhaust Controls an RGB LED mounted inside the exhaust pipe of an RC. On heavy throttle it starts glowing red, ease up on the throttle afterwards and you get flashing colours as it backfires. RC Dashboard Connected to the receiver, it shows a digital throttle gauge on a small OLED-screen.
Check it all out on GitHub.
Apr
12
12
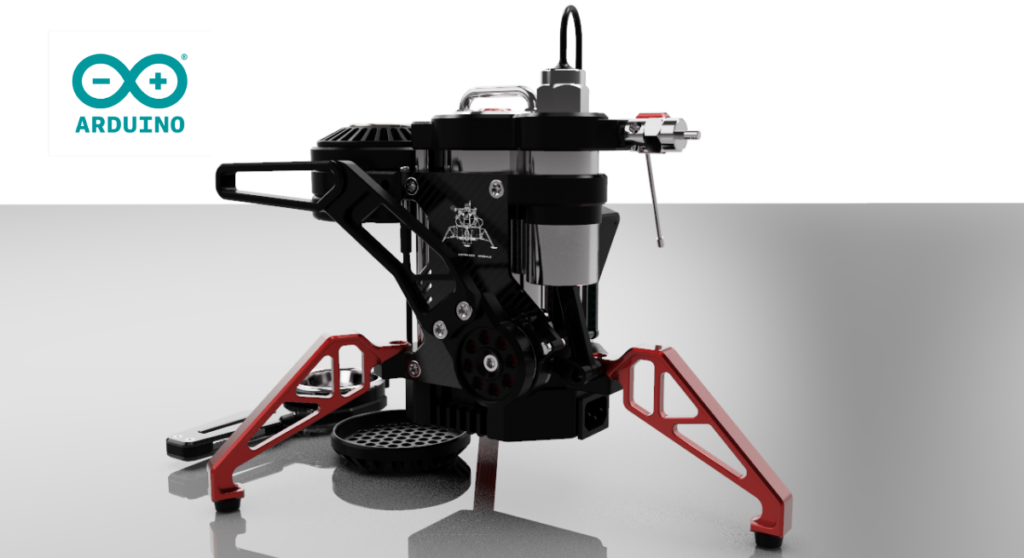
If you think coffee people are opinionated, then you’ve never met an espresso person. There is a lot of art and science that goes into making the perfect little cup of espresso and a good barista will control every factor, from temperature to pressure to pour rate. It isn’t rocket science, but it isn’t far off. So the LanderShot Lunar Espresso Module, a CNC-machined high-tech espresso machine, has a fitting theme.
This is, at its core, a premium espresso machine that merges designer aesthetics with cutting-edge electronics. The founder of LanderShot, Ted Ciamillo, lives in the state of Washington, but is of Italian descent. He wanted to honor his Italian heritage — and the origin of espresso — so he turned to Arduino.
Temperature control is crucial when making espresso; heat the water too much and you’ll burn the coffee, but you’ll lose the flavor and strength if you heat it too little. For that reason, the Lunar Espresso Module utilizes PID (proportional-interval-derivative) control for the 1000-watt heater. That ensures that water comes up to temperature quickly without overshooting the target, helping it go from 20 °C to 100 °C in just 180 seconds. A pneumatic lever lets the user increase the pressure to the desired level, with each stroke adding one bar.
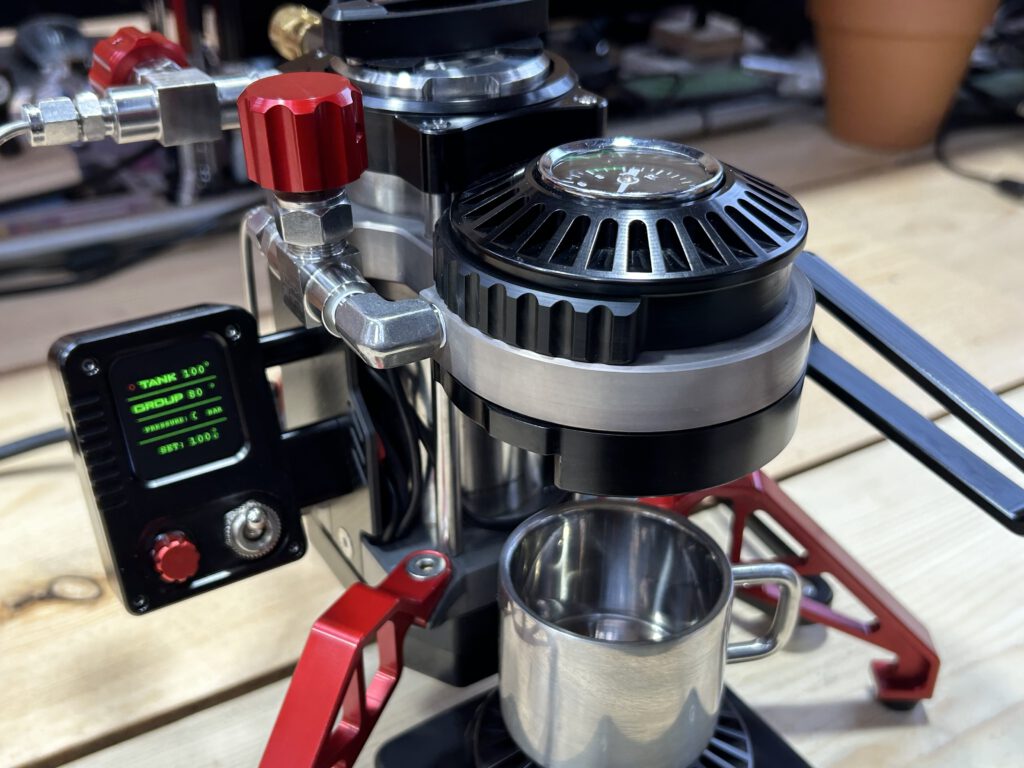
An Arduino Nano Every board controls the heat, monitors temperature and pressure, and displays the results on a small screen offset to the side. “The Nano Every is excellent at performing the several jobs in the machine. We chose it for its low-profile architecture, easy access to the pinouts, robustness and accessible price point. And, of course, we are pleased that the brains of our machine were designed in Italy,” Ciamillo says.
He adds that the greatest technical challenge was fitting all of the electronic components into the compact machine. While that may be true, we think that he’s selling himself short on the design and CNC work. The milled parts are stunning to look at, and we can only imagine that they’re even more pleasing to touch while pulling a shot.Ready to take your daily coffee to new heights? A limited number of LanderShot Lunar Espresso Module machines are available for pre-order and should ship out in June.
The post LanderShot is an out-of-this-world espresso machine appeared first on Arduino Blog.
Apr
11
11
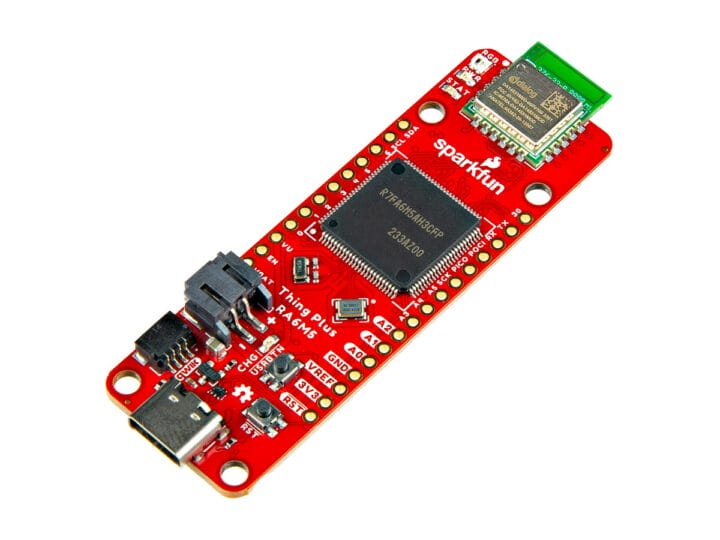
SparkFun Thing Plus – RA6M5 is a small MCU board based on a 200 MHz Renesas RA6M5 Cortex-M33 microcontroller and a Renesas DA14531MOD Bluetooth 5.1 LE module that follows Adafruit Feather/Sparkfun Thing Plus form factor. The module can transmit data over BLE with just 4mA (at 3.3V) power consumption and the company claims the board to be powered by a coin-cell battery. A LiPo battery can also be connected to the board through a 2-pin JST battery connector, and the Things Plus – RA6M5 board also features a single-cell charger and LiPo fuel gauge. Sparkfun Thing Plus – RA6M5 specifications: Microcontroller – Renesas R7FA6M5AH3CFP Core – Arm Cortex-M33 microcontroller @ up to 200 MHz Memory – 512KB SRAM Storage – 2MB Flash Security – Arm TrustZone, and Secure Crypto Engine 9 Wireless – Renesas DA14531MOD module for Bluetooth 5.1 LE connectivity with support for CodeLess AT command Datapump Radio Transmit [...]
The post SparkFun Thing Plus – RA6M5 board supports Bluetooth 5.1 LE through Renesas DA14531MOD module appeared first on CNX Software - Embedded Systems News.
Apr
10
10
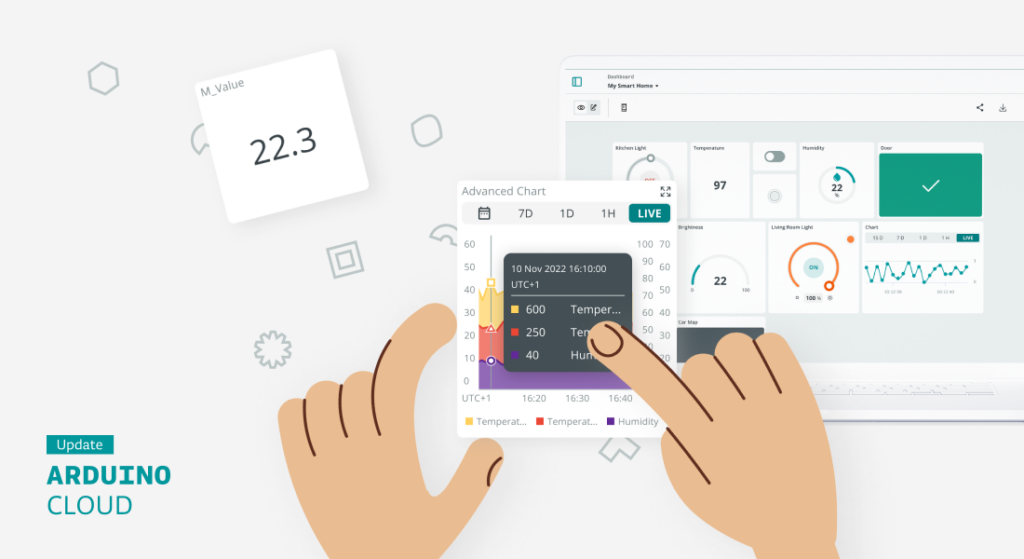
Arduino Cloud recently received a major upgrade renewing the user interface and the Arduino Cloud editor. And as we promised it was just the beginning. This article dives into some of the new IoT monitoring dashboard features that may seem small, but pack a big punch for your connected projects.
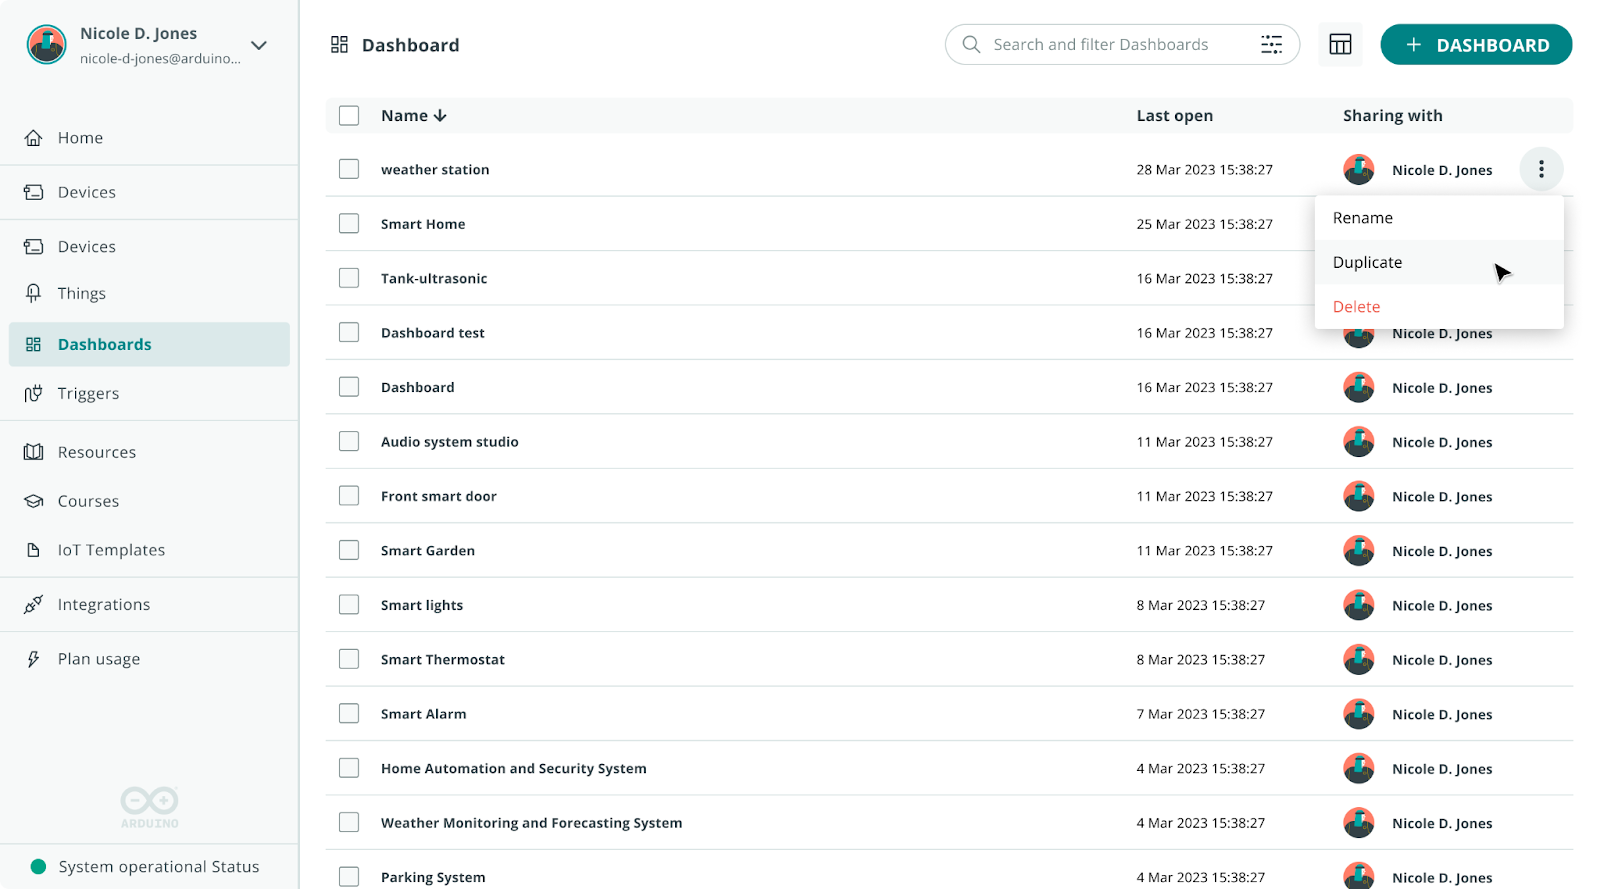
1. Duplicate IoT Dashboards
Dashboards are the heart of the Arduino Cloud, allowing you to effortlessly monitor and control your devices. That’s why improving their functionality is crucial.
Even though creating an IoT dashboard is an easy task with the intuitive drag-and-drop interface, it can become a bit tedious when you have to replicate many of them and apply minor adjustments.
Now it is possible to duplicate your IoT dashboards with just one click. Just click on the three dots (?) of the dashboard that you want to clone and select “Duplicate.” This creates a copy that you can customize to meet your specific needs.
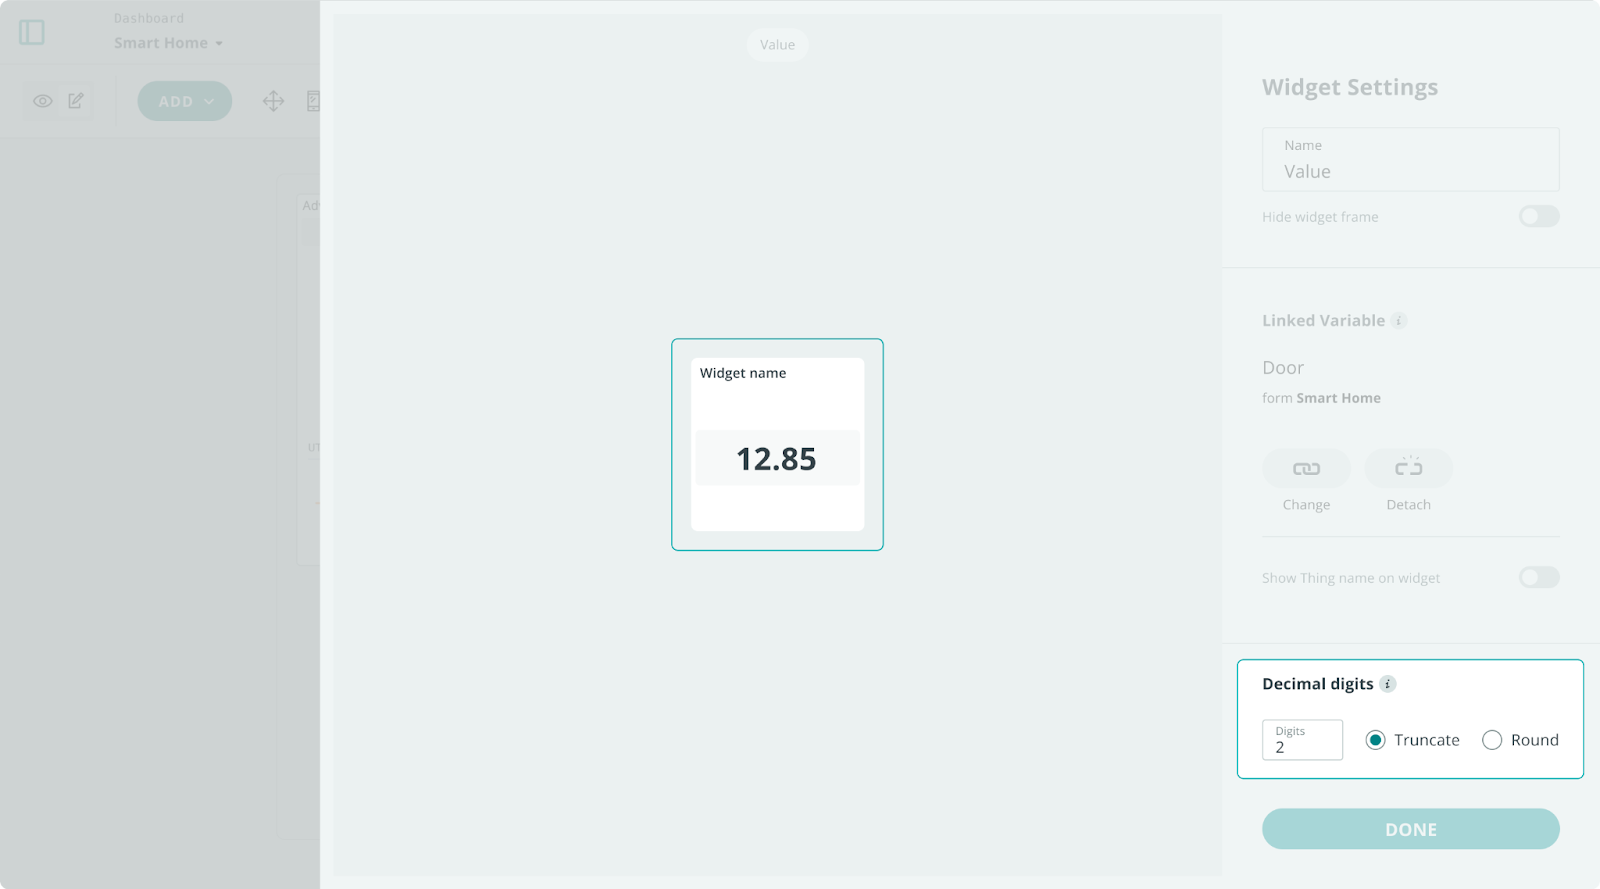
2. Customize your IoT Value Widget
Customizing widgets has been a common request from our user community, and we’ve recently addressed this with the introduction of decimal settings in the “Value” widget. This much-awaited feature allows users to configure the number of decimal digits displayed in the widget when dealing with floating-point variable types.
When selecting a floating-point variable type, users can specify the decimal precision shown in the widget and choose whether to truncate or round the value. Importantly, this setting only affects the visualization, not the actual variable value.
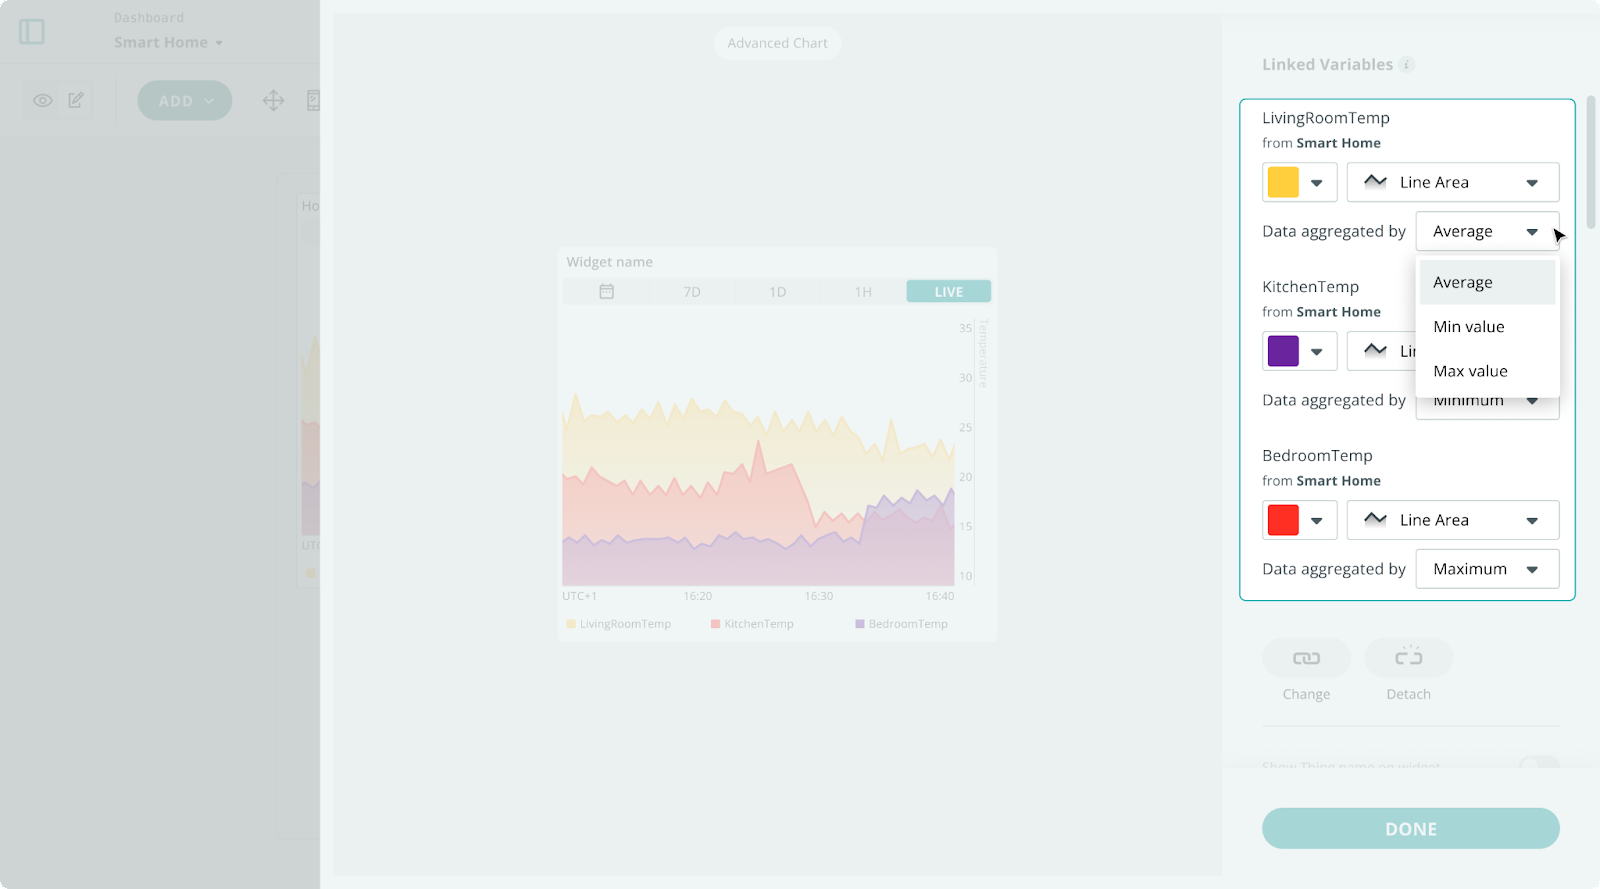
3. Enjoy the new data aggregation method in Advanced Chart widget
Advanced chart widgets are one of the most popular widgets for data analysis as they help you improve your data analysis. The widget now includes support for configuring the data aggregation method.
But what does it mean?
The chart widgets come with a smart implicit feature known as data aggregation. To prevent the chart from becoming too messy with an excess of data points, there is a fixed limit of data points per chart:
- If the number of data points to show is lower than the maximum number of data points, there is no aggregation.
- If the number of data points to show is bigger than the maximum number of data points, data is aggregated.
Before this update, there was only an implicit aggregation method, which was the average.
With this new Advanced Chart widget feature, you can now choose the aggregation method that suits your needs. Options include average, max value, and min value:
- Average: Calculates the average of the data for each aggregation period.
- Max value: Uses the maximum value within the aggregation period.
- Min value: Uses the minimum value within the aggregation period.
This enhancement is a direct result of the feedback from our community. It’s a feature that has long been requested by users, and we’re happy to finally deliver it.
Check out this article if you want to learn more about Advanced Chart widgets.
4. Deploy ready-to-use dashboards and firmware for your ESP32 devices
Templates are one of the most popular features of the Arduino Cloud. You can select a ready-to-use solution and deploy it with one click. You get the software and an IoT monitoring dashboard. If you need to do modifications for your IoT project, you can just edit the code and dashboard and off you go! It’s a fun and easy way to get started.
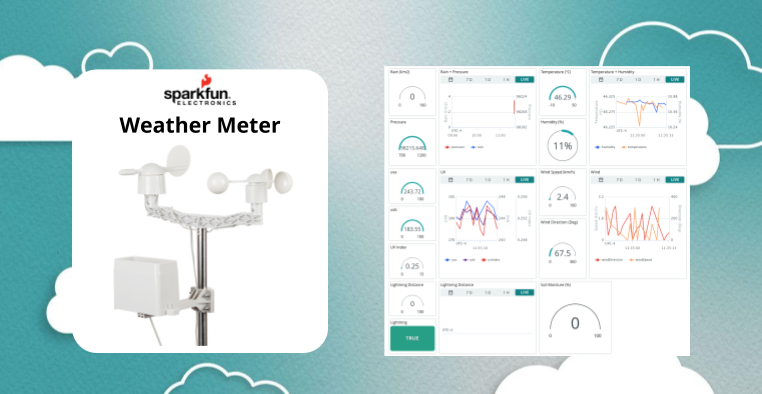
The exciting thing is that two new dashboard templates for ESP32 boards are now available, complementing the offering for Arduino boards:
With the SparkFun Weather Station kit template, you can program the SparkFun Weather Station kit firmware and get a ready-to-use dashboard that shows information about wind, rain, and sunlight.
Check out the full list of templates to see the ones that fit you more.
Bonus: IoT widget preview
As a bonus, we’re also introducing a handy new feature – now when you add a widget to a dashboard, you’ll see a preview and description of the widget. This makes it even easier to choose the right widget for your dashboard and streamline your project setup process.

Get started with Arduino Cloud
The Arduino Cloud is free to use. Create your Arduino Cloud account today and explore how you can bring your projects to the next level. If you need enhanced functionality, you can check the premium features and redeem a code for a free 30-day trial.
Want to learn more about Arduino Cloud IoT monitoring dashboards?
The post 4 new IoT monitoring dashboard updates on Arduino Cloud appeared first on Arduino Blog.
Apr
10
10
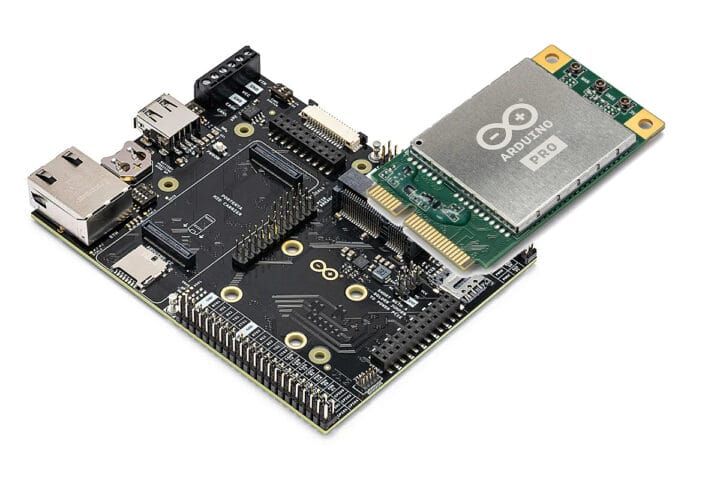
Arduino has announced two new products that are part of the Arduino Pro family at Embedded World 2024: the Arduino Pro 4G Module and Arduino Portenta Mid Carrier board. Arduino Pro 4G module Two variants of the mini PCIe module are available: one global and one for the EMEA and Southeast Asia markets with similar interfaces, but based on different Quectel modules, and the global model also supports GNSS. Specifications: Both also support 3G/2G fallback if 4G LTE network connectivity is out of range. The 4G LTE module works with Arduino Pro carrier boards featuring a mini PCIe connector such as the Max Carrier and the new Mid Carrier which we will be covering below. More information can be found on the documentation website and product page. The Arduino Pro 4G module global goes for $65 while the EMEA version sells for 29 Euros. Those prices are without antennas which [...]
The post Arduino announces the Pro 4G Module and Portenta Mid Carrier board at Embedded World 2024 appeared first on CNX Software - Embedded Systems News.
Apr
09
09

An optical reflective sensor is a composite electronic device with two elements – an IR LED and an IR photo-transistor. The IR LED blasts light, and when something bounces the light back to the photo-transistor, the transistor turns on and the amount of current flowing through it increases. This makes the sensor great at detecting when something is in front of the sensor.
The Adafruit STEMMA Reflective Photo Interrupt Sensor guide has everything you need to get started with using this breakout. There’s pages for overview, pinouts, CircuitPython, Arduino and resources for download.
Read more at Adafruit STEMMA Reflective Photo Interrupt Sensor

