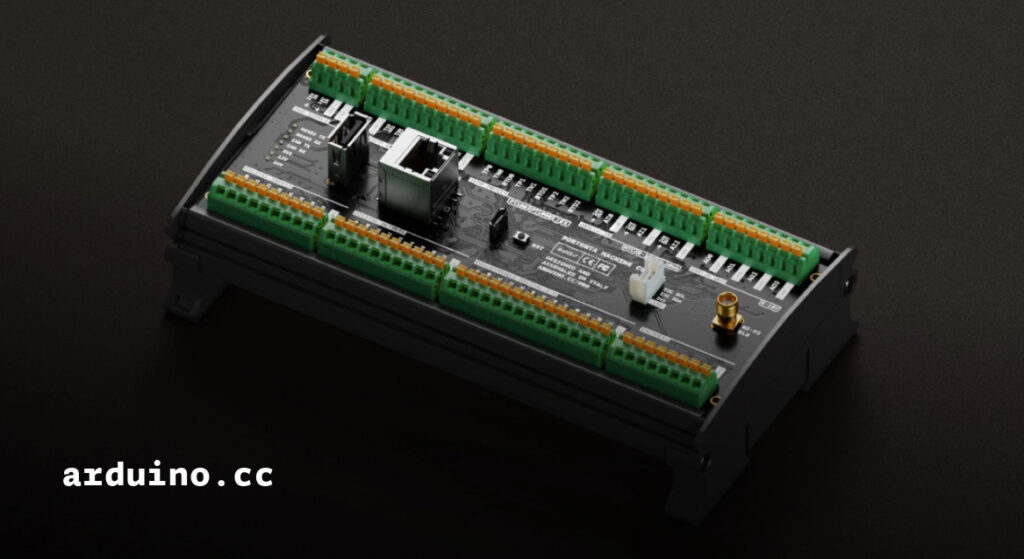
At Arduino, we’re committed to providing developers with tools that make the coding process smooth and efficient. That’s why we’re thrilled to announce the new Arduino_PortentaMachineControl library, an upgraded version designed to replace the deprecated Arduino_MachineControl library. It comes with a number of improvements, from a revamped structure to enhanced documentation, making it easier than ever to manage the features of the Arduino Portenta Machine Control.
Don’t know the Arduino Portenta Machine Control? It’s a versatile industrial control unit offering soft-PLC control, diverse I/O options, and flexible network connectivity. For more information about this product, visit the dedicated page.
What you’ll find in the new library
Enhanced library structure: We restructured the library to improve its organization, making it more intuitive. This ensures that you can quickly locate and utilize the functions you need for your projects.
Easier-to-understand names: We standardized function and class names for better consistency and readability. This change ensures a clearer and more understandable codebase.
Optimized efficiency: We eliminated unnecessary functions, decluttering the library and focusing on the essential features needed for effective machine control.
Refreshed and clearer examples: You’ll find reworked examples to showcase the library’s capabilities, providing a better demonstration of the board’s features and of their usage.
User manual and migration tutorial
But that’s not all! Alongside the library, we’re excited to release the official user manual for the Arduino Portenta Machine Control: an essential and in-depth guide to all the board’s features, readily available to all users.
In addition – knowing that transitioning from the old Arduino_MachineControl library might pose some challenges – we’ve prepared a detailed migration tutorial to guide you seamlessly through the process. Make the switch confidently and take advantage of the improved functionality offered by the new library!
And if that’s not enough, we’ve also included additional technical documentation with the library, ensuring that you have all the information you need to benefit from its new and improved capabilities.
Arduino library submissions have a new, easier and more transparent workflow.
Libraries are one of the pillars of the Arduino ecosystem. At time of writing, more than 3,780 open source libraries are available to perform any kind of task. This includes communication with external components and using algorithms for data processing. Such a variety of shared building blocks helps achieve things quickly without the need to write low-level code.
Beyond the official libraries maintained by the Arduino team, most are contributed by the community. Anyone can submit a new library for inclusion, provided it meets the specification and passes the Arduino Lint checks.
We’re happy to announce that the submission process for community libraries has been refactored. The goal is making it leaner, more automated and more transparent. Previously you would open an issue on the Arduino IDE repository for the Arduino team to handle the request manually. Instead, we’ve now established an official GitHub repository containing the library registry.
Submitting a new library is now as simple as opening a pull request to that repository. Then you add the URL of the library’s repository to the list. A bot performs automated checks and, when passed, the request will be merged immediately. Within one day, the new library will be listed in the Arduino library directory. It’ll also be made available within the IDE, the Arduino CLI command line tool and the Web Editor. The Arduino team will still be monitoring the process in order to fight abuses and to provide assistance.
After a library is indexed, new versions are automatically detected and published (if compliant). So nothing changes for existing libraries and no action is required. See the repository documentation for more details about the new process and join the discussion in the forum to provide your feedback.
Subscribe to the Arduino newsletter so you don’t miss any other exciting developments!
This post is from Sandeep Mistry, Senior Software Engineer at Arduino.
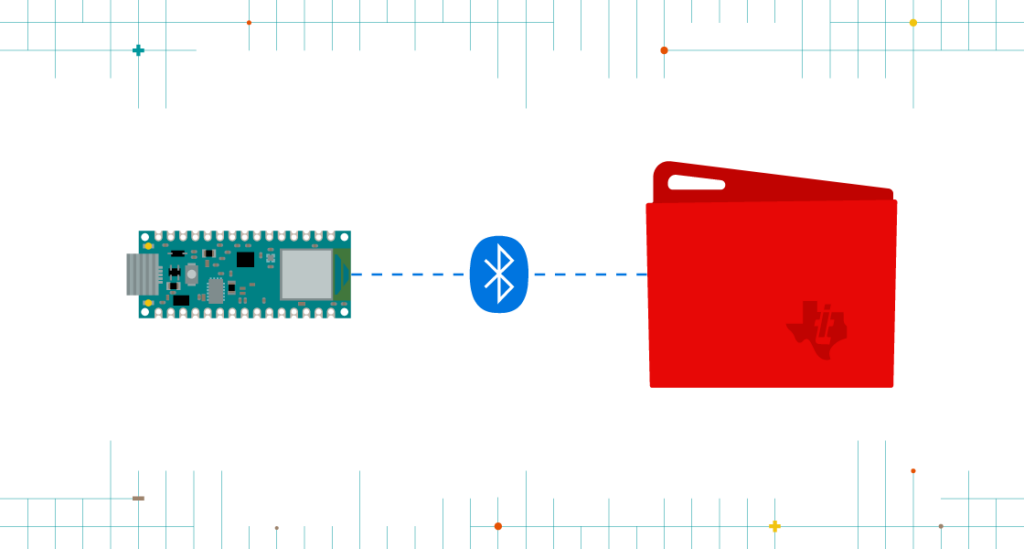
Today, we are pleased to announce BLE (Bluetooth Low Energy) central support in v1.1.0 of the ArduinoBLE library. This major feature addition allows your Arduino board to scan for and connect to BLE peripheral devices. With one simple library, you can now use BLE to directly connect your Arduino board to:
A smartphone, tablet, laptop or PC
BLE peripherals (e.g. TI SensorTag) – NEW!
Another Arduino board – NEW!
The ArduinoBLE library and new BLE central feature are supported on the following Arduino boards:
Prior to this release, Arduino only officially supported BLE peripheral functionality on these boards. A BLE peripheral is typically used to expose some sensor data or actuators to another device BLE central capable device such as a smartphone or PC. With the new BLE central functionality, you’ll be able to wirelessly connect two boards together for communication or connect to a third party BLE peripheral, such as a TI SensorTag.
We think that the ArduinoBLE library is much easier to use than anything else out there and are excited to see what you build with this new capability!
The development journey
Back in 2015, the Arduino 101 was released, based on the Curie module developed by Intel. It was the first official Arduino board with on-board BLE support. The CurieBLE library initially only supported BLE peripheral mode.
After launch, the Arduino and Intel teams worked together to design an Arduino friendly BLE API that supported both BLE Peripheral and Central functionality. This was released later in 2016 in the v2.0 of the Arduino core for Arduino 101.
The BLE features of the 101 were also incorporated into the CTC 101 kit in many classrooms around the world. Students used smartphones or tablets for exercises in the kit to interact with project based lessons running on the board. Unfortunately, Intel decided to stop producing the Curie module in 2017, bringing the Arduino 101 board to end of life.
Last year, at Maker Faire Bay Area 2018, Arduino launched two new boards: the MKR WiFi 1010 and Uno WiFi Rev.2. Both boards use the u-blox NINA-W102 as a 2.4 GHz wireless module. Initially both boards only supported WiFi using the WiFiNINA library. However, the ESP32 chip inside the u-blox NINA-W102 supports Bluetooth classic and BLE as well.
Later in 2018, the Arduino core team was tasked with adding BLE support to the MKR WiFi 1010 board so that it could be used with the upcoming Arduino Science Kit Physics Lab product. The Science Kit Physics Lab product is another educational kit, targeted for students in the classroom. We had several choices to move forward, including:
Bridging the ESP-IDF’s BLE API’s via RPC to the main MCU that sketches run on
Basing things on the industry standard Bluetooth HCI protocol and investing in a Bluetooth HCI host stack as an Arduino library
The first option above was expected to take an equal amount of time to the second, but also would make the BLE library exposed to users highly dependent on the underlying firmware running on the ESP32. It was also not as portable to other chip sets in the future. Thus, ArduinoBLE was created. The NINA firmware only needed small change to bridge its virtual Bluetooth HCI controller to the UART pins of the module.
Earlier this year, we released the Arduino Nano 33 IoT and Arduino Nano 33 BLE boards. Since the Arduino Nano 33 IoT uses the same chipset as the MKR WiFi 1010, things worked out of the box. For the Nano 33 BLE, which is based on the Nordic nRF52840 chip, a new Arduino core was developed for this board based on mbed OS (see this blog post for more info). mbed OS includes a radio stack called Cordio, which provides both a Bluetooth HCI link controller and HCI host. Creating a single C++ class that interfaced with Cordio’s Bluetooth HCI link layer allowed us to re-use 95%+ of ArduinoBLE on this board.
After the Nano 33 BLE started shipping, there was even more demand for BLE central support. So, development for feature was scheduled and is now available. It combines the API designed for the Arduino 101 in CurieBLE ported on top of ArduinoBLE’s Bluetooth HCI host stack.
Many thanks to Tom Igoe, one of the co-founders of Arduino, for providing feedback on the official Arduino BLE libraries throughout the years.
In case you missed it, the big news is that a minimal Arduino core is up and working on the ESP32. There’s still lots left to do, but the core functionality — GPIO, UART, SPI, I2C, and WiFi — are all up and ready to be tested out. Installing the library is as easy as checking out the code from GitHub into your Arduino install, so that’s exactly what I did.
I then spent a couple days playing around with it. It’s a work in progress, but it’s getting to the point of being useful, and the codebase itself contains some hidden gems. Come on along and take a sneak peek.
The Core
An Arduino isn’t worth very much unless it can talk to the outside world, and making the familiar Arduino commands work with the ESP32’s peripheral hardware is the job of the core firmware. As of this writing, GPIO, WiFi, SPI and I2C were ready to test out. GPIO means basically digitalWrite() and digitalRead() and there’s not much to say — they work. WiFi is very similar to the ESP8266 version, and aside from getting the ESP32 onto our home WiFi network, I didn’t push it hard yet. When other libraries come online that use WiFi, I’ll give it a second look.
SPI
The SPI routines in the ESP32 Arduino port both work just fine. I tested it out by connecting a 25LC256 SPI EEPROM to the chip. The ESP’s extremely flexible hardware peripheral routing matrix allows it to assign the SPI functions to any pins, but the Arduino implementation is preset to a default pinout, so you just need to look it up, and hook up MOSI to MOSI and so on. As of now, it only uses one of the ESP32’s two free SPI units.
With SPI, some of the weirdness of using Arduino on a powerful chip like the ESP32 start to poke through. To set the speed of the SPI peripheral, you can use the familiar SPI_CLOCK_DIV_XX macros, only they’re scaled up to match the ESP32’s faster CPU clock speed. The end result is that SPI_CLOCK_DIV_16 gives you a 1 MHz SPI bus on either the 16 MHz Uno or the 240 MHz ESP32, which is probably what you want for compatibility with old code. But 240 divided by 16 is not 1. In retrospect, the macros would be better defined in terms of the desired frequency rather than the division factor, but you can’t go back in time.
There were also two extra definitions that I had to add to the program to make it run, but they’ve both been streamlined into the mainline in the last eighteen hours. That’s the deal with quickly evolving, openly developed software. One day you write that the macro MSBFIRST isn’t defined, and before you can go to press, it’s defined right there in Arduino.h. Great stuff!
I2C: The Wire
The I2C (“Wire”) library has also gotten the ESP32 treatment, and worked just as it should with an LM75 temperature sensor. This is my standard I2C test device, because it lets you read a few registers by default, but you can also send the sensor a few configuration options and read them back out. It’s not a particularly demanding device, but when it works you know the basics are working. And it did.
The ESP’s dedicated I2C pins are on GPIO 21 and 22 for data and clock respectively. Some I2C implementations will use the microcontroller’s pullup resistors to pull the I2C bus lines high, so I tested that out by pulling the 10 KOhm resistors out. The ESP stopped getting data back instantly, so that answers that. Don’t forget your pullup resistors on the I2C lines and all is well. Otherwise, it’s just connecting up two wires, double-checking the I2C device address, and reading in the data. That was easy.
External Libraries
More than half of the reason to use Arduino is the wide range of external, add-on libraries that make interfacing with all sorts of hardware easy and painless. Many of these libraries are built strictly on top of the Arduino core, and should “just work”. Of course, when you’re actually coding this close to the hardware, nothing is going to be as portable as it is a few layers of abstraction higher up on your desktop computer. Let’s go test this hypothesis out.
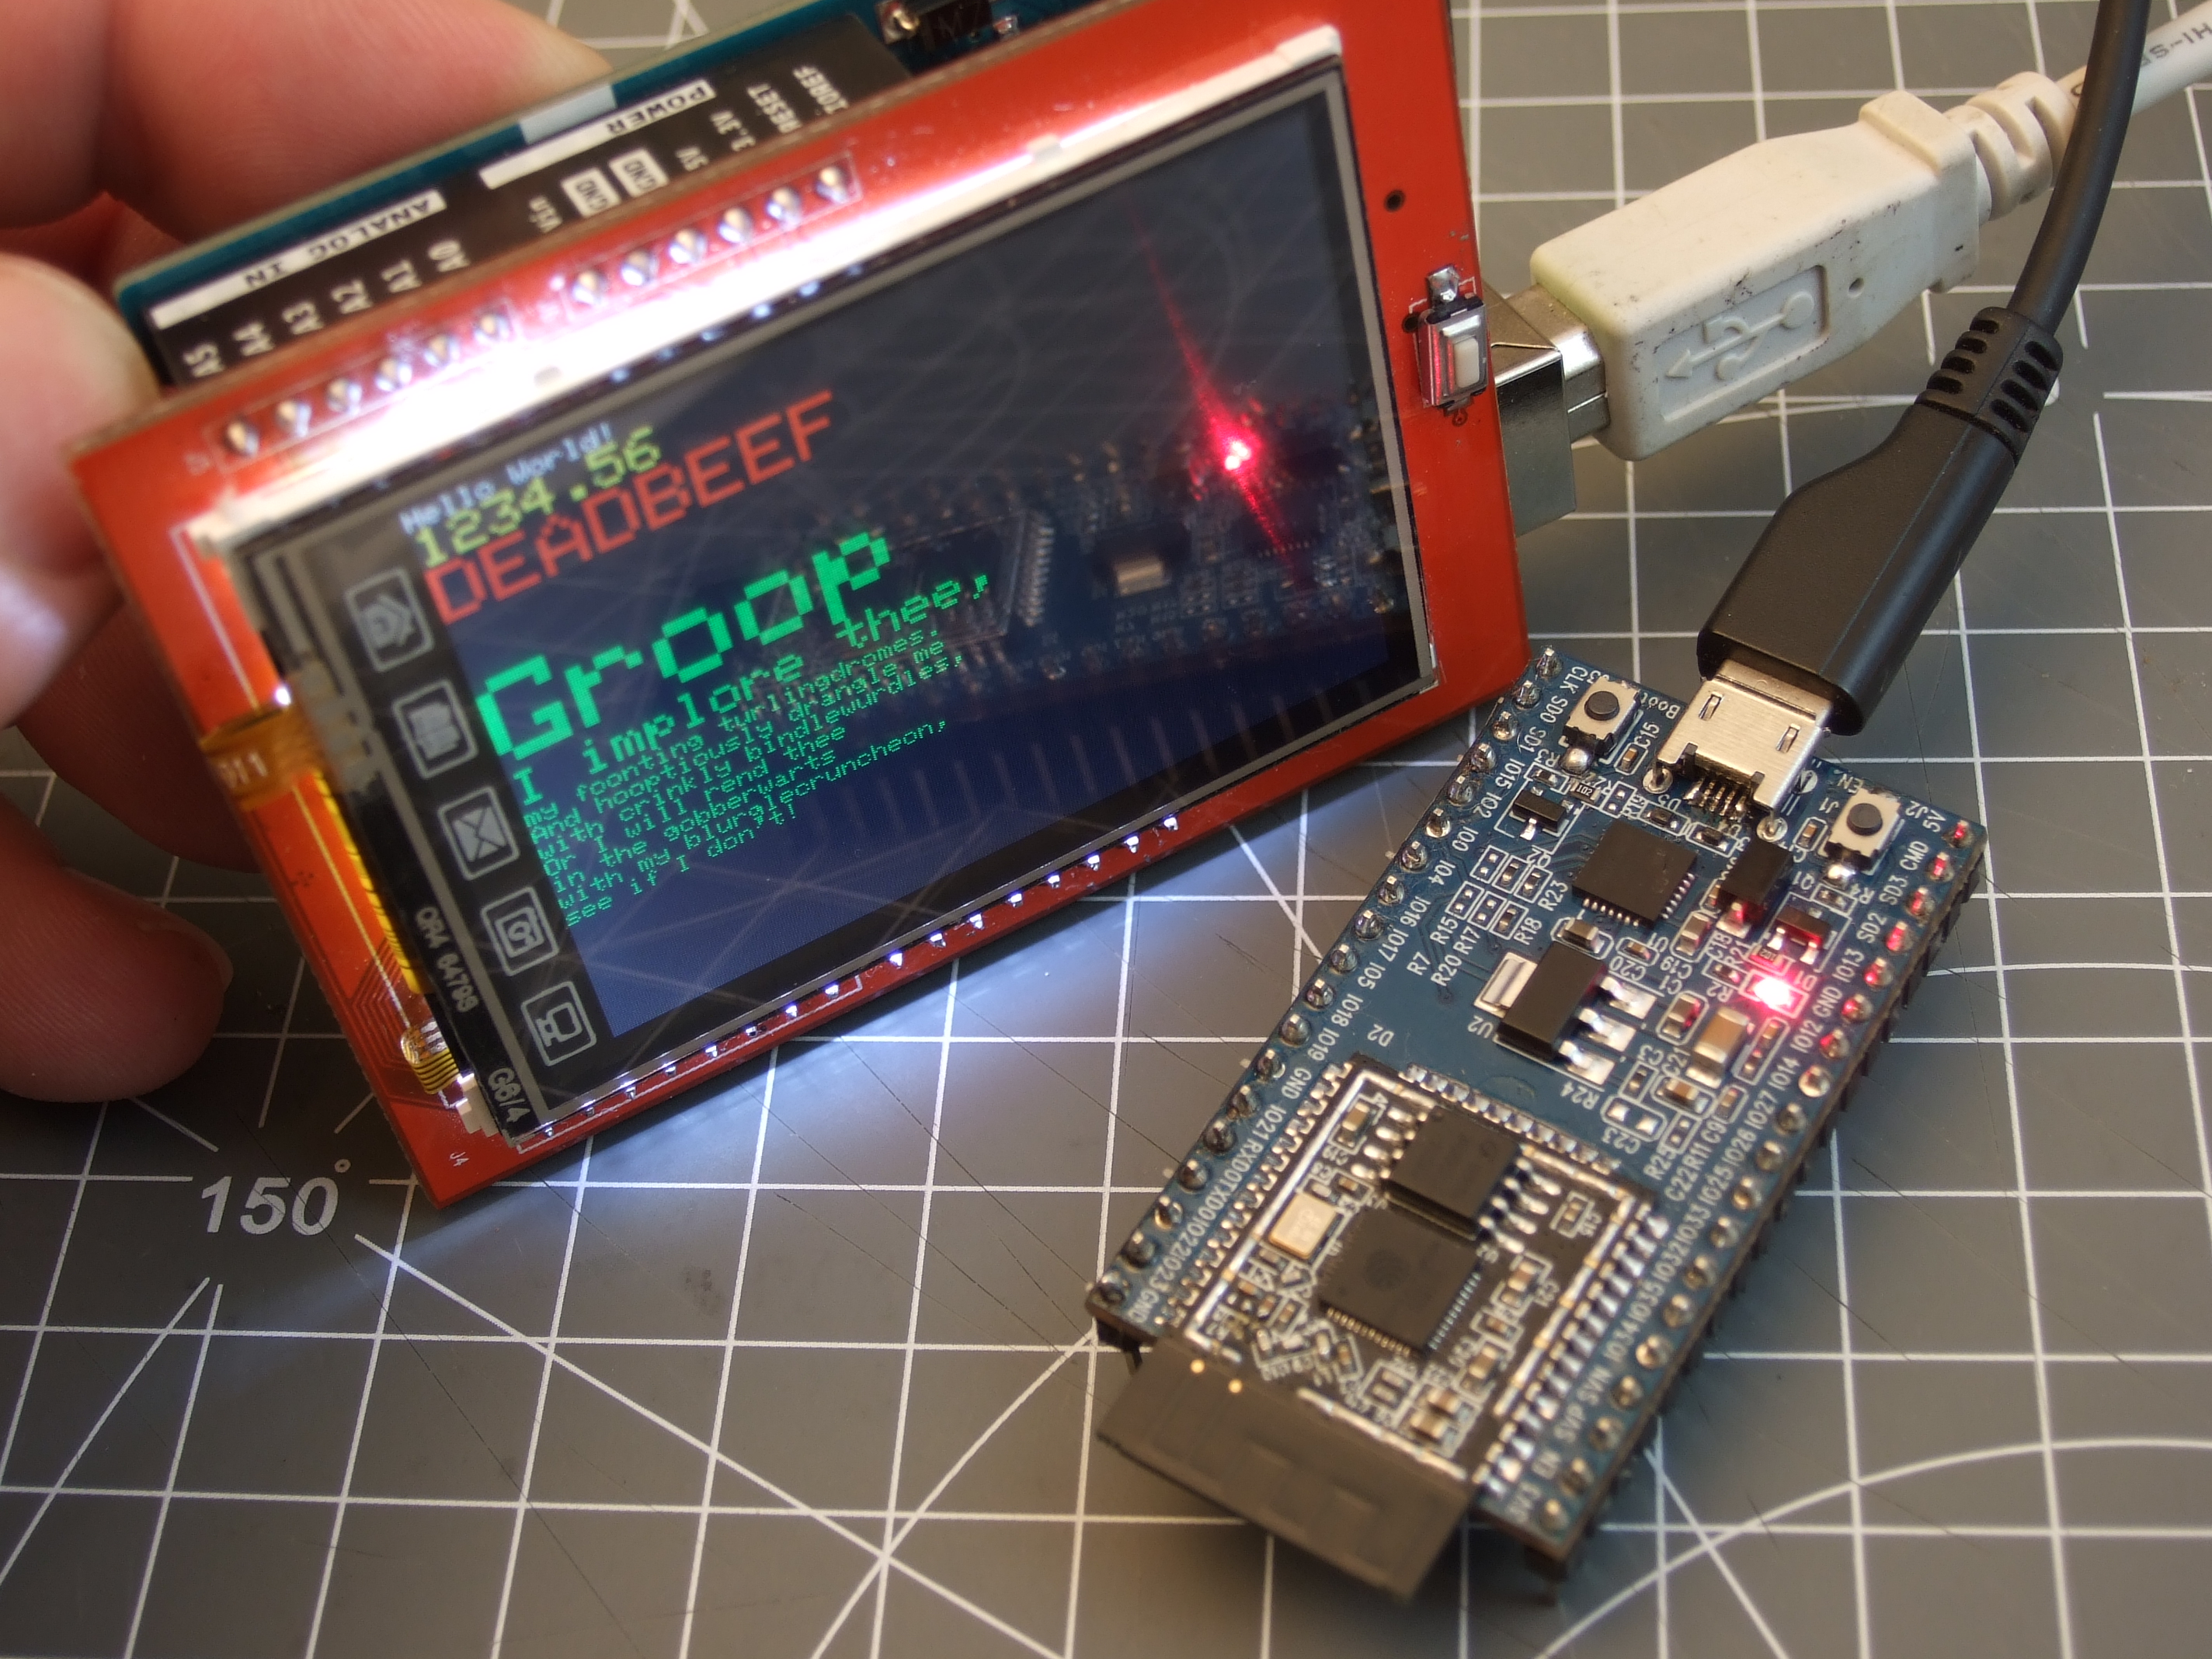
El Cheapo IL9341 TFT Display
Uno Lauging at ESP32
Since the SPI library works out of the box, the other various libraries that depend on it should as well, right? Well, kinda. I wasted an afternoon, and still failed. Why? I have a cheapo ILI9341 screen that only works with an old TFTLCD library, rather than with the nice Adafruit_ILI9341 libs. The former is so full of AVR-specific voodoo that it completely fails to compile, and is probably easier to re-write from scratch for the ESP32 than make work in its present form. The Adafruit library compiles fine, because it only depends on the SPI library, but it doesn’t work with my lousy screen.
Going repeatedly back and forth between these two libraries, my LCD experiment ended in tears and frustration: I couldn’t make either of them work. I scoped out the SPI data on a logic analyser, and it looked good, but it wasn’t drawing on the screen. At this point, a full line-by-line protocol analysis would have been needed, and that’s a few days worth of work. If I just wanted a running ILI9341 driver, I would go grab [Sprite_tm]’s NES emulator demo and use the one there, but it’s not Arduinified yet, so it’s out of bounds for the scope of this article.
DHT22 Humidity and Temperature Sensor
The Way It Should Work: Three Wires and Ten Lines of Code
Seeking a quick-and-dirty success, and beaten down by hours of hacking away for naught, I pulled a DHT22 sensor out of the eBay bin, and cloned Adafruit’s DHT library. Of course it didn’t compile straight out of the box, but there were only a couple of things that were wrong, and both turned out to be easily fixable.
ESP32’s Arduino didn’t have a microsecondsToClockCycles() function yet so I commented it out, multiplied by 240 MHz, and left a hard-coded constant in my code. This value was just used for a timeout anyway, so I wasn’t too worried. There are also some timing-critical code sections during which the Adafruit code uses an InterruptLock() function to globally enable and disable interrupts, but these functions weren’t yet implemented, so I just commented it all out and crossed my fingers.
After reassigning the data pin to one of the ESP32’s free ones (GPIO 27, FWIW), it compiled, uploaded, and ran just fine. I now know exactly how hot and humid it is up here in my office, but moreover have had a quick success with an Arduino external library, and my faith is restored.
Lessons from the Libraries
I suspect that these two examples are going to be representative of the ESP32-Arduino experience for a little while. Oddball hardware is going to take some time to get supported. Highly optimized libraries with cycle-correct timings or other microcontroller-architecture specific code in them will need to be ported over as well, despite being “Arduino” code. If you’re a code consumer, you’ll just have to wait while the wizards work their behind-the-scenes magic.
But there will also be a broad group of libraries that are written in a more-or-less device-independent way, and these should be easy enough to get working within fifteen minutes or so, as with the DHT sensor library. If you’re willing to compile, read the errors, and comment out or fix whatever shows up, some codebases will work in short order.
What’s Next? Turning Servos
Given that the Arduino-ESP32 port is brand new, indeed it’s still in progress, there is a lot of work for the community to do in getting it up to speed. Suppose that you need to drive a lot of servos, but the “Servo” library isn’t implemented yet. You’re an impatient coder. What to do? Get hacking!
The good news is that the Arduino-ESP32 libraries themselves are full of hints and examples for getting started. Open up the ESP32-specific directory that you cloned from GitHub. The usual *.cpp files provide the standard Arduino core functionality. The esp32-hal-xxx.h and esp32-hal-xxx.c files are chip-specific, and a tremendous help in taking advantage of the chip’s stranger options. For instance, esp32-hal-matrix.* gives you nice and easy access to the pin-routing matrix, which is a daunting task if you’re starting just from the datasheet.
Spot-On and Jitter-Free
But let’s get back to servos. The ESP32 chip has an intriguing hardware LED PWM peripheral that lets you assign up to sixteen channels to individual LEDS, specify the PWM frequency and bit-depth, and then control them by appropriately setting bits in hardware registers. If you think this would be hard to do by hand, you’d be right. The esp32-hal-ledc.* files provide helper functions to set up the hardware PWM generator, and with these libraries, getting a 16-bit LED fade in straight C or “Arduino” is easy. But our sights are set on servos.
To drive a hobby servo, one needs pulses between 1,000 and 2,000 microseconds each, repeated every twenty milliseconds or so. Setting the repetition rate to 50 Hz takes care of the first part, and each count is 20 ms / 65,635 ticks long, or roughly 0.3 microseconds. Setting the PWM width value to something between 3,300 and 6,500 generates pulses in the right ballpark, and my servo ran jitter-free (and a clean signal was confirmed on the oscilloscope). Here’s all it took:
That wasn’t so hard, was it? It’s not “Arduino”-style — there’s no objects or classes or methods anywhere in sight — but thanks to a straightforward and well-written hardware abstraction layer, using the very complicated peripherals is made pretty simple. Kudos to [me-no-dev] for his work on the back-end here. The HAL inside the Arduino libraries is currently the best source of code examples on many of the chip’s more esoteric and interesting peripherals.
Conclusion?
The short version of my dive into Arduino-esp32 is that there’s a lot here, even though it’s not done yet. Blinking LEDs and other simple GPIO is a given, and the core communication libraries that are already implemented worked for me: GPIO, WiFi, SPI, and I2C are up and running.
Non-core libraries are hit and miss. I suspect that a lot of them will work with just a little bit of tweaking. Others, especially those that are architecture-dependent, may not be worth the effort to port and will need to be re-written. The ESP32 has a bunch of interesting and innovative hardware peripherals onboard and there’s certainly no Arduino libraries written for them yet, but there’s some great HAL code hidden away in the Arduino-ESP32 codebase that’ll give you a head start. We could get lost in there for hours. Time to get hacking!
The ESP32 is still a new chip, but orders should be coming in soon. Have one? Want to see us put other libraries or languages through their paces? Let us know in the comments.
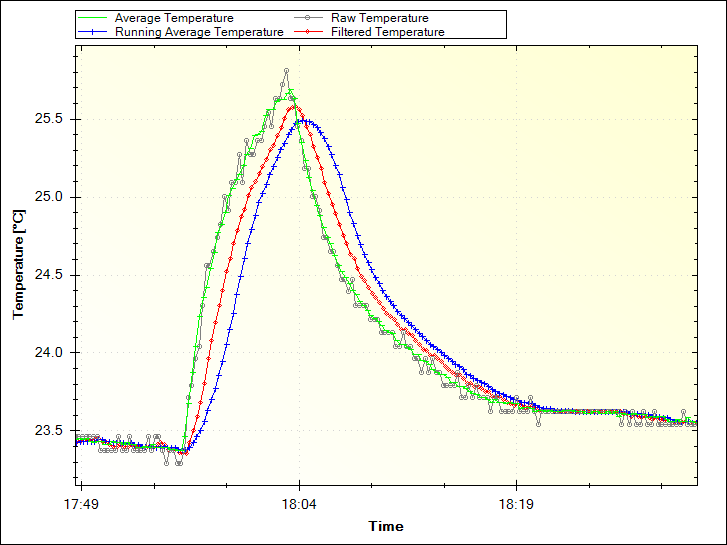
Increasing accuracy in the collection of data coming from sensors is a need that, sooner or later, Makers need to face. Paul Martinsen from MegunoLink created a tutorial to eliminate noise from sensor readings on Arduino with three simple filtering techniques.
The Averaging and Running Average techniques are easy to implement as they work by adding a number of measurements together, then dividing the total by the number of measurements. In both cases, the downside is that it can use a lot of memory.
The Exponential filter is a better solution for several reasons: it doesn’t require much memory, you can control how much filtering is applied with a single parameter, and it saves battery power because you don’t need to make many measurements at once. For this solution, they developed an Arduino filter library so you don’t need to go mad with math!
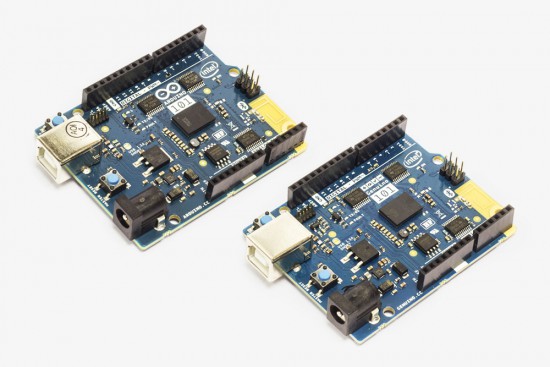
A few weeks ago, an announcement was posted on the Arduino Forum mentioning new improvements on the software side of the Arduino/Genuino 101. With this release, the board–which was developed in collaboration with Intel–is reaching its full potential, with not only better code generation but unlocking useful features to make your sketches even more interactive as well.
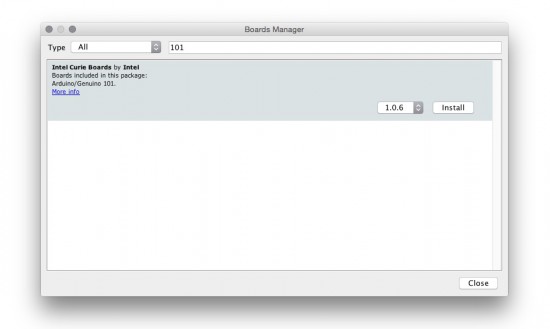
You can easily upgrade the core using the Arduino IDE’s Board Manager (pictured below), while Arduino Create users will be automatically updated, so no action is required–the cool thing about the cloud!
In more detail:
The GCC compiler has been updated to support hardware extensions to the ARC EM core in the Intel® Curie™ module. This provides significant improvements in floating point operations, bit shifting, and other operations to enhance Sketch performance.
The Arduino/Genuino 101 platform offers 2MB Flash storage onboard, which is now enabled for user sketches.
An experimental driver has been implemented to enable the I2S interface via the CurieI2S library. Connecting the I2S bus to an external DAC (digital to analog converter) allows users to play high-quality music (HiFi).
Other improvements and bug fixes:
Motion Sensor: Several sample sketches, like MotionDetection, have been implemented to demonstrate the application of the IMU data
Bluetooth LE: Several new examples for BLE peripheral library added
IMU: Correct motion detection setting implemented
Library CurieTimerOne APIs are now compatible with the TimerOne library
Libraries are files written in C or C++ which provide sketches with extra functionality, for example the ability to control an LED matrix, read an encoder, connect to a sensor, display, or module, etc. They are very useful to lower the barriers for creating amazing interactive projects and use a wide range of components. Libraries can be created by everyone and shared with the open source community!
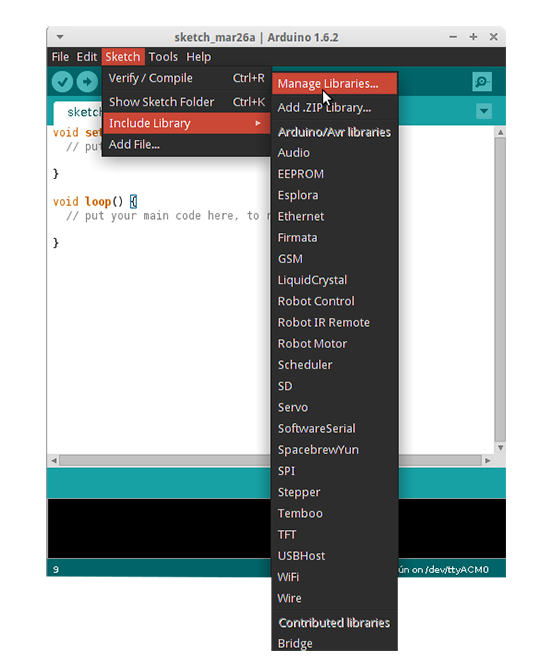
To use an existing library in a sketch you can use the Library Manager (available from IDE version 1.6.2), open the IDE and click to the “Sketch” menu and then Include Library > Manage Libraries and follow the Guide on this page.
If you want contribute with a new library for an Arduino or a Genuino board, you are welcome to do so. The best way to start is to learn how to turn a sketch into a library and when you are good at it, learn how to code with basic Arduino principles in mind in order to allow beginners to get started with Arduino easily. Follow the Guidelines at this page, here’s a preview of what you’ve find:
Be kind to the end user. Assume you are writing an API for an intelligent person who has not programmed before. Come up with a clear mental model of the concept you’re working with, and the terms and functions you will use.
Use full, everyday words. Don’t be terse with your function names or variables. Use everyday terms instead of technical ones. Pick terms that correspond to popular perception of the concept at hand. Don’t assume specialized knowledge. For example, this is why we used analogWrite() rather than pwm(). Abbreviations are acceptable, though, if they’re in common use or are the primary name for something.For example, “HTML” is relatively common and “SPI” is effectively the name of that protocol (“serial-peripheral interface” is probably too long). (“Wire” was probably a mistake, as the protocol it uses is typically called “TWI” or “I2C”.)
Avoid words that have different meanings to the general public. For example, to programmers, an error is a notification that something happened. To the general public, errors are bad things.
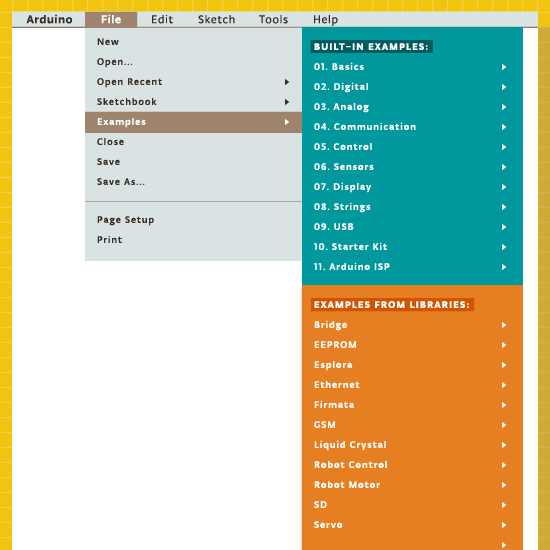
We never rest, even during summer, to serve our community and we announce today that we’ve refreshed over 150 example pages and redesigned the Examples area, offering an updated support to the current Arduino Software (IDE) Built-in and Libraries examples
Our website is a living entity that everyday hosts a huge number of visitors. They are looking for software, information, guidelines, ideas and also the right tutorial to start tinkering with their new board on a specific issue or project.
The Reference is the place where everything is documented and explained, with dry and essential information that is also included locally with every Arduino Software (IDE) installation.
Our software also includes a number of built-in sketches that help our users to quickly understand how the various functions and libraries may be used and applied to specific projects and tasks. We all started with the famous Blink and at the end of this tutorial we all felt the power and the excitement of having tamed our board with the upload of our first sketch. Keeping all these examples in good shape and updated is essential to keep you users safe from troubles or difficulties.
These examples evolve, as the libraries also evolve, therefore the sketches may be updated, amended or added. Each of these examples is commented and has an introductory part that gives a description of the purpose of the sketch and – if necessary – the instructions to put together the circuit. We know that the information provided inside the IDE and the sketches is not enough and therefore we made an area of our website where each sketch is explained and documented.
Year after year, board after board and library after library, many “hands” contributed to this area, filling gaps and amending things to reflect the Arduino Software (IDE) status. It has been an ongoing process that inevitably brought the Tutorials area in a state where many styles and ways of explaining things merged. We have big plans for our www.arduino.cc website and it is important to clean and fix the existing areas before we add new contents. This is why my first task – as editorial manager – has been the refresh and overall alignment of our Examples and Examples from Libraries pages.
We have roughly 150 pages documenting our Examples for the current products and libraries and going through them all wasn’t exactly a piece of cake: many things were checked for each example and sometimes things were outdated or missing. We also have our sister brand Genuino that got its space in all the relevant example pages. Now contents, style, look and feel and links in this area are ready for new and fresh developments.
I would like to end this post adding that this task was also a very good opportunity to refresh my knowledge about the powerful capabilities of Arduino programming language and its libraries. I had a few doubts on how to do a few things in my own sketches and going through all the examples gave me the hints I was missing.
The plain list of examples available in the Arduino Software (IDE) is just made of the sketch names, conversely in our pages you find a brief description of each of them. I suggest that you wander through these descriptions: let them excite your curiosity and inspire you!
A new version of the Arduino IDE (1.6.1) is available at the download page!
A month ago we released the version 1.6.0 of the Arduino IDE. We then received lots of feedback: issues on Github, emails on the developers mailing list and, most important, forum messages. We fixed a lot of issues, here is a brief list:
Native dialogs on MacOSX on the Java 7+ experimental version
Improved library name matching, so IRemote library won’t conflict with RobotIRremote library (thanks Paul Stoffregen)
Fixed bug on Windows when attempting to open a sketch by double clicking it
As usual, the complete list of fixes and credits is available here.
Don’t forget to report any issue you find, either on Github or on the Arduino forum: your help is very much appreciated. It doesn’t matter if you are not a tech specialist: every feedback adds value.
We are already working on release 1.6.2, with some very useful features and user experience improvements. Stay tuned!
Planet Arduino is, or at the moment is wishing to become, an aggregation of public weblogs from around the world written by people who develop, play, think on Arduino platform and his son. The opinions expressed in those weblogs and hence this aggregation are those of the original authors. Entries on this page are owned by their authors. We do not edit, endorse or vouch for the contents of individual posts. For more information about Arduino please visit www.arduino.cc
You are currently browsing the archives for the Libraries category.