Posts | Comments

Planet Arduino

Archive for the ‘arduino due’ Category

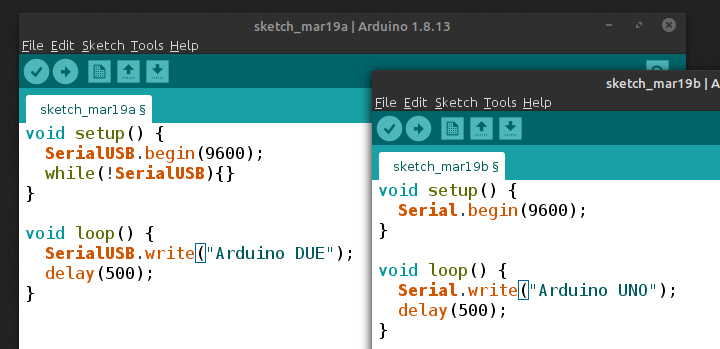
[Andrew] wonders why the SerialUSB() function on the Cortex M3-based Arduino Due is so much faster than Serial() on the Uno or Nano, and shares his observations in this short video. He sets up an experiment with a simple sketch on both boards and uses Wireshark to evaluate the results.

Data is sent in the USB packets in groups of four characters on the ATmega-based boards, but the entire string is put in a packet on the Due board. If you look under the hood, the answer is hiding in plain sight. While the Arduino family of boards connect to your computer using a USB virtual serial port, the ATmega ones have an actual serial connection on-board. For instance, on the Nano there is an FT232RL between the USB connector and the microprocessor (on an Arduino Uno board, a small ATMEGA8U2 is used instead of an FTDI chip, but the concept is the same). On the Arduino Due, the USB connects directly to the SAM3X8E processor.

This concept doesn’t apply only to Arduino boards, of course. On any serial connection between two computers, when a virtual USB device is used on both sides of the link (no actual serial signals involved), the serial baud rate is a fictional thing — data transfer speeds depends on USB alone. We are curious why the packets contain four characters in [Andrew]’s ATmega Wireshark captures — why not 1, 2, or 10? Is this something that can be controlled by the programmer, or is it fixed by the protocol and/or the FTDI chip? If you have the answer, let us know in the comments below.

Watching the advancement of technology is interesting enough by looking at improved specifications for various components as the years go by. But clock speeds, memory size, and power consumption are all fairly intangible compared to actual implementation of modern technology when compared to days of yore. For example, this $40 microcontroller can do what a video game console was able to do in the 80s for a tenth of the (inflation adjusted) price.

The NESDUE is an emulator for NES games which runs completely on an Arduino Due. The Arduino does have some limitations that have to be worked around to get the Nintendo to work, though. For one, it needs to be overclocked to be playable and it also needs a workaround to get past the memory limit of 96 kB of RAM. From there, a small screen is wired up along with a controller (from a Super Nintendo) and the gaming can begin.

This is an impressive feat for an Arduino platform to accomplish, especially with the amount of memory tweaking that has to happen. This might be the most advanced gaming system available that runs everything on an Arduino, right up there with the Arduinocade which can provide an arcade-like experience straight from the Arduino as well.

Vacuum fluorescent displays (VFDs) have a distinct cool blue-greenish glow, and were once used in a wide range of devices, from VCRs to microwave ovens and even car dashboards. Although extremely popular way back when, they can be more difficult to source today. In the video below, Scotty Allen of the Strange Parts YouTube channel takes on the challenge of getting a $600 ISE (now Noritake) display up and running with an Arduino Due.

The process starts with examining the datasheet to find that the Due’s 3.3V logic can indeed drive the 20×2 character display, then he constructs a custom adapter board to do just that. After more datasheet lurking, head scratching and hacking, he finally got it to show “Hello world!” toward the end of the clip, along with some simple animations. 

The VFD control is part of a larger build that will be revealed in the future, and a good reminder of just how much trial and error is needed to succeed in making something awesome.

[Matthew Peverill] is a busy PhD student who loves to make time for a little Kerbal Space Program. He was tired of using such pedestrian controls as a keyboard and mouse for such important work, and wanted something a little more like they have down in Houston.

For this project, he’s focusing on the inputs more than anything else. The intent is not to play solely from this control panel, but to strike a balance between fun inputs and accurate control without screwing up favorite game play modes. It’s based on an Arduino Due, and uses some custom I²C multiplexer boards to wrangle all the various inputs.

We love the look of this panel, especially the appropriately Futura-fonted labels and all the toggle switches. Matthew took inspiration and guidance for this project from a couple of sources, so he’s definitely following in the Hackaday spirit of standing on the shoulders of giants. He’s moved through two prototypes and is working out the bugs before making the next one. The final version will be made of backlit transparent acrylic, and you know we can’t wait to see that.

What, you don’t have access to a laser cutter? Just build a control panel into an old Heathkit trainer or something.

Smartwatches can keep us informed of incoming information at a glance, but responding still takes the use of another hand, potentially occupied by other tasks. Researchers at Dartmouth College are trying to change that with their new WrisText system.

The device divides the outside of a Ticwatch 2 into six sections of letters, selected by the movement of one’s wrist. As letters are chosen, possible words are displayed on the screen, which are then selected automatically, or by rubbing and tapping gestures between one’s finger and thumb. 

The prototype employs an Arduino DUE to pass information to a computer, along with proximity and piezo sensors to detect hand and finger movements. 

We present WrisText – a one-handed text entry technique for smartwatches using the joystick-like motion of the wrist. A user enters text by whirling the wrist of the watch hand, towards six directions which each represent a key in a circular keyboard, and where the letters are distributed in an alphabetical order. The design of WrisText was an iterative process, where we first conducted a study to investigate optimal key size, and found that keys needed to be 55o or wider to achieve over 90% striking accuracy. We then computed an optimal keyboard layout, considering a joint optimization problem of striking accuracy, striking comfort, word disambiguation. We evaluated the performance of WrisText through a five-day study with 10 participants in two text entry scenarios: hand-up and hand- down. On average, participants achieved a text entry speed of 9.9 WPM across all sessions, and were able to type as fast as 15.2 WPM by the end of the last day.

More information can be found in the project’s research paper, or you can see it demonstrated in the video below.

When the Power Glove was released in the early 1990s, the idea that you could control games with hand motions was incredible, but like the Virtual Boy that followed years later, the hardware of the day just couldn’t keep up. Today, hardware has finally gotten to the point where this type of interface could be very useful, so Teague Labs decided to integrate a Power Glove with an HTC Vive VR headset.

While still under development, the glove’s finger sensors have shown great promise for interactions with virtual touchscreen devices, and they’ve even come up with a game where you have to counter rocks, paper, and scissors with the correct gesture.

Making this all possible is the Arduino Due, which supports the library for communicating with the Vive tracker.

We took a Power Glove apart, 3D scanned the interfacing plastic parts and built modified parts that hold the Vive Tracker and an Arduino Due on the glove. After some prototyping on a breadboard, we designed a shield for the Due and etched it using the laser-cutter transfer technique. We then soldered all components and spray-painted the whole shield to protect the bare copper. After mounting the tracker and tweaking the code by matzmann666, we had the glove work.

If you’d like to see the details of what has been accomplished so far, check out the Teague Labs team’s design files and code on GitHub.

Animated GIF  - Find & Share on GIPHY

Redditor “xmajor9x” has spent several weeks building a three-legged machine to balance a metal ball on top of a plate. The device uses three servos attached to a rectangular surface with linkages that translate servo position into linear displacement of the table. This allows it to keep the ball centered, or rotate around the perimeter in a circle or square pattern.

An Arduino Due controls the ball using a PID loop, and the ball’s position is sensed not by an external camera, but by the top “plate,” which is actually made out of a resistive touchscreen. Although this adds a very unique element, it means that the ball on top must be quite heavy to be reliably tracked, and its creator is considering switching to a computer vision system in the future.

Be sure to check out the project’s GitHub page for code and more info on the build!

Animated GIF  - Find & Share on GIPHY

If you’ve seen color sensors such as the TCS34725,  you may have considered them for projects that can pick out one colored object over another. On the other hand, if you were to take one of these sensors, mount them to an Arduino-driven plotter, and then take readings in an X/Y plane, you’d have all the elements needed for a simple single-pixel scanner.

In the video seen below, Kerry D. Wong does just this using his hacked HP 7044A plotter to scan a picture, recording RGB color values in a 128 x 128 grid. As the device scans, the Arduino Due used for control passes these values to a computer, which assembles them together into a low-resolution image.

You can find more details on the project, including its code, in Wong’s blog post here.

To address the limitations of today’s fixed-face watches, researchers have come up with an actuated smartphone concept that physically moves itself using an Arduino Due, Bluetooth and several motors.

Receiving Internet notifications has gone from using a computer, to checking them on your smartphone, to now simply seeing them come in on your wearable device. On the other hand, you still have to rotate your wrist into the right position to see the screen. Worse yet, if you want to show others what is on your wrist, you may even have to twist your arm awkwardly.

Fortunately, there is a possible solution to this scourge in the form of Cito, which bills itself as “An Actuated Smartwatch for Extended Interactions.” This design can move in five different directions–rotates, hinges, translates, orbits and rises–potentially making viewing more convenient, or even providing haptic feedback. Prototype electronics are housed inside a control box on the upper arm, but presumably would become much smaller in a production version.

You can see the team’s entire paper here, or read this write-up for a more involved summary.

Photo: Jun Gong

We’ve all enjoyed looking up at a clear night sky and marveled at the majesty of the stars. Some of us have even pointed telescopes at particular celestial objects to get a closer view. Anyone who’s ever looked at anything beyond Jupiter knows the hassle involved.  It is most unfortunate that the planet we reside on happens to rotate about a fixed axis, which makes it somewhat difficult to keep a celestial object in the view of your scope.

It doesn’t take much to strap a few steppers and some silicon brains to a scope to counter the rotation of earth, 
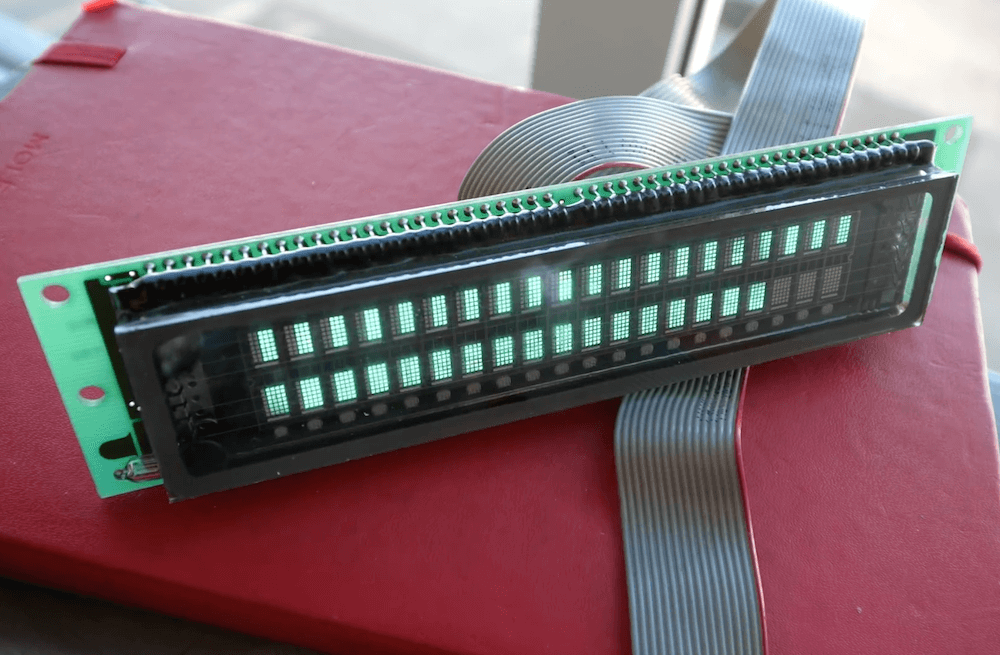
and such systems have been available for decades. They are unfortunately quite expensive. So [Dessislav Gouzgounov] took matters into his own hands and developed the rDuinoScope – an open source telescope control system.

Based on the Arduino Due, the systems stores a database of 250 stellar objects. Combined with an RTC and GPS, the rDunioScope can locate and lock on to your favorite nebula and track it, allowing you to view it in peace. Be sure to grab the code and let us know when you have your own rDuinoScope set up!


Filed under: Arduino Hacks


  • Newsletter

    Sign up for the PlanetArduino Newsletter, which delivers the most popular articles via e-mail to your inbox every week. Just fill in the information below and submit.

  • Like Us on Facebook