[Forsyth Creations] started by CAD-modeling the chassis right on top of a still from the video. The entire body is 3D-printed in four large pieces, which took several days because each piece took around 24 hours. Inside the car there’s an Arduino brain driving a motor in the back and a servo in the front. This bad boy runs on a couple of rechargeable battery packs and can be controlled with either a Wii balance board or a PS2 controller. This thing really moves, although it doesn’t quite reach 100MPH. Watch it zoom around in the video after the break.
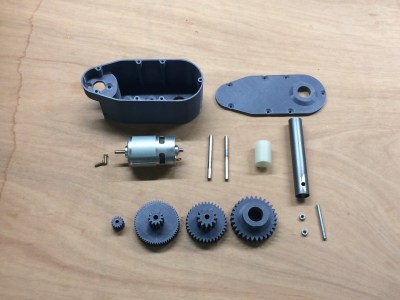
This servo/gear reduction was assembled with almost all 3D-printed parts. Apart from a brushed 36 V DC-motor, a stainless steel shaft, and screws for holding the servo together, the only other non-printed part is the BTS7960B motor driver.
Some interesting stats about the plastic servo – its stall torque is about 55 kg/cm, reaching a peak current draw of 18 A when using a 6s LiPo battery outputting 22-24 V. The shaft rotates using two 20 mm holes and lubrication. (Ball bearings were originally in the design, but they didn’t arrive on time for the assembly.)
The holes of the gears are 6.2 mm in diameter in order to fit around the shaft, although some care is taken to sand or fill the opening depending on the quality of the 3D print.
This isn’t [Brian Brocken]’s only attempt at 3D-printing gears. He’s also built severalcrawling robots, a turntable, and a wind up car made entirely from acrylic. The .stl files for the project are all available online for anyone looking to make their own 3D-printed servo gears.
Salvaging a beefy motor is one life’s greatest pleasures for a hacker, but, when it comes to using it in a new project, the lack of specs and documentation can be frustrating. [The Post Apocalyptic Inventor] has a seemingly endless stockpile of scavenged motors, and decided to do something about the problem.
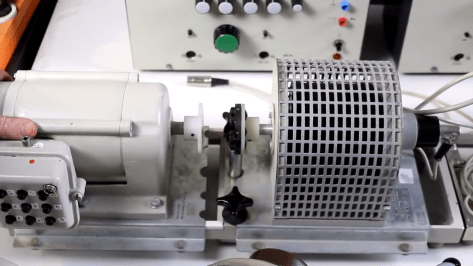
Once again applying his talent for junk revival, [TPAI] has spent the last year collecting, reverse-engineering and repairing equipment built in the 1970s, to produce a complete electric motor test setup. Parameters such as stall torque, speed under no load, peak power, and more can all easily be found by use of the restored test equipment. Key operating graphs that would normally only be available in a datasheet can also be produced.
The test setup comprises of a number of magnetic particle brakes, combined power supply and control units, a trio of colossal three-phase dummy loads, and a gorgeously vintage power-factor meter.
Motors are coupled via a piece of rubber to a magnetic particle brake. The rubber contains six magnets spaced around its edge, which, combined with a hall sensor, are used to calculate the motor’s rotational speed. When power is applied to the coil inside the brake, the now magnetised internal powder causes friction between the rotor and the stator, proportional to the current through the coil. In addition to this, the brake can also measure the torque that’s being applied to the motor shaft, which allows the control units to regulate the brake either by speed or torque. An Arduino slurps data from these control units, allowing characteristics to be easily graphed.
If you’re looking for more dynamometer action, last year we featured this neatly designed unit – made by some Cornell students with an impressive level of documentation.
We love the doors on Star Trek’s Enterprise. We should have known they were human-operated though because they were too smart. They would wait for people, or fail to open when someone was thrown against them during a fight. [SieuweE] has a much more practical automatic door that he calls ArduDoor.
You might guess from the name it uses an Arduino. It also uses a windshield wiper motor which is perfect since it is high-torque and low speed. You might even be able to pick one up for little or nothing if you frequent the junkyards.
The downside is that it takes 12A of current to operate the motor at 12V, however that’s the price to pay for a high-torque motor. [SieuweE] is using an ATX power supply to run it which isn’t terribly convenient, but is easy to source and use.
The Arduino and ultrasonic sensor are pretty standard fare, but the welded door opening mechanism is where the real work lies in this project. Of course, your door will vary so you might have to get a little creative if you want to duplicate the ArduDoor.
Ok, this one is a bit bizarre, but in perfect keeping with the subject matter: a talking toilet ripped from the pages of the Captain Underpants children’s books. Hackaday.io user [hamblin.joe]’s county fair has a toilet decorating contest and at the suggestion of their neighbour’s son, [hamblin.joe] hatched a plan to automate the toilet using an Arduino in the fashion of the hero’s foes.
Two Arduinos make up this toilet’s brains, an Adafruit Wave Shield imbues it with sound capabilities, and a sonic wave sensor will trigger the toilet’s performance routine when someone approaches. A windshield wiper motor actuates the toilet bowl lid via a piece of flat iron bar connected to a punched angle bracket. Installing the motor’s mount was a little tricky, since it had to be precisely cut so it wouldn’t shift while in the toilet bowl. A similar setup opens the toilet tank’s lid, but to get it working properly was slightly more involved. Once that was taken care of there was enough room left over for a pair of 12V batteries and a speaker. Oh, and a pair of spooky eyes and some vicious looking teeth.
A good robot is always welcome around here at Hackaday, and Hackaday.io user [igorfonseca83]’browser-controlled ‘bot s is no exception. Felines beware.
[igorfonseca83] — building on another project he’s involved in — used simple materials for the robot itself, but you could use just about anything. His goal for this build was to maximize accessibility in terms of components and construction using common tools.
An Arduino Uno gets two D/C motors a-driving using an H-bridge circuit — granting independent control the wheels — an ESP8266 enabling WiFi access, with power provided by a simple 5V USB power bank. [igorfonseca83] is using an Android smartphone to transmit audio and video data; though this was mostly for convenience on his part, a Raspberry Pi and camera module combo as another great option!
A few workarounds notwithstanding — considering some components in this particular configuration do not directly connect to each other — a bunch of code, set up of a website to act as a controller that accesses the IP address of the ESP8266, and an app installed on the audio/video streaming smartphone later, and you have a cat-stalking robot ready to rock. There are, of course, other uses for fpv robots, but with arguably less entertaining results.
Feel like taking a long walk, but can’t be bothered with carrying your drinks? Have no fear, this “Follow Me” Cooler Bot is here!
Really just a mobile platform with a cooler on top, the robot connects to smartphone via Bluetooth, following it using GPS. Making the platform involves a little woodworking skill, and an aluminium hub with a 3D-printed hub adapter connects the motors to a pair 6″ rubber wheels with a swivel caster mounted at the rear. A pocket in the platform’s base houses the electronics.
The Arduino Uno — via an L298n motor driver — controls two 12V DC, brushed and geared motors mounted with 3D printed brackets, while a Parallax PAM-7Q GPS Module in conjunction with an HMC 5883L compass help the robot keep its bearing. A duo of batteries power the motors and the electronics separately to prevent any malfunctions.
Controlling the platform is done on an Android smartphone using Blynk. Ease of use and the ability to set basic commands to be sent to the robot over a desired connection type made it ideal for this helpful little ‘bot.
There isn’t anything more complicated going on — like obstacle avoidance or sophisticated pathfinding — so you kinda need a clear line between you and the cooler. Still, beverage storage is a great feature to add to you tag-along robot companion. It seems to work just fine.
Prosthetic and assistive technologies have come have come a long way in recent years. When there are not only major medical research organizations, but individuals getting on board designing tools to improve the lives of others? That’s something special. Enter a homebrew essay into this field: ExoArm.
Attached to the body via what was available — in this case, the support harness for a gas-powered weed-eater — which distributes the load across the upper body and an Arduino for a brain, ExoArm designer [Kristjan Berce] has since faced roadblocks with muscle sensors meant to enable more instinctive control. So — for now — functionality is limited to a simple up and down motion controlled by two switches. It is worth noting that the down switch is currently mounted in such a way that when the user moves their arm down, the ExoArm follows suit, so there is some natural feel to using the arm in its present iteration.
Developed with the elderly — and others who need a boost to physical strength to live a normal life — in mind, this prototype is able to curl up to 10kg in excess of its own weight. Presently, the only motor is on the elbow joint — granting a basic range of motion — with one adapted to the shoulder joint forthcoming! And, costing only $100, it’s a heck of a start.
Building an electric motor from a coil of wire, some magnets, and some paper clips is a rite of passage for many budding science buffs. These motors are simple brushed motors. That is, the electromagnet spins towards a permanent magnet and the spinning breaks the circuit, allowing the electromagnet to continue spinning from inertia. Eventually, the connection completes again and the cycle starts over. Real brushed motors commutate the DC supply current so that the electromagnet changes polarity midway through the turn. Either way, the basic design is permanent magnets on the outside (the stationary part) and electromagnets on the inside (the rotating part).
Brushless motors flip this inside out. The rotating part (the rotor) has a permanent magnet. The stationary part (the stator) has multiple electromagnets. By controlling the electromagnets, the rotor spins. With no brushes, these motors are often more efficient, they don’t generate as much electrical noise, and there is no danger of brushes wearing out. In addition, the electromagnets staying put make the motor easier to wire and, if needed, easier to cool the electromagnets. The principle of operation is similar to a stepper motor. Steppers are usually optimized for small precise steps. Brushless motors are optimized for spinning, not stepping.
[Axbm] built a clever brushless motor out of little more than PVC pipe, some magnets, wire, and iron rods. The plan is simple: construct a PVC frame, build a rotor out of PVC and magnets, and mount electromagnets on the frame. An Arduino and some FETs drive the coils, although you could drive the motors using any number of methods. You can see the whole thing work in the video below.
One interesting tidbit is the winding of the coils. [Axbm] put 600 turns of wire around each iron core (soft iron is best, although you can use stainless steel, which is easier to find). Instead of cutting the wire when done, he simply moved on to wind the next magnet. To keep the magnetic fields in the proper orientation, the winding of one magnet has to be in the opposite direction of the previous winding. So if you wind one magnet clockwise, the next magnet must be anticlockwise.
Want to really understand how something works? Make one yourself. That’s the approach that Reddit user [Oskarbjo] took with this neat electric motor build. He made the whole thing from scratch, using an Arduino, 3D printing, and ample quantities of wire to create a solenoid motor. This transforms the linear force of a solenoid, where a magnet is moved by a magnetic field, into rotary force. It’s rather like an internal combustion engine, but driven by electricity instead of explosions. Hopefully.
[Oskarbjo]’s engine seems to work, including a rather neat mechanism to detect the rotation of the shaft and relay that back to the controller. He hasn’t posted much detail in the build process, unfortunately, but did say that “If you’d want to build something similar I can probably help you out a bit, but half the fun is coming up with your own solutions.” Amen to that. We’ve seen a few neatsolenoidmotor builds, but this one wins points for starting from scratch. There is an Instagram video of the motor running after the break.
Planet Arduino is, or at the moment is wishing to become, an aggregation of public weblogs from around the world written by people who develop, play, think on Arduino platform and his son. The opinions expressed in those weblogs and hence this aggregation are those of the original authors. Entries on this page are owned by their authors. We do not edit, endorse or vouch for the contents of individual posts. For more information about Arduino please visit www.arduino.cc
You are currently browsing the archives for the motor category.