Remote control your electrical devices through your local network or internet. The circuit contains one output (Relay) and one input (isolated input). The whole project was built by using arduino nano platform and an ENC28J60 ethernet module. It can be used the W5100 ethernet module instead of ENC28J60, by replacing the UIPEthernet library to Ethernet library.
Moreover, the control is made from the Android application I wrote and it’s available on Google Play (https://play.google.com/store/apps/details?id=com.serasidis.NetworkRelay).
The schematic diagram, arduino sketch, photos and demonstration video is on my web site:
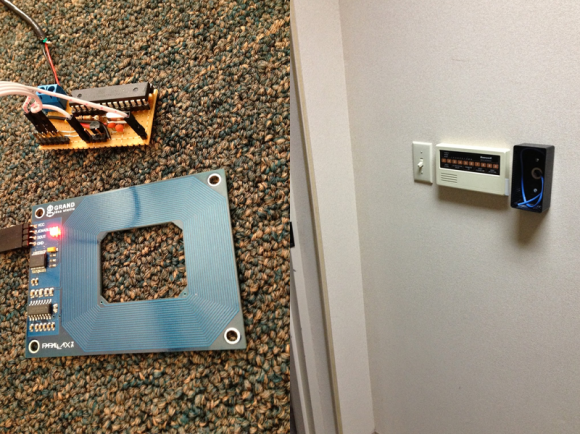
[Shawn] recently overhauled his access control by fitting the doors with some RFID readers. Though the building already had electronic switches in place, unlocking the doors required mashing an aging keypad or pestering someone in an adjacent office to press a button to unlock them for you. [Shawn] tapped into that system by running some wires up into the attic and connecting them to one of two control boxes, each with an ATMega328 inside. Everything functions as you would expect: presenting the right RFID card to the wall-mounted reader sends a signal to the microcontroller, which clicks an accompanying relay that drives the locks.
You may recall [Shawn's] RFID phone tag hack from last month; the addition of the readers is the second act of the project. If you’re looking to recreate this build, you shouldn’t have any trouble sourcing the same Parallax readers or building out your own Arduino on a stick, either. Check out a quick walkthrough video after the jump.
[Richard]‘s wife scored an Evenheat glass-fusing kiln, but the 20-year-old temperature controller was broken. He could have simply ordered a replacement controller, but that kind of problem solving doesn’t get you on Hack a Day. His wife wanted more control over the kiln and he convinced her that building their own was the way to go. Thus, the Meltinator 9000 was born.
[Richard]‘s design uses an Arduino Uno and an Adafruit display shield, protoshield, and thermocouple reader board. He built a simple relay driver with a resistor, BJT, and a diode and connected it to pin 13 and its built-in indicator. To [Richard]‘s delight, all of this fit in the original enclosure.
[Richard]‘s software provides 25 fusing schedules with ten steps apiece. Each step has a target temperature, rate of temperature change, and a hold time which can be increased on the fly. He ran a test program that heated the kiln to 1500°F at a rate of 2550°F/hour. He then cooled it to 500°F at a rate of 1000°F/hour, which took longer than he thought. The good news is that the kiln is well-insulated! [Richard] has the software available on his GitHub.
Okay, so he doesn’t have Grandma riding in it that we know of, but [zim] recently decided to turn a Jazzy mobility chair into “a radio-controlled platform for mischief”. RC offers more range than wifi or bluetooth, and he was able to find a reasonably priced secondhand radio on Craigslist. However, he found out that in the event of signal loss, the receiver keeps sending the last commands to the speed controller. [zim] didn’t want his 150 lb (68kg) mischief platform getting loose, so he devised a fail-safe that cuts power to the motor when the signal is lost.
[zim] discovered that the receiver returns channel 3 (the throttle) to a preset condition whenever the signal is lost. He used a 24V HVAC relay controlled by an Arduino Nano to sample the PW on channel 3 and shut it off when either the throttle or the signal are cut.
[Paulo's] garden lights are probably a bit more accurately automated than anyone else’s on the block, because they use latitude and longitude clock to decide when to flip the switch. Most commercial options (and hobbiest creations) rely on mechanical on/off timers that click on an off every day at the same time, or they use a photosensitive element to decide it’s dark enough. Neither is very accurate. One misplaced leaf obscuring your light-dependent resistor can turn things on unnecessarily, and considering the actual time of sunset fluctuates over the year, mechanical switches require constant adjustment.
[Paulo's] solution addresses all of these problems by instead relying on an algorithm to calculate both sunrise and sunset times, explained here, combined with swiftek’s Timelord library for the Arduino. The build features 4 7-segment displays that cycle through indicating the current time, time of sunset and of sunrise. Inside is a RTC (real time clock) with battery backup for timekeeping along with an Omron 5V relay to drive the garden lamps themselves. This particular relay comes with a switch that can force the lights on, just in case.
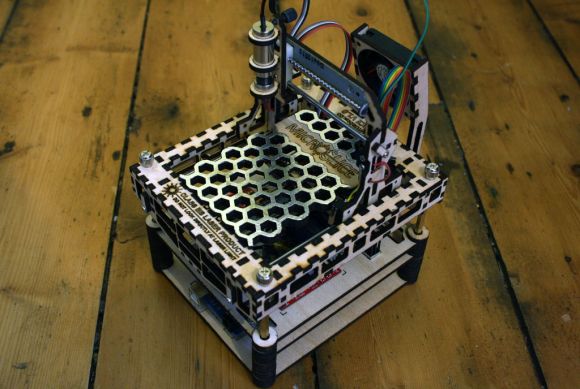
[SilverJimmy] already had a full-sized 50 watt laser cutter, but he decided to try his hand at putting together something smaller and microcontroller-driven. The result is this adorable little engraver: the MicroSlice.
To keep the design simple, [SilverJimmy] opted for a fixed cutting table, which meant moving the cutting head and the X-Axis as a unit along the Y-Axis. The solution was to take inspiration from gantry cranes. He snagged a couple of stepper motors with threaded shafts, designed the parts in Inkscape, then fired up his full-size cutter to carve out the pieces. An Arduino Uno and the relays for the laser and fans sit on the MicroSlice’s bottom platform, and two EasyDriver motor controllers sit above them on the next layer.
Swing by the Instructables for more details including the source code, and to see a video of the engraver below. [SilverJimmy] sourced his laser from eBay, but check out the engraver from earlier this year that used a DVD diode.
Yep – One of those! This Instructable extends my Arduino Ethernet controller to control a set of up to 6 relays, but that’s not the neat bit. The neat bit is that there is a web based state machine in the AtMega chip so that the relays will operate in whatever sequence with whatever timing you want – all by themselves. This allows you to have a set of relays connected to the end of a piece of Ethernet cable that can be accessed from a web browser anywhere from your house.
Over the last few years I’ve been writing a few Arduino tutorials, and during this time many people have mentioned that I should write a book. And now thanks to the team from No Starch Press this recommendation has morphed into my new book – “Arduino Workshop“:
Although there are seemingly endless Arduino tutorials and articles on the Internet, Arduino Workshop offers a nicely edited and curated path for the beginner to learn from and have fun. It’s a hands-on introduction to Arduino with 65 projects – from simple LED use right through to RFID, Internet connection, working with cellular communications, and much more.
Each project is explained in detail, explaining how the hardware an Arduino code works together. The reader doesn’t need any expensive tools or workspaces, and all the parts used are available from almost any electronics retailer. Furthermore all of the projects can be finished without soldering, so it’s safe for readers of all ages.
The editing team and myself have worked hard to make the book perfect for those without any electronics or Arduino experience at all, and it makes a great gift for someone to get them started. After working through the 65 projects the reader will have gained enough knowledge and confidence to create many things – and to continue researching on their own. Or if you’ve been enjoying the results of my thousands of hours of work here at tronixstuff, you can show your appreciation by ordering a copy for yourself or as a gift
You can review the table of contents, index and download a sample chapter from the Arduino Workshop website.
Arduino Workshop is available from No Starch Press in printed or ebook (PDF, Mobi, and ePub) formats. Ebooks are also included with the printed orders so you can get started immediately.
04/07/2013 – (my fellow) Australians – currently the easiest way of getting a print version is from Little Bird Electronics.
In the meanwhile have fun and keep checking into tronixstuff.com. Why not follow things on twitter, Google+, subscribe for email updates or RSS using the links on the right-hand column? And join our friendly Google Group – dedicated to the projects and related items on this website. Sign up – it’s free, helpful to each other – and we can all learn something.
Over the last few years I’ve been writing a few Arduino tutorials, and during this time many people have mentioned that I should write a book. And now thanks to the team from No Starch Press this recommendation has morphed into my new book – “Arduino Workshop“:
Although there are seemingly endless Arduino tutorials and articles on the Internet, Arduino Workshop offers a nicely edited and curated path for the beginner to learn from and have fun. It’s a hands-on introduction to Arduino with 65 projects – from simple LED use right through to RFID, Internet connection, working with cellular communications, and much more.
Each project is explained in detail, explaining how the hardware an Arduino code works together. The reader doesn’t need any expensive tools or workspaces, and all the parts used are available from almost any electronics retailer. Furthermore all of the projects can be finished without soldering, so it’s safe for readers of all ages.
The editing team and myself have worked hard to make the book perfect for those without any electronics or Arduino experience at all, and it makes a great gift for someone to get them started. After working through the 65 projects the reader will have gained enough knowledge and confidence to create many things – and to continue researching on their own. Or if you’ve been enjoying the results of my thousands of hours of work here at tronixstuff, you can show your appreciation by ordering a copy for yourself or as a gift
You can review the table of contents, index and download a sample chapter from the Arduino Workshop website.
Arduino Workshop is available from No Starch Press in printed or ebook (PDF, Mobi, and ePub) formats. Ebooks are also included with the printed orders so you can get started immediately.
In the meanwhile have fun and keep checking into tronixstuff.com. Why not follow things on twitter, Google+, subscribe for email updates or RSS using the links on the right-hand column? And join our friendly Google Group – dedicated to the projects and related items on this website. Sign up – it’s free, helpful to each other – and we can all learn something.
[Craig Turner] wrote in to tell us about the wireless fireworks controller he just finished building. It has eight total channels and offers the kind of safety features we like to see when working with explosives.
The image above details the launcher side of the project. The project box houses an Arduino which is powered by a 9V battery. To enable this base station the key lying on top of the project box must be inserted and turned to the on position. To the left is the 12V battery which is used to supply the igniters via a set of eight relays. In the demo video after the break [Craig] is using nichrome wire to demonstrate, but we’ve even see projects that actually burn up resistors to light the fireworks.
The system uses RF12 wireless modules to communicate with the control panel. That also has an Arduino, along with a number pad. After switching on the power the operator must enter a PIN code before the system will allow any of the fireworks to be launched.
Planet Arduino is, or at the moment is wishing to become, an aggregation of public weblogs from around the world written by people who develop, play, think on Arduino platform and his son. The opinions expressed in those weblogs and hence this aggregation are those of the original authors. Entries on this page are owned by their authors. We do not edit, endorse or vouch for the contents of individual posts. For more information about Arduino please visit www.arduino.cc
You are currently browsing the archives for the Relay category.


 Okay, so he doesn’t have Grandma riding in it that we know of, but [zim] recently decided to turn a Jazzy mobility chair into “a radio-controlled platform for mischief”. RC offers more range than wifi or bluetooth, and he was able to find a reasonably priced secondhand radio on Craigslist. However, he found out that in the event of signal loss, the receiver keeps sending the last commands to the speed controller. [zim] didn’t want his 150 lb (68kg) mischief platform getting loose, so