Posts | Comments

Planet Arduino

Archive for the ‘9G servo’ Category

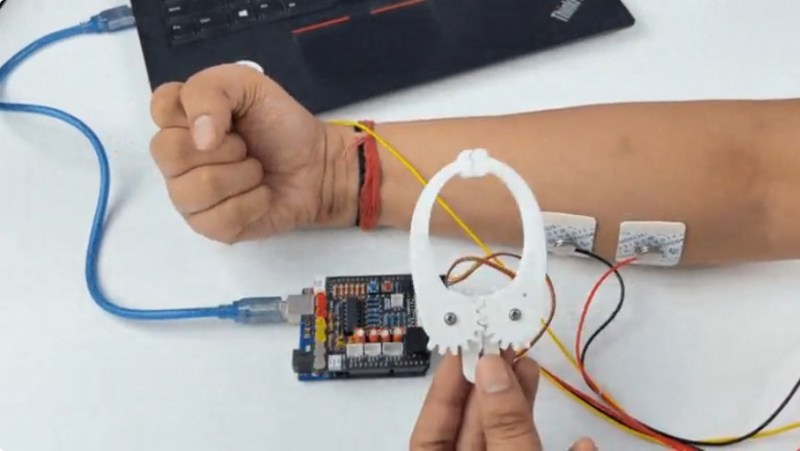
As fun as claw games are, the jaws are always disappointingly weak, and you usually end up with bupkis. What if the jaws were completely within your  control? That’s the idea behind [Upside Down Labs]’ muscle-controlled servo claw game.

While electromyography (EMG) is great for identifying neuro-muscular abnormalities and allows for amazing prosthetic limbs to work, it can also be used for fun. As you’ll see in the video after the break, accurate block-stacking (and possible candy-grabbing) depends on teamwork and tensed muscles.

Though the user provides the muscle, the brains behind this operation is an Arduino Uno with a Muscle BioAmp shield stacked on top, which [Upside Down Labs] also created. This shield makes it ridiculously easy to connect EMG sensors and other I²C devices like screens and, well, servo claws. From there, it’s really just a matter of printing the claw, connecting it to a 9g servo, and using an accompanying kit to prepare the skin and connect the muscles to the Arduino. Be sure to check it out in tense block-stacking action after the break.

If you want to listen in on your muscles, look no further than the BioAmp EMG Pill.

[a-RN-au-D] was looking for something fun to do with his son and dreamed up a laser blaster game that ought to put him in the running for father of the year. It was originally just going to be made of cardboard, but you know how these things go. We’re happy the design went this far, because that blaster looks fantastic.

Both the blaster and the target run on Arduino Nanos. There’s a 5mW laser module in the blaster, and a speaker for playing the pew pew-related sounds of your choice. Fire away on the blaster button, and the laser hits a light-dependent resistor mounted in the middle of the target. When the target registers a hit, it swings backward on a 9g servo and then returns quickly to vertical for the next shot.

There are some less obvious features that really make this game a hit. The blaster can run in 10-shooter mode (or 6, or whatever you change it to in the code) with a built-in reload delay, or it can be set to fully automatic. If you’re short on space or just get sick of moving the target to different flat surfaces, it can be mounted on the wall instead — the target moves forward when hit and then resets back to flat. Check out the demo video we loaded up after the break.

No printer? No problem — here’s a Node-RED shooting gallery that uses simple wooden targets.

When [Taste the Code] saw that his YouTube channel was approaching 1,000 subscribers, it was time to do something special. But celebration is no reason to be wasteful. This flag-waving celebratory hat has endless possibilities for the future.

The build is simple, which is just right for these strange times of scarcity. An Arduino Uno hot-glued to the back of the hat is directly driving a pair of 9g servos on the front. [Taste the Code] made the flags by sticking two stickers back to back with a bamboo skewer in between. The code is flavored such that the flags will wave in one of three randomly-chosen patterns — swing around, swing in reverse, and wild gesticulations.

After the novelty of the whole 1k subs thing wears off, [Taste the Code] can change the flags over to Jolly Rogers to help with social distancing. And someday in the future when things are really looking up, they can be changed over to SARS-CoV-2 victory flags, or fly the colors of a local sports team. We think it would be way cool to program some kind of real semaphore message into the flags, though the mobility might be too limited for that. Check out the build video after the break, which happens picture-in-picture as [Taste the Code] dishes out a channel retrospective and lays out a course for the future.

Even though YouTube messed with subscriber counts, we think it’s still worth making a cool counter. Here’s one with a Tetris twist.

The junk bin can be a great source of inspiration, unless you’re too familiar with the contents to be imaginative with them. But thrift stores are another matter, like giant junk bins that are constantly replenished by underappreciated elves. You never know what kinds of goodies they will pile on the shelves, so it’s easy to become a fixture and visit them once or thrice a week.

[Hunter Irving] haunts a few choice thrift stores in his neighborhood, and a few months ago he found a knockoff Thomas the Tank Engine with an articulated face. It uses a simple mechanism to produce an impressive amount of movement, especially for a cheap knockoff toy. Both of its eyes slide sideways and its mouth opens, resulting in a very animated (and terrifying) range of expressions. Sensing an opportunity to turn his animatronic robot dreams into karaoke-singing nightmare fuel for the rest of us, he forked over a few bucks and took it home.

As luck would have it, a 9g micro servo fit perfectly in the back of the frightening little face. [Hunter] designed an axle to transfer motion to the face mechanism, but it broke almost immediately. We applaud his Plan B, though, which consists of a mounting block for the servo, and a cable tie armature connected with screws. Once that was sorted, [Hunter] designed a bulbous body for it in Blender.

This terrifying train-faced toy uses an Arduino Leonardo to read MIDI note-on and -off messages, and opens his mouth when appropriate to sing hit favorites in a smooth, speech-synthesized contralto. Pour yourself a strong beverage and enjoy the build/demo video after the break.

Interested in making your own? [Hunter] has all the files up on his Patreon page. For just $1, you can access the code, synth files, and STL files. While you’re there, you can also get the scoop on his Nintendo LABO waveform cards.


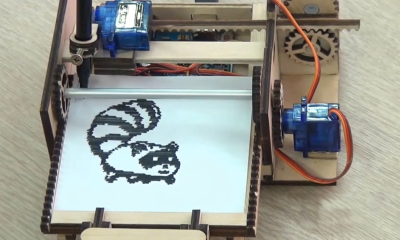
This little DIY 64×64 graphical printer by [Egor] is part pen plotter in design, somewhat dot matrix-ish in operation, and cleverly designed to use unmodified 9G servos. The project page is all in Russian (translation to English here) but has plenty of photos that make the operation and design clear. Although nearly the entire thing is made from laser-cut wood, [Egor] says that a laser cutter is optional equipment. The first version was entirely cut with hand tools.

screenshot-2016-12-06-10-49-13Small DIY CNC machines driven over a serial line commonly use Arduinos and CD-ROM drive guts (like this Foam Cutter or this Laser Paper Cutter) but this build uses its own custom rack-and-pinion system, and has some great little added details like the spring-loaded clip to hold paper onto the print pad.

The frame and parts (including all gears) are laser-cut from 4 mm plywood and the unit is driven by three small servos. A simple Java program processes images and an Arduino UNO handles the low-level control. A video of everything in action is embedded below.

Speaking of rack-and-pinion setups using cheap servos, that idea was taken to the next level by this design for a 3-D printed linear actuator that uses unmodified servos.


Filed under: Arduino Hacks, cnc hacks


  • Newsletter

    Sign up for the PlanetArduino Newsletter, which delivers the most popular articles via e-mail to your inbox every week. Just fill in the information below and submit.

  • Like Us on Facebook