Posts | Comments

Planet Arduino

Archive for the ‘back to the future’ Category

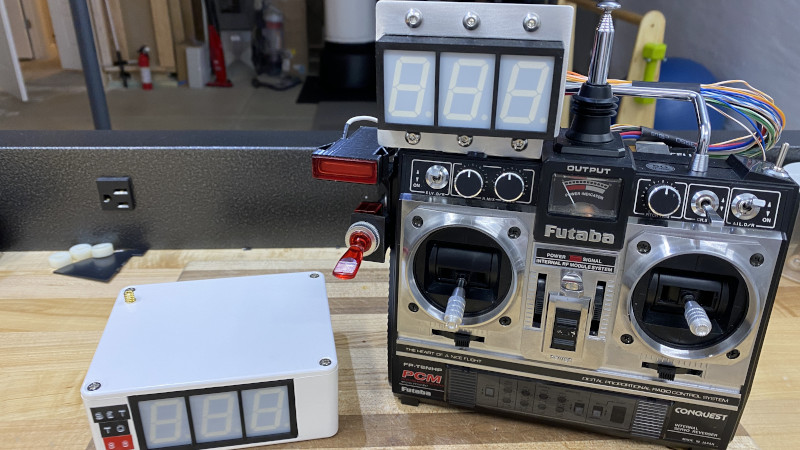
Obviously, the most iconic piece of fictional hardware from the Back to the Future films is Doc Brown’s DeLorean DMC-12 time machine. But we’d have to agree with [Jason Altice] of CodeMakesItGo that the second-most memorable gadget is the modified Futaba remote control used to control the DeLorean from a distance. Now, thanks to his detailed build guide, you can build your own version of the time machine’s controller — complete with working speed readout.

Now to be clear, [Jason] isn’t claiming that his build is particularly screen accurate. It turns out that the actual transmitter used for the prop in the film, the Futaba PCM FP-T8SGA-P, has become difficult to find and expensive. But he argues that to the casual observer, most vintage Futaba transmitters are a close enough match visually. The more important part is recreating the extra gear Doc Brown bolted onto his version.
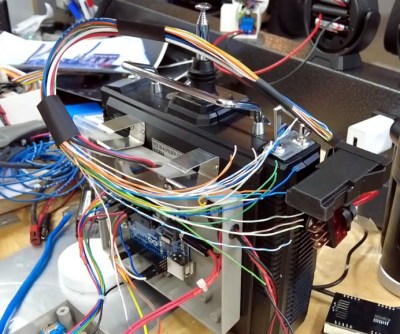
All but four of the display wires are fake.

To that end, [Jason] was able to source some screen accurate hardware to kit out his transmitter, such as the Unibox 140 project box and the metal 9 V battery clips. Other components, like the lighted Molex 1820 switch, were harder to track down. Luckily we live in the age of cheap desktop 3D printers, and he was able to run off an impressively accurate replica without too much trouble.

Of course, the stand out feature is the seven-segment LED speed indicator. Each digit is a separate 25 mm (1 inch) SC10-21SRWA display, which have been mounted together on a custom PCB along with a TM1650 controller. An Arduino Uno inside the Unibox 140 drives the display, and receives speed data from the transmitter in the car using a long-range Reyax LoRa RYLR998 module.

[Jason] built the GPS-equipped “speed box” to closely resemble the movie version, albeit with three functional digits compared to only two in the original prop. Internally it’s using the same LED display, LoRa module, and Arduino Uno as the transmitter. We liked the approach of keeping the hardware more or less the same on both sides of the link, keeps things nice and simple.

Now you certainly don’t need a DeLorean time machine to test out your finished remote control, but we appreciate that [Jason] went through the trouble of renting one so he could show off his creation in style. The final product looks great, and ranks right up there with the replica time circuits on the list of BttF props we’d love to have up on the shelf.

We would love to be a fly on the wall Christmas morning to see [Wilksyonreddit]’s kid tear the paper off of this adult-level busy box. Can you imagine the unbridled glee? It should certainly make the arduous six-month build worth the trouble. Here’s hoping the walls are sturdy, because we predict they will be bounced off of.

This gift that keeps on giving has an Arduino MEGA clone inside and a couple of shift registers to deal with all those buttons and switches. In addition to all the buttons, switches, and the number pad, there are two 3D-printed touch sensor pads that can detect little fingers up to four inches away. Although he’s already built a few games and activities for it, [Wilksy] posted this in r/duino looking for more ideas. There’s a lot to work with here on baby’s first nuclear missile launch console, both input- and output-wise. We humbly suggest 4D Simon, though we must admit to fantasizing about MIDI controllers.

Hidden inside this Christmas present is an Easter egg we think you’ll appreciate. Enter the right code, and the box becomes a treasure trove of Back to the Future sound effects and audio clips. Video’s after the break, McFly.

This box would make a great Kerbal Space Program controller, too, like this one.


We love our props here at Hackaday, and whenever we come across a piece from the Back To The Future fandom, it’s hard to resist showcasing it. In this case, [Xyster101] is showing of his build of Doc Brown’s Flux Capacitor.

[Xyster101] opted for a plywood case — much more economical than the $125 it would have cost him for a proper electrical box. Inside, there’s some clever workarounds to make this look as close as possible to the original. Acrylic rods and spheres were shaped and glued together to replicate the trinity of glass tubes, 3/4″ plywood cut by a hole saw mimicked the solenoids, steel rods were sanded down for the trio of points in the centre of the device and the spark plug wires and banana connectors aren’t functional, but complete the look. Including paint, soldering and copious use of hot glue to hold everything in place, the build phase took about thirty hours.

The LEDs have multiple modes, controlled by DIP switches hidden under a pipe on the side of the box. There’s also motion sensor on the bottom of the case that triggers the LEDs to flicker when you walk by. And, if you want to take your time-travel to-go, there’s a nine volt plug to let you show it off wherever — or whenever — you’re traveling to. Check out the build video after the break.

With this flux capacitor in hand, grab this time circuit display and cram them both into eD, the electric DeLorean, and you’re well on your way to living in the future.

[Via Imgur]


Filed under: Arduino Hacks


  • Newsletter

    Sign up for the PlanetArduino Newsletter, which delivers the most popular articles via e-mail to your inbox every week. Just fill in the information below and submit.

  • Like Us on Facebook